
How to Take a Photo of a Glass Frame Without Reflection


Share:
Table of Contents
Capturing a photo of a glass frame might sound simple, but unwanted reflections often make it frustrating even for experienced photographers. Whether you’re shooting artwork, mirrors, or framed photos for property listings, learning how to take a photo of a glass frame without reflection can make all the difference. In this guide, Fotober will walk you through practical techniques and camera settings to help you achieve clear, professional-looking results for your real estate visuals.
1. Understanding the Challenges of Glass Photography
Photographing glass is difficult because of its reflective nature. When light hits a glass surface, it reflects at the same angle it arrives, which means any direct source of light - windows, lamps, or even your camera’s flash - can appear as a bright reflection.
The biggest issue isn’t just the reflection itself but what it hides. Important elements like artwork, certificates, or property design details behind the glass become unclear. Additionally, environmental elements such as ceiling lights or your own silhouette can appear in the photo, distracting from the subject.
The challenge lies in controlling how light interacts with the glass surface. The goal is not to remove reflections entirely during shooting (which is often impossible) but to minimize and control them effectively so they can be reduced or eliminated in post-production later. Understanding these challenges is the foundation for mastering how to take a photo of a glass frame without reflection.

2. Preparing Your Glass Frame and Shooting Environment
Preparation plays a crucial role in getting reflection-free shots. Start by cleaning the glass thoroughly with a microfiber cloth. Dust, fingerprints, and smudges amplify glare when light hits the surface, so a spotless glass frame is essential.
Next, consider your surroundings. Reflections come from whatever light source or object the glass “sees.” That means walls, furniture, or even you could show up in the image. Simplify your shooting space by using a dark or neutral backdrop. If possible, wear dark clothing while photographing to avoid catching your reflection.
Position the glass frame at an angle instead of facing the camera head-on. Tilting the frame just slightly - about 5–10 degrees - can redirect reflections away from your lens. If the frame is large, place it on a stable easel or flat surface and ensure the glass sits evenly to avoid warping effects in the final image.
By controlling the setup environment, you’re already halfway toward mastering how to take a photo of a glass frame without reflection effectively.

3. Camera Settings and Equipment Tips
Proper camera settings and the right equipment make a major difference when shooting reflective surfaces. You don’t necessarily need high-end gear, but understanding how to use your tools correctly will produce professional-quality results.
Choosing the Right Angle
One of the simplest ways to reduce reflection is to shoot at an angle instead of straight on. When light reflects directly back toward your camera, it appears as glare. By adjusting your shooting position to a 30 – 45° angle relative to the glass, you can direct reflections away from the lens.
If natural light is available, position your setup near a window but not directly in front of it. Side lighting tends to produce softer reflections and enhances texture without creating bright spots. Avoid overhead lighting unless you can diffuse it.
Experiment by moving both your camera and your light source slightly around the subject until reflections minimize. This flexibility is key to achieving the best results when learning how to take a photo of a glass frame without reflection.

Using Polarizing Filters
A circular polarizing filter is one of the most effective tools for reducing reflections. It works by filtering out certain light waves that cause glare. When mounted on your camera lens, simply rotate the filter while looking through the viewfinder to find the point where reflections diminish.
This technique is particularly useful when photographing glossy surfaces like glass doors, windows, or picture frames. However, note that polarizers reduce the amount of light entering the lens, so you may need to compensate by slightly increasing ISO or opening the aperture.
For real estate photographers capturing interiors with glass décor or framed art, a polarizer can instantly elevate photo quality, helping you maintain clear, professional visuals while following best practices for how to take a photo of a glass frame without reflection.
Adjusting Lighting to Minimize Glare
Lighting is the most influential factor in glass photography. Avoid using your camera’s built-in flash - it will reflect directly into the glass. Instead, rely on indirect or diffused lighting.
Softboxes, reflectors, or even natural window light filtered through sheer curtains can help distribute light evenly. Place two light sources at 45° angles on either side of the glass frame to balance illumination. This technique not only minimizes glare but also ensures even exposure across the subject.
If shadows appear too harsh, move your lights further away or soften them using diffusion panels. The goal is to make light “wrap” around the subject instead of bouncing sharply off it.
By combining correct angles, filters, and lighting setups, you’ll produce clear, reflection-free results that stand out in any portfolio.
4. Post-Processing Techniques to Reduce Reflections
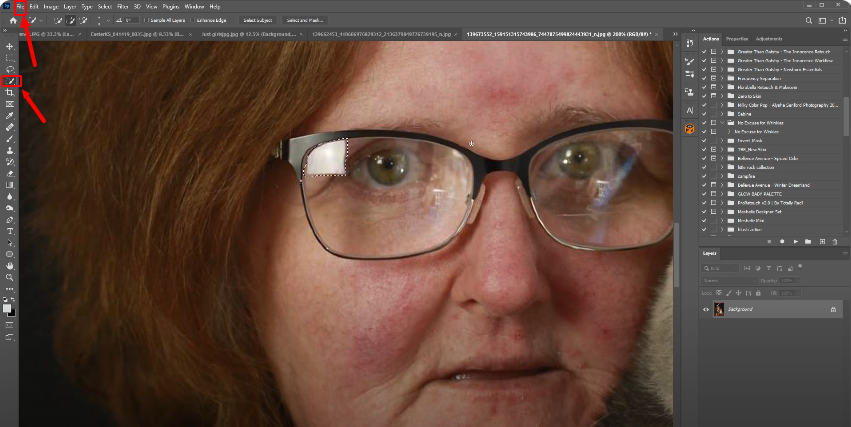
Even with perfect setup, a small amount of glare or reflection may still appear. That’s where post-processing comes in. Using Photoshop or Lightroom, you can fine-tune your image to remove imperfections without compromising realism.
Start with the Clone Stamp Tool or Healing Brush to remove minor reflections or light streaks. For larger reflective areas, use Layer Masks to selectively darken highlights and adjust exposure.
The Dehaze and Highlights sliders in Lightroom can also help balance reflective zones without losing sharpness. Be careful not to over-edit, as overly smooth glass can appear artificial.
If color tones have shifted due to lighting adjustments, use Selective Color or Curves to restore natural tones. Applying gentle noise reduction at the end helps maintain a polished look, especially if the image was shot at a higher ISO.
Post-processing is often the final step in achieving professional-level results for how to take a photo of a glass frame without reflection, particularly for clients in real estate, art, or product photography.
5. Why Choose Fotober for Real Estate Photo Editing
Capturing and editing glass surfaces - windows, frames, mirrors, or glossy décor - is a demanding task. Fotober’s professional editors specialize in real estate photo editing, delivering natural, reflection-free images that highlight every property’s aesthetic appeal.
Whether your shoot involves interior frames, wall art, or large glass facades, Fotober provides high-quality correction services that maintain lighting balance, detail, and realism. Our expert team handles adjustments like glare removal, color correction, and exposure enhancement efficiently and consistently.
By outsourcing your editing to Fotober, you save time and ensure every image meets global real estate presentation standards. Each photo is carefully processed to look clean, bright, and inviting - perfect for listings, brochures, or digital portfolios.
If you’re mastering how to take a photo of a glass frame without reflection, partnering with Fotober can take your results from good to professional-grade.
Conclusion
Learning how to take a photo of a glass frame without reflection requires understanding light behavior, controlling your environment, and applying the right post-processing techniques. With a clean setup, diffused lighting, careful angles, and optional polarizing filters, you can capture clear, professional images even in challenging reflective conditions.
While technique is vital, expert editing can refine those final details that separate amateur from professional results. That’s where Fotober supports photographers and real estate businesses - offering precision, quality, and consistency in every project.
For flawless, reflection-free real estate photos, contact Fotober today and transform your images into polished, market-ready visuals.
Related posts

Double Your Booking: Airbnb Photography Tips for World Cup Host Cities
July 15, 2026

The Legacy of Sam Neill Real Estate: Vineyard & His Private Sanctuary
July 14, 2026

World Cup 2026 Host City Real Estate: Overview & Marketing Strategies
July 13, 2026

Most Common Photography Mistakes California Realtors Should Avoid
July 10, 2026
