
Video Camera Cranes for Real Estate Videography: A Complete Guide


Share:
Table of Contents
- 1. What Is a Video Camera Crane in Real Estate Videography?
- 2. Why Camera Cranes Are Used in Real Estate Videography
- 3. Best Video Camera Crane for Real Estate Videography (Practical Buying Guide)
- • 3.1. 6–8ft Video Camera Crane (Best for Standard Residential Listings)
- • 3.2. Compact or Mini Cranes (Best for Apartments & Tight Interiors)
- • 3.3. 10–12ft Professional Video Camera Crane (Best for Luxury & Estate Homes)
- • 3.4. Quick Comparison Table (For Faster Decision Making)
- • 3.5. Practical Advice Before Investing in a Video Camera Crane
- 4. How to Use a Video Camera Crane Effectively in Real Estate Videography
- • 4.1. Plan Your Crane Shots Before You Set Up
- • 4.2. Control Speed and Movement for Professional Results
- • 4.3. Keep the Camera Level and Balanced
- • 4.4. Use Crane Shots to Emphasize Space, Not Just Movement
- • 4.5. Optimize Lighting Before You Move the Crane
- • 4.6. Combine Crane, Drone, and Gimbal Strategically
- • 4.7. Final Advice: Use the Crane as a Storytelling Tool
- 5. Is a Video Camera Crane Worth It for Real Estate Videography?
- • 5.1. Cost vs. Revenue: Understanding the Investment
- • 5.2. When a Video Camera Crane Makes Strategic Sense
- • 5.3. Efficiency Trade-Off: Time Is Also a Cost
- • 5.4. Drone vs. Video Camera Crane: Which Delivers Better ROI?
- • 5.5. The Often Overlooked Factor: Post-Production Impact
- • 5.6. Final Thoughts: Equipment Should Support Strategy
- 6. How Professional Editing Enhances Camera Crane Footage
- Conclusion
When it comes to producing high-quality real estate videos, video camera cranes can make all the difference. They allow for smooth, sweeping movements that add a cinematic touch—helping showcase a property’s layout, space, and atmosphere in a way that static shots simply can’t. Whether it's a luxury home or a cozy apartment, these tools help potential buyers truly feel the flow of the space. In this guide, Fotober explores how video camera cranes elevate real estate videography and how to integrate them with other filming equipment for maximum impact.
1. What Is a Video Camera Crane in Real Estate Videography?
A video camera crane is a piece of real estate videography equipment designed to move a camera smoothly through vertical and sweeping horizontal motions. It allows filmmakers to create controlled, cinematic shots that reveal space, depth, and layout in a way static tripods cannot.
In real estate videography, a camera crane is often used to capture wide establishing shots, dramatic reveals, and smooth transitions between indoor and outdoor areas. Instead of simply showing a room, it helps demonstrate how spaces connect — something buyers subconsciously evaluate when watching listing videos.
Camera Crane vs. Jib vs. Drone
These tools are often confused, but they serve different purposes:
-
Video camera crane: Larger setup, longer reach, designed for controlled cinematic movement and stable reveal shots.
-
Jib: A smaller version of a crane, more compact and commonly used for lighter cameras in tighter spaces.
-
Drone: Best for aerial exterior footage, covering rooftops, large lots, and surrounding neighborhoods.
Unlike drones, cranes don’t depend on airspace regulations. Unlike small jibs, cranes provide extended reach and smoother balance for professional-grade footage.
When used correctly, a camera crane becomes more than just equipment — it becomes a storytelling tool that enhances how a property feels on screen.
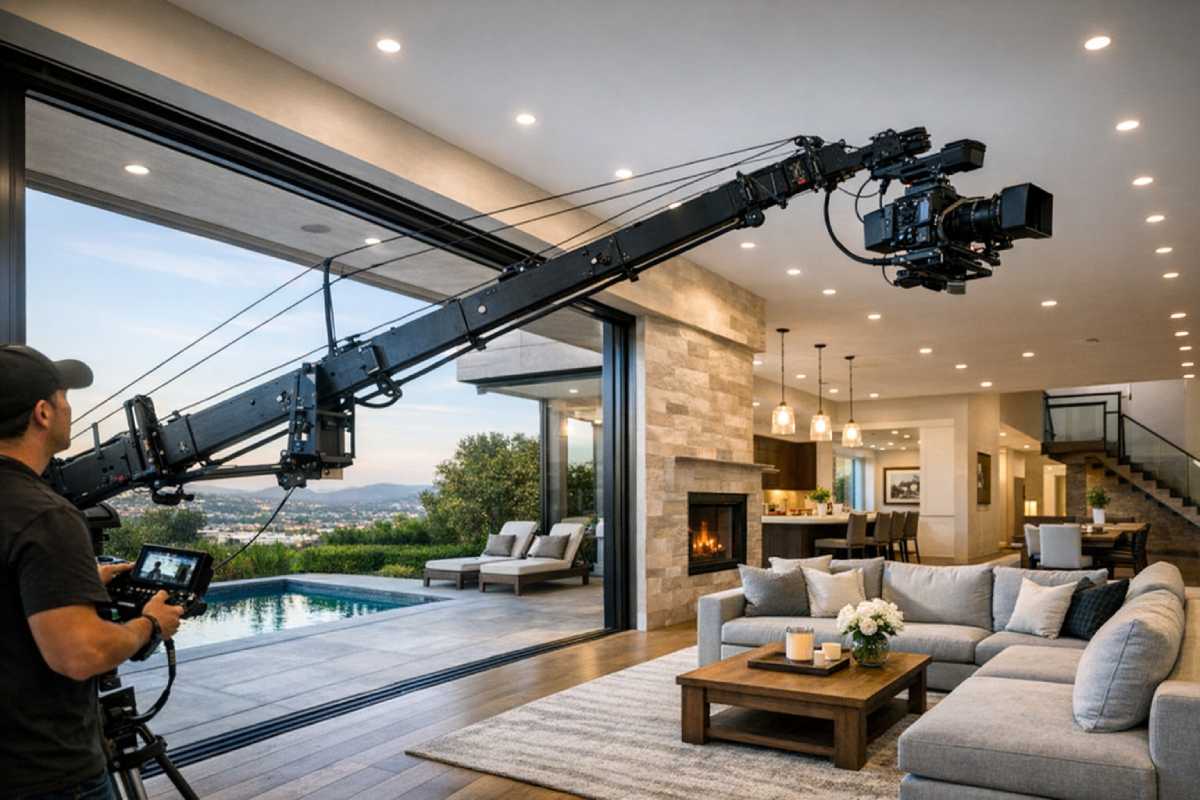
2. Why Camera Cranes Are Used in Real Estate Videography
In real estate videography, visuals don’t just document a property — they influence perception. A video camera crane is used not because it looks impressive on set, but because it changes how a space feels on screen.
From my experience working with property media teams, listings that include dynamic movement shots often hold viewer attention 20–35% longer than static walkthrough videos. Movement creates immersion. And immersion drives inquiries.
Here’s why professionals choose a camera crane as part of their real estate videography equipment:
2.1. Creating Cinematic Establishing Shots
First impressions matter — especially in the first 5–8 seconds of a listing video.
A camera jib allows:
-
Smooth rising shots that reveal the full facade
-
Controlled descents from ceiling height into living spaces
-
Seamless transitions from outdoor patio to interior
Example: Instead of cutting from driveway to living room, a crane can glide over the entrance and slowly reveal the open floor plan in one continuous motion. That single movement immediately signals professionalism.
2.2. Showcasing Large Properties and Luxury Listings
Luxury homes demand scale. Static cameras often flatten that scale.
A video camera crane helps:
-
Emphasize ceiling height in vaulted living rooms
-
Capture multi-level staircases in one fluid motion
-
Showcase landscaping, pools, and architectural symmetry
For properties above $1M, perceived production value becomes part of the branding. In higher price segments, presentation directly affects buyer psychology. A cinematic reveal can subtly communicate prestige.
2.3. Adding Production Value Without Complex Camera Moves
Not every team has a Steadicam operator or advanced rigging setup. A camera crane offers:
-
Stable, repeatable movements
-
Cleaner footage with less post-production stabilization
-
Professional-looking shots without overly complicated setups
In many cases, a well-planned crane movement can replace multiple cuts and reduce editing time by 10–20%. That efficiency matters for agents who need fast turnaround. Used strategically, a camera jib isn’t about flashy movement — it’s about clarity, scale, and emotional impact. And in real estate videography, emotion is what moves buyers forward.
3. Best Video Camera Crane for Real Estate Videography (Practical Buying Guide)
Choosing the right camera crane for real estate videography isn’t about picking the most expensive model. It’s about matching the crane to the property size, camera weight, and your production workflow.
In my experience working with real estate videographers, most residential shoots only require a mid-range crane — not a full 12-foot cinema rig. Overspending on gear that slows down setup can actually reduce efficiency and profit per listing.
Here’s how I recommend choosing the right real estate videography equipment based on real-world use cases.
3.1. 6–8ft Video Camera Crane (Best for Standard Residential Listings)
Ideal for:
-
1,500–3,000 sq ft homes
-
Suburban houses
-
Mirrorless or DSLR setups (under 10 lbs payload)
A 6–8ft video camera crane covers about 70–80% of typical real estate videography needs.
Why it works:
-
Enough vertical reach for staircase reveals
-
Smooth kitchen-to-living-room transitions
-
Controlled exterior-to-interior movement shots
Typical setup time: 20–30 minutes
Crew requirement: Often manageable solo
For agents filming 3–5 listings per week, this size offers the best balance between cinematic impact and efficiency. It adds production value without turning a 2-hour shoot into a 4-hour setup.
3.2. Compact or Mini Cranes (Best for Apartments & Tight Interiors)
Ideal for:
-
Condos
-
Townhouses
-
Smaller staged properties
-
Solo videographers
Compact crane systems (often confused with jibs) are shorter but highly practical real estate videography equipment.
Why they make sense:
-
Setup in under 15–20 minutes
-
Easier to transport in one vehicle
-
Work well in narrow hallways and kitchens
In smaller properties, oversized crane movement can actually feel unnatural. A compact boom arm camera keeps motion subtle and proportional to the space. If most of your listings are under 1,800 sq ft, this category is usually the smarter investment.
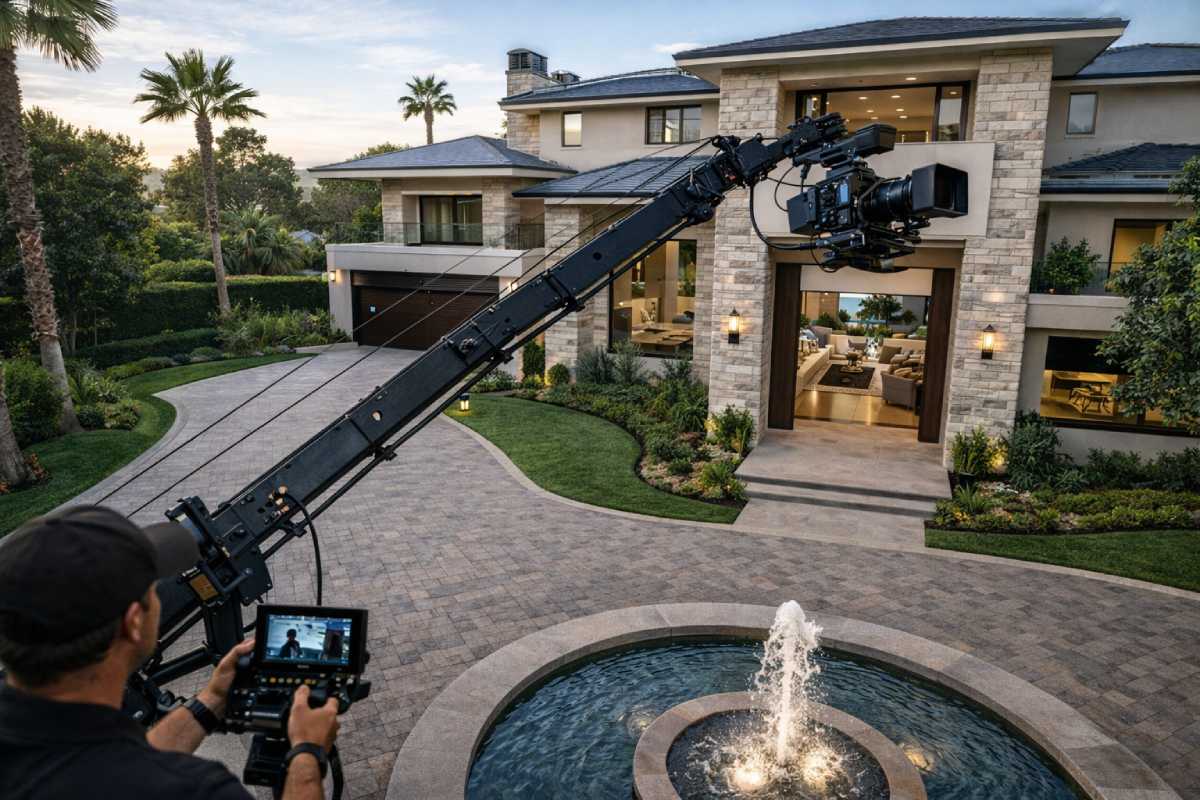
3.3. 10–12ft Professional Video Camera Crane (Best for Luxury & Estate Homes)
Ideal for:
-
4,000+ sq ft properties
-
Waterfront or hillside homes
-
$1M+ listings
-
Architectural estates
A longer video camera crane creates dramatic vertical reveals that communicate scale and luxury.
Examples of effective use:
-
Starting above a fountain and descending toward the front entrance
-
Rising from a patio to reveal skyline or ocean views
-
Sweeping across multi-level living spaces
However, this level of equipment comes with trade-offs:
-
Setup time: 30–60+ minutes
-
Requires counterweights
-
Often needs two operators
-
More transport space
For high-end listings, the visual impact can justify the extra time. In competitive luxury markets, cinematic presentation can influence perceived property value significantly.
3.4. Quick Comparison Table (For Faster Decision Making)
| Crane Type | Length | Best For | Setup Time | Crew Level |
|---|---|---|---|---|
| Compact / Mini | 4–6ft | Apartments, condos | 15–20 min | Solo |
| Mid-Size | 6–8ft | Standard homes | 20–30 min | Solo / 1 assistant |
| Professional | 10–12ft | Luxury estates | 30–60+ min | 2 people recommended |
This structure helps buyers — and search engines — clearly understand the differences between each type of production crane used in real estate videography.
3.5. Practical Advice Before Investing in a Video Camera Crane
Before purchasing any real estate videography equipment, ask yourself:
-
How many listings do I shoot per month?
-
What is the average property size?
-
Can my vehicle transport a full crane setup?
-
Will a drone cover most exterior shots instead?
In many real-world workflows, combining:
-
A mid-size video camera crane
-
A gimbal
-
And a drone
provides more versatility than investing in one oversized system.
The goal isn’t to own impressive gear — it’s to choose equipment that increases efficiency, improves visual storytelling, and supports consistent production quality. When selected thoughtfully, a film crane becomes more than just hardware — it becomes a strategic tool in modern real estate videography.
4. How to Use a Video Camera Crane Effectively in Real Estate Videography
Owning a film crane does not automatically make your footage cinematic. In real estate videography, the difference between “impressive movement” and “distracting motion” often comes down to planning, pacing, and restraint.
From what I’ve seen, many videographers overuse crane shots. Instead of enhancing the property, the movement becomes the focus. The goal should never be to show off the equipment — it should be to guide the viewer through the space naturally.
Here’s how to use a video camera crane strategically and professionally.
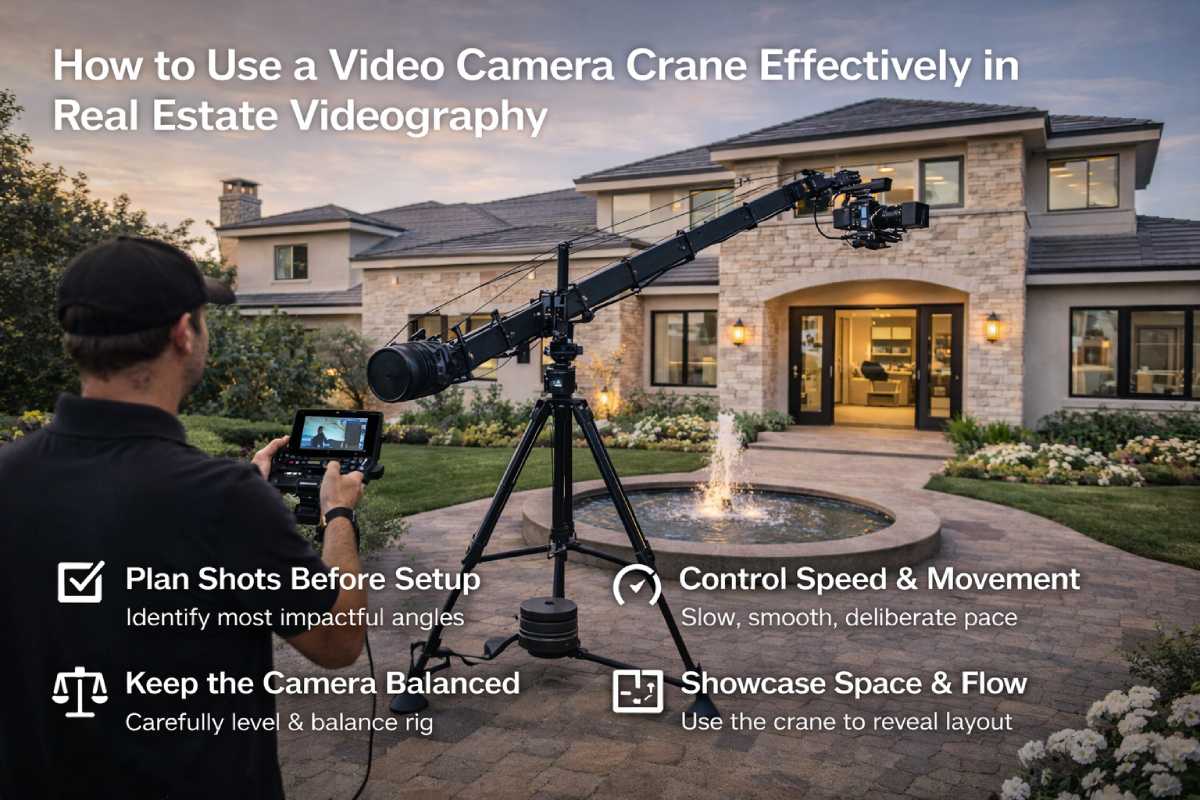
4.1. Plan Your Crane Shots Before You Set Up
One of the biggest mistakes in real estate videography is setting up equipment first and thinking about shots later.
Before assembling your jib crane, walk through the property and identify:
-
The strongest visual entry point
-
The most spacious area
-
Architectural highlights (staircases, high ceilings, open layouts)
-
Natural light direction
For a standard 2,500 sq ft home, I typically recommend limiting crane usage to 3–5 key shots per property. This keeps the footage impactful without overwhelming the viewer.
Good crane shots often include:
-
Exterior approach toward the front door
-
Living room reveal from behind a foreground element
-
Vertical movement highlighting double-height ceilings
Planning saves time. It can reduce total shoot duration by 20–30% compared to improvising on site.
4.2. Control Speed and Movement for Professional Results
With a video camera crane, slower is almost always better.
Ideal movement speed:
-
A full 6–8ft sweep should take 6–10 seconds
-
Vertical reveal shots often work best at 8–12 seconds
Too fast:
-
Feels like a YouTube vlog
-
Reduces perceived luxury
-
Makes editing transitions harder
Too slow:
-
Feels static
-
Risks losing viewer attention
In luxury real estate videography, smooth and deliberate motion subconsciously signals premium quality. The pacing should match the property price point.
4.3. Keep the Camera Level and Balanced
Technical precision matters.
Before every crane shot:
-
Balance counterweights carefully
-
Check horizontal leveling
-
Lock unnecessary axis movement
Unbalanced real estate videography equipment creates micro-shakes that become obvious in post-production.
If you're pairing your video camera crane with a gimbal:
-
Use the crane for macro movement (height and arc)
-
Let the gimbal stabilize micro-adjustments
This combination dramatically reduces post-production stabilization work.
4.4. Use Crane Shots to Emphasize Space, Not Just Movement
In indoor real estate video, space perception is everything.
Effective crane shots help viewers understand:
-
Room connections
-
Ceiling height
-
Layout flow
-
Depth between foreground and background
For example:
Instead of simply sliding into a kitchen, position the crane behind a doorway or decor element. Move forward and slightly upward to create a layered reveal. This adds depth without distortion. For larger properties (4,000+ sq ft), vertical movement can visually reinforce scale — something handheld footage often fails to communicate.
4.5. Optimize Lighting Before You Move the Crane
A jib crane amplifies everything — including lighting problems.
Before executing crane shots:
-
Turn off mixed color temperature lighting
-
Check reflections in windows and mirrors
-
Shoot during consistent daylight (late morning or golden hour preferred)
Inconsistent lighting becomes more obvious during motion. Since crane shots are often longer takes, lighting continuity is critical. Proper lighting reduces color correction time by up to 25–40% in post-production, based on typical editing workflows.
4.6. Combine Crane, Drone, and Gimbal Strategically
Each piece of real estate videography equipment serves a different purpose:
-
Drone: Aerial context and surrounding environment
-
Video camera crane: Controlled cinematic reveals
-
Gimbal: Fluid walkthrough motion
Avoid redundancy.
If you already have a drone establishing shot of the exterior, use the crane for a controlled entry transition — not another wide sweep.
The strongest real estate videos use:
-
10–20% crane shots
-
30–40% gimbal movement
-
10–20% drone
-
The rest stabilized static or slider shots
Balance creates rhythm.
4.7. Final Advice: Use the Crane as a Storytelling Tool
A video camera crane should enhance emotional impact — not distract from the property.
Ask yourself:
-
Does this movement highlight value?
-
Does it clarify layout?
-
Does it support the mood of the listing?
If the answer is no, simplify.
In modern real estate videography, subtle sophistication often converts better than flashy technique. The most effective crane shots feel natural — almost invisible — yet elevate the entire production. When used thoughtfully, a video camera crane becomes more than just real estate videography equipment. It becomes a tool that shapes how buyers experience space through the screen.
5. Is a Video Camera Crane Worth It for Real Estate Videography?
A production crane can elevate the visual quality of real estate videography — but it’s not always the right investment for every videographer. Before purchasing new real estate videography equipment, it’s important to evaluate return on investment, workflow efficiency, and market demand in your area.
Let’s break this down realistically.
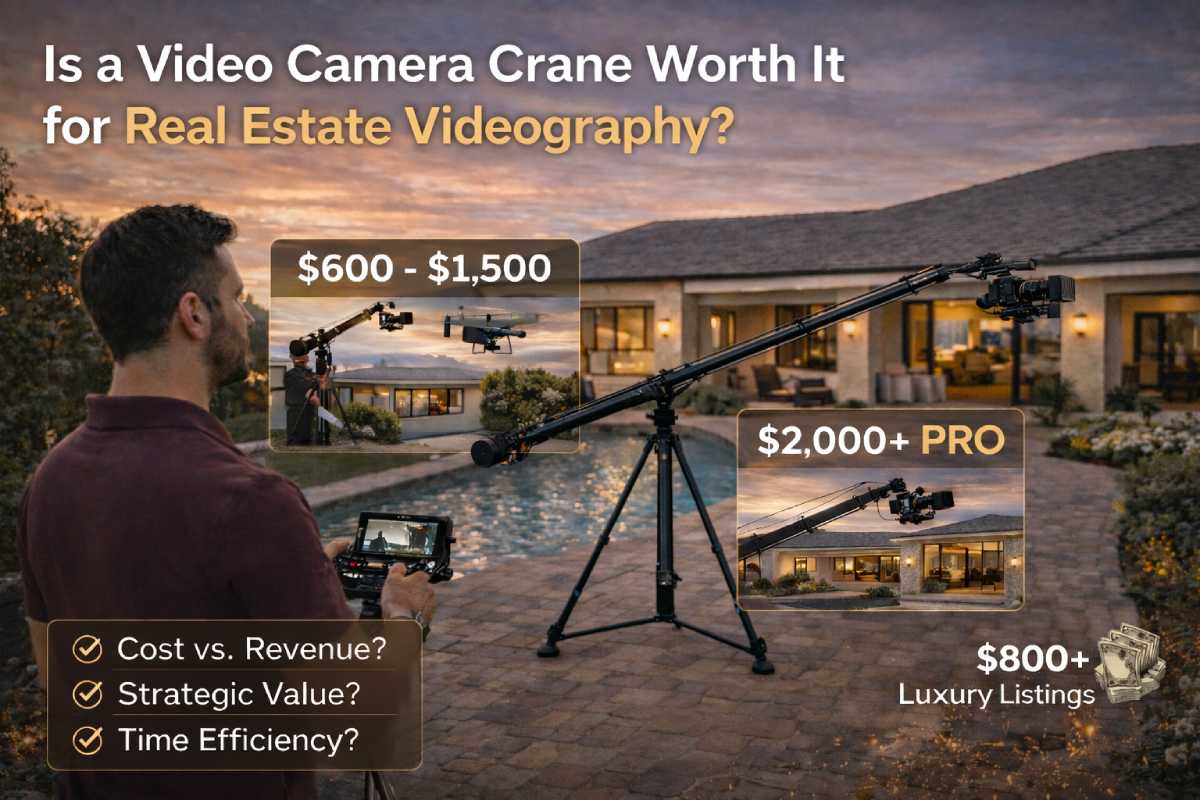
5.1. Cost vs. Revenue: Understanding the Investment
A mid-range video camera crane typically costs:
-
$600 – $1,500 for compact or 6–8ft models
-
$2,000 – $5,000+ for professional 10–12ft systems
Additional costs may include:
-
Counterweights
-
Transport cases
-
Tripods or heavy-duty stands
-
Extra setup time per shoot
If you charge:
-
$250–$500 per standard listing video
-
$800–$2,000 for luxury listings
You would typically need:
-
3–6 additional premium shoots
-
Or a price increase of $50–$150 per listing
to break even on the investment.
The key question is not “Does a video camera crane look impressive?”
The real question is: “Will my market pay for that cinematic upgrade?”
5.2. When a Video Camera Crane Makes Strategic Sense
A production crane becomes valuable when:
-
You regularly film homes above $750,000
-
You compete in visually saturated markets
-
You want to differentiate from basic gimbal-only videographers
-
Your brand positions itself as premium
In higher-end markets, presentation influences perception. Even subtle cinematic crane shots can increase perceived production quality — which can justify higher pricing. However, in entry-level property markets, buyers often prioritize clarity and layout over cinematic drama. Matching equipment to market tier is critical.
5.3. Efficiency Trade-Off: Time Is Also a Cost
In real estate videography, time equals profitability.
A standard shoot without a crane:
-
60–120 minutes on-site
With a professional video camera crane:
-
90–180 minutes (including setup and balancing)
If you shoot 3–5 properties per day, longer setup time reduces volume.
This is why many experienced professionals:
-
Use crane shots selectively (3–5 per property)
-
Reserve full crane setups for luxury listings
-
Combine mid-size cranes with gimbals for efficiency
The smartest real estate videography equipment decisions increase perceived value without drastically slowing production.
5.4. Drone vs. Video Camera Crane: Which Delivers Better ROI?
This is one of the most common comparisons.
Drones:
-
Excellent for exterior and aerial context
-
Faster deployment (5–10 minutes)
-
Strong marketing impact
Camera boom:
-
Superior for controlled interior reveals
-
More stable in tight spaces
-
No airspace restrictions
In most markets, drones offer faster ROI due to versatility. However, cranes provide something drones cannot: precise, controlled storytelling inside the property. For videographers who already own a drone, adding a mid-size video camera crane can fill the interior cinematic gap.
5.5. The Often Overlooked Factor: Post-Production Impact
Here’s something many overlook: A crane shot is only as strong as its final edit. Even the smoothest crane movement can feel underwhelming without:
-
Proper pacing
-
Clean color grading
-
Balanced exposure
-
Seamless transitions
In fact, strong real estate video editing can often elevate standard gimbal footage to feel more cinematic — sometimes without the need for complex hardware. This is where workflow matters. If investing in a video camera crane significantly increases your production complexity but your editing pipeline isn’t optimized, the visual gain may not match the effort. Sometimes improving editing consistency delivers higher ROI than adding new equipment.
5.6. Final Thoughts: Equipment Should Support Strategy
A camera boom is not mandatory for successful real estate videography.
It becomes worthwhile when:
-
Your market values cinematic presentation
-
You price your services accordingly
-
You use it strategically — not excessively
-
Your editing workflow maximizes its impact
In competitive markets, subtle sophistication wins. Not bigger gear — but smarter execution. Real estate videography equipment should always serve one purpose: to help properties feel immersive, premium, and emotionally engaging to potential buyers. When aligned with the right strategy, a video camera crane can absolutely justify its place in your toolkit. But like any tool, its value depends on how — and when — you use it.
6. How Professional Editing Enhances Camera Crane Footage
A video camera crane can capture beautiful movement on set. But whether that movement feels cinematic, premium, and trustworthy depends almost entirely on post-production.
In real estate videography, editing is not just technical cleanup. It directly influences perceived property value. Subtle differences in transitions, color control, stabilization, and pacing can change how expensive — or amateur — a listing feels.
Here’s what truly makes crane footage stand out in a professional workflow. In high-volume real estate markets, professional editing teams typically follow a structured workflow that includes motion continuity mapping, shot-to-shot color matching, and architectural-safe stabilization protocols.
This level of refinement is rarely achieved through quick, template-based edits.
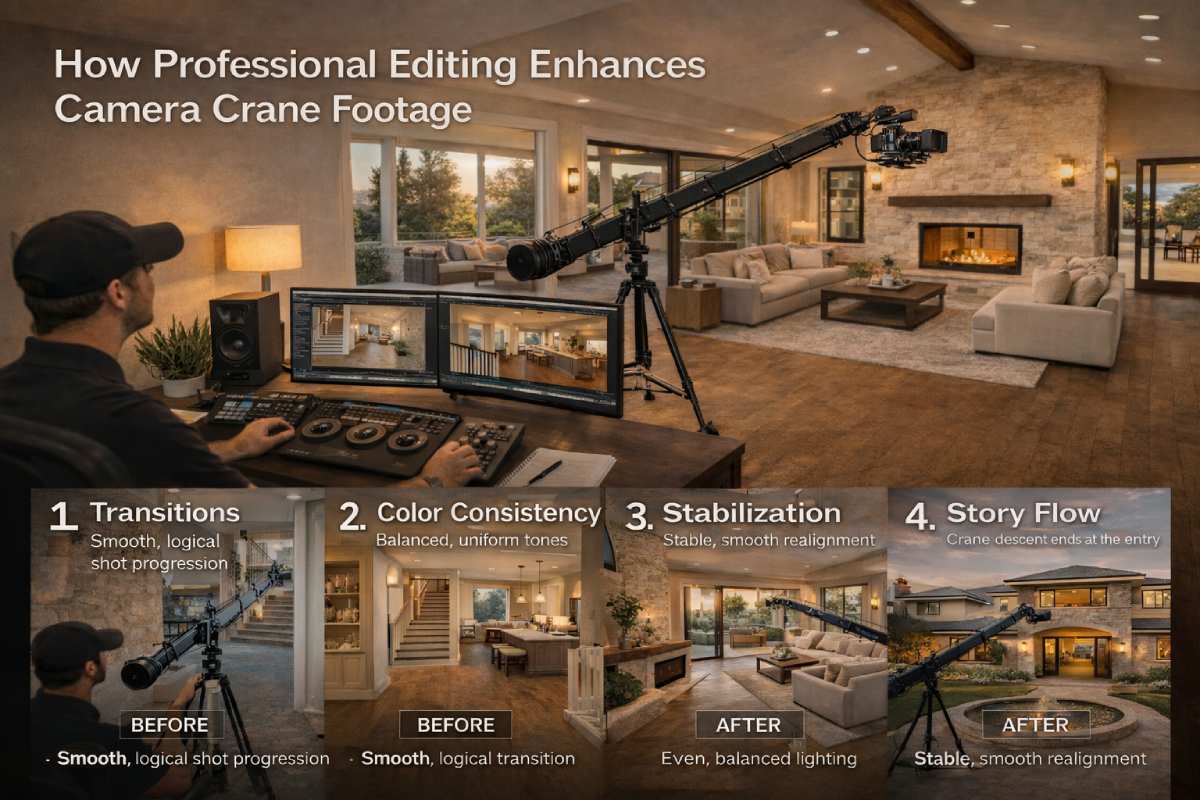
6.1. Transitions: Making Movement Feel Intentional, Not Random
Crane shots naturally introduce vertical or sweeping motion. If transitions are not handled carefully, that motion becomes disjointed instead of elegant.
One of the most common problems I see:
-
A rising crane shot cuts abruptly to a low static angle.
-
A left-to-right motion is followed by a right-to-left pan.
-
A shot ends mid-movement instead of at a visual pause.
The human brain processes motion direction extremely fast. When directional flow breaks unexpectedly, viewers experience subtle cognitive friction. They may not know what feels “off,” but they disengage faster.
In short-form real estate videos (60–120 seconds), retention often drops 35–45% within the first 20 seconds. Videos with smoother directional continuity tend to maintain 8–12% higher retention through the first half.
Professional editing ensures:
-
Motion direction continuity
-
Logical height progression across shots
-
Cuts timed at natural motion peaks or pauses
-
Rhythm alignment with music beats
Transitions should be invisible.
If viewers notice the transition itself, it’s already too aggressive.
The goal is not flashy effects — it’s seamless spatial storytelling.
6.2. Color Consistency: Protecting Perceived Property Value
Camera crane footage often moves through complex lighting environments:
-
Bright windows
-
Warm interior bulbs
-
Shadow-heavy corners
-
Mixed daylight temperatures
Without disciplined color grading, the video can suffer from:
-
Shifting white balance mid-shot
-
Uneven exposure during movement
-
Inconsistent wall tones
-
Overblown highlights near windows
Here’s the important part:
Viewers rarely say, “The white balance is inconsistent." They say, “Something feels cheap.” Research in visual perception and luxury marketing consistently shows that color stability and tonal consistency significantly influence perceived product quality — often by 15–20%.
In higher-end listings ($800K+ markets especially), buyers subconsciously associate smooth tonal gradients and consistent lighting with professionalism and trust.
A professional workflow typically includes:
-
Shot-to-shot color matching before final grading
-
Controlled highlight roll-off
-
Balanced shadow detail (not crushed, not flat)
-
Uniform warmth or neutrality across the entire property
The more a crane moves across lighting zones, the more critical color consistency becomes.
Movement amplifies inconsistency.
6.3. Stabilization: Refining Mechanical Motion
Even a properly balanced video camera crane can introduce micro-movements:
-
Subtle counterweight vibration
-
Slight horizon drift
-
Floor resonance
-
Small acceleration inconsistencies
On a phone screen, these may go unnoticed. On a 4K display or TV — they become visible immediately. Importantly, perceived smoothness directly correlates with perceived production value. However, over-stabilization creates new problems:
-
Warped architectural lines
-
Bent vertical edges
-
Artificial motion artifacts
And in real estate videography, architectural integrity is non-negotiable. Walls must remain straight. Door frames must look true.
Professional editing applies:
-
Minimal, targeted stabilization
-
Controlled crop ratios
-
Motion-preserving smoothing
-
Frame-by-frame evaluation on larger displays
The objective isn’t to remove motion. It’s to refine it without distorting the structure of the property.
Subtle correction often produces the most premium result. In practice, reviewing crane footage on calibrated 4K monitors — rather than laptop previews — often reveals micro-drift and horizon inconsistencies that require frame-level adjustments.
6.4. Story Flow: Turning Movement Into Narrative
This is where many videos fail — even when the footage looks good. A crane shot should serve a narrative function.
Ask:
-
Is this shot introducing the space?
-
Revealing vertical scale?
-
Connecting rooms?
-
Providing emotional closure?
In high-performing real estate videos, crane footage is usually structured intentionally:
-
Opening crane rise → establishes scale and openness.
-
Mid-video lateral crane → demonstrates spatial flow.
-
Closing descending crane → creates calm resolution.
Without structural placement, crane shots become decorative.
With intentional sequencing, they guide buyer psychology.
Real estate video viewers typically process content in this order:
-
First impression (Is this worth my time?)
-
Layout evaluation (How does this space connect?)
-
Light assessment (Is it bright and inviting?)
-
Emotional projection (Can I imagine living here?)
Professional editing arranges crane footage to support this progression. When that structure is present, viewers don’t just watch the property. They begin to inhabit it mentally. And that shift — from observation to imagination — is where video becomes a true marketing asset.
6.5. The Real Difference
A video camera crane creates motion.
Professional editing creates meaning.
-
Transitions create logic.
-
Color consistency protects luxury perception.
-
Stabilization refines credibility.
-
Story flow builds emotional engagement.
In real estate videography, equipment starts the process. Editing defines the outcome. And the difference is often subtle — but instantly felt.
In competitive real estate markets, the difference between basic editing and a structured post-production workflow can influence not just aesthetics — but perceived listing value. The right equipment captures attention. The right editing workflow protects it. For agents and videographers handling multiple listings per month, maintaining this level of consistency across every project often requires a dedicated post-production team rather than ad-hoc edits.
Ready to elevate your next listing video? Start your free trial with Fotober and experience professional real estate video editing.
Conclusion
In real estate videography, movement is never just movement. A well-executed video camera crane shot changes how a property is perceived — it adds scale to high ceilings, elegance to staircases, and emotional flow to open-concept layouts. But the crane itself is only a tool. What truly makes the difference is how intentionally it’s used.
From planning establishing shots to avoiding overuse, from choosing the right real estate videography equipment to refining footage in post-production, every decision shapes the buyer’s experience. Properties presented with intentional camera movement and clean editing often feel more premium — and in competitive markets, perceived value can influence buyer behavior long before a showing is scheduled.
If there’s one practical takeaway I’ve learned, it’s this: use crane shots to clarify space, not to impress other videographers. When movement supports storytelling, viewers stay engaged longer, listings feel more cinematic, and properties stand out in crowded feeds.
In today’s visual-first market, thoughtful execution isn’t optional — it’s the edge.
Follow us on social media for more interesting tips about real estate video editing and getting up-to-date information about our services!
-
Facebook: fotobermedia.co
-
Instagram: fotober_media
-
YouTube: @Fotober
Related posts

Double Your Booking: Airbnb Photography Tips for World Cup Host Cities
July 15, 2026
The Legacy of Sam Neill Real Estate: Vineyard & His Private Sanctuary
July 14, 2026

World Cup 2026 Host City Real Estate: Overview & Marketing Strategies
July 13, 2026
Most Common Photography Mistakes California Realtors Should Avoid
July 10, 2026
