
How to Undo in Photoshop: Keep Your Edits Neat and Clean
.png)

Share:
Table of Contents
Making mistakes in Photoshop is normal, even for professionals. Knowing how to undo something in Photoshop efficiently can save hours of work and frustration. In this guide, Fotober will show you how to master Photoshop's undo features and keep your editing workflow smooth and efficient. Whether you're a beginner or an experienced editor, these techniques will help you work more confidently and effectively, ensuring you can correct mistakes with ease and maintain productivity.
1. Importance of Undo in Editing Workflow
According to Adobe's user data, the Undo command ranks as the most used function in Photoshop, with professionals using it an average of 18 times per hour. This statistic shows how crucial error recovery is in digital editing. Even experienced editors rely on undo functions to explore creative options and fix mistakes.
Making mistakes helps you learn and improve your photo editor for real estate skills. The undo feature gives you the freedom to experiment without fear of ruining your work. You can try different effects, make bold adjustments, and easily reverse them if they don't work out. This flexibility encourages creativity and helps you develop your editing style.
Each edit in Photoshop can affect your image quality. Using undo properly helps maintain image quality by letting you step back from edits that may have degraded the image. Professional editors often test multiple approaches before finding the perfect real estate photo editing, making undo an essential tool for quality control.
2. How to Use Basic Undo Commands in Photoshop
In Photoshop, mastering the Undo and Redo commands is crucial for efficient editing. These shortcuts allow you to quickly reverse or restore actions, saving time and enhancing your workflow. Below, we’ll cover the basic commands every Photoshop user should know.
2.1. How to Use "Undo" and "Redo" Shortcuts (Ctrl + Z / Cmd + Z)
Adobe's research shows that using keyboard shortcuts can speed up editing by 30-40%. Knowing how to undo something in Photoshop efficiently is essential, and the Undo command (Ctrl+Z in Windows, Command+Z in Mac) is the quickest way to reverse your last action. Professional editors report saving an average of 15 minutes per hour by mastering these shortcuts, making them crucial for an efficient workflow.

Here are the basic Commands:
- Undo: Ctrl+Z (Windows) / Cmd+Z (Mac)
- Redo: Ctrl+Shift+Z (Windows) / Cmd+Shift+Z (Mac)
- Step Backward: Alt+Ctrl+Z (Windows) / Alt+Cmd+Z (Mac)
- Step Forward: Shift+Ctrl+Z (Windows) / Shift+Cmd+Z (Mac)
Understanding how to undo something in Photoshop and using these shortcuts in different situations is key to working efficiently. For real estate professionals, mastering how to edit real estate photos in photoshop efficiently with the help of undo and redo shortcuts can significantly improve editing speed, ensuring that adjustments can be made quickly without losing quality. The Undo command (Ctrl+Z) instantly reverses your last action, and pressing it again will redo the action, creating a toggle effect. This behavior differs from older versions of Photoshop, where Ctrl+Z would keep stepping back through your history.
For multiple undos, use Step Backward (Alt+Ctrl+Z). This command allows you to go back through your history one step at a time, and you can press it repeatedly to undo several actions. Many pros prefer this method for better control over their editing process.
The Redo command (Ctrl+Shift+Z) comes into play after you’ve undone something. It lets you move forward in your history and restore changes you’ve undone. This is especially useful when you want to compare the before and after of your edits. You can easily toggle between undo and redo to see the effects of your changes.
Real-world application examples:
Complex Retouching
- Undo brush strokes instantly
- Step back through healing tool applications
- Compare different versions of skin smoothing
- Restore preferred edits with redo
Layer Adjustments
- Undo layer style changes
- Review different opacity settings
- Step through filter adjustments
- Recover accidentally deleted layers
Color Corrections
- Compare different color grades
- Undo individual curve adjustments
- Step through multiple color versions
- Restore preferred color states
2.2. Differences Between "Undo" and "Step Backward"
Understanding the difference between Undo and Step Backward helps you work faster and more efficiently in Photoshop. The Undo command (Ctrl+Z) works as a simple back-and-forth switch in newer versions. Press once to go back, and press again to go forward. This toggle makes Undo perfect for quick fixes and comparing your last two edits. Adobe updated this behavior to match other software, making it more user-friendly for beginners.
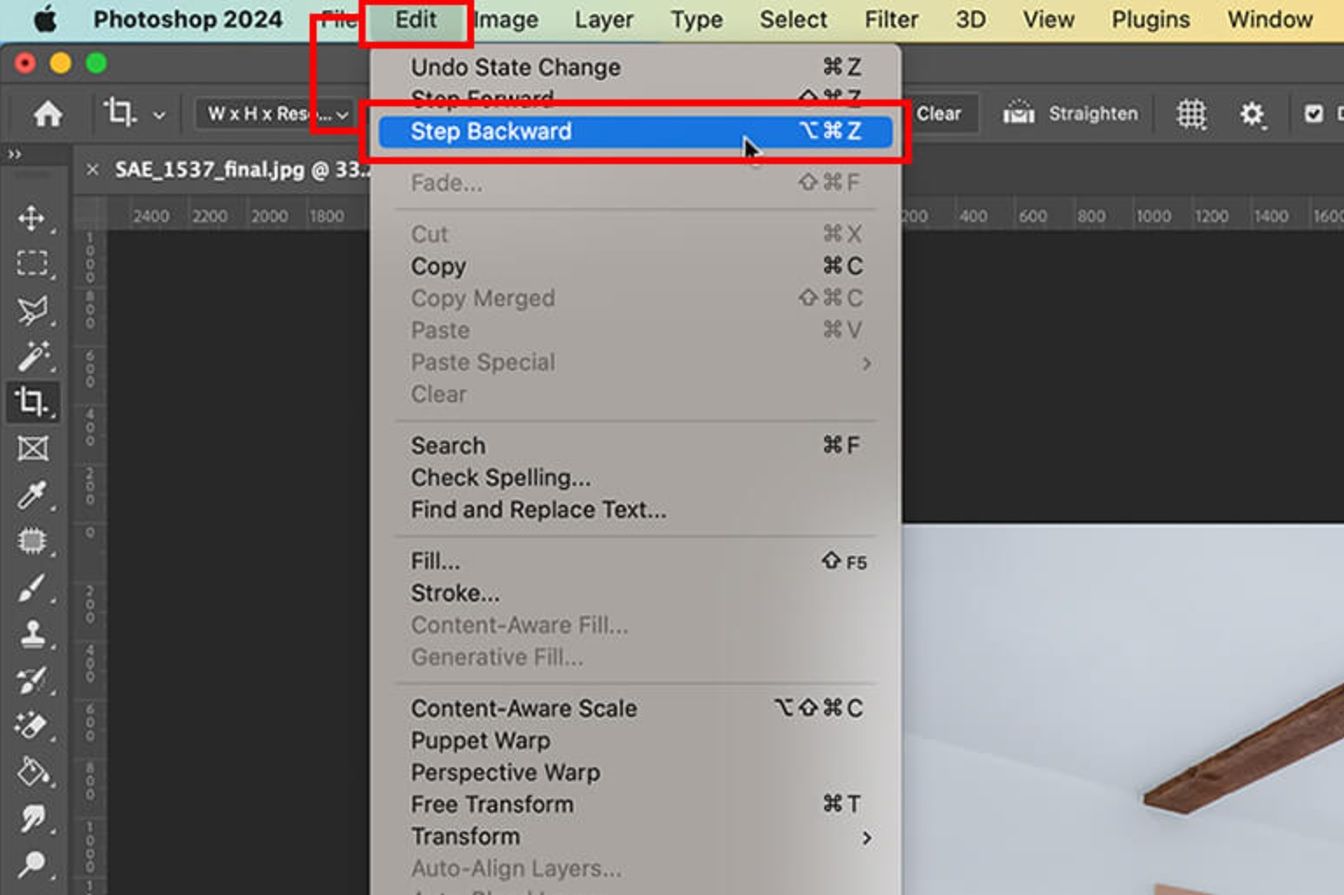
Think of Step Backward (Alt+Ctrl+Z) as walking backward through your editing history. Each time you press the shortcut, you move back one step in your editing timeline. You can keep going back as many steps as your history allows. This level of control makes Step Backward more precise than the basic Undo command. Most professional editors prefer Step Backward when they need to find a specific point in their work.
Step Backward also gives you more flexibility when fixing mistakes. You can go back multiple steps without losing track of where you are, which is helpful when you realize a mistake was made several steps ago. The only downside is that it takes longer than using regular Undo. But the extra control is worth it when you need to find the exact point where something went wrong.
Here's when to use each command:
Use Undo (Ctrl+Z) When:
- Making quick fixes
- Comparing last two edits
- Fixing recent mistakes
- Working with simple changes
Use Step Backward (Alt+Ctrl+Z) When:
- Going back multiple steps
- Finding specific edits
- Reviewing your work
- Fixing old mistakes
3. Troubleshooting Common Undo Issues
Adobe data shows that history state limits are the most common undo issues in Photoshop. Understanding how to manage these limits can help prevent frustration during editing. Let’s explore the main problems and solutions to improve your editing experience.
Dealing with Limited History States
Photoshop’s default setting only remembers your last 50 edits. This limit can catch you off guard during long editing sessions, especially when you find you can't undo something in Photoshop far enough back to fix a mistake. To solve this, open Photoshop’s preferences and increase the number of history states.
The more history states you have, the more memory Photoshop needs. It’s essential to keep this number reasonable-somewhere between 50 and 100 history states works well for most projects. For additional backup, take snapshots of significant stages in your work. This way, you can always return to key points, even if you run out of history states.

Fixing Undo Issues in Older Photoshop Versions
Older versions of Photoshop handle undo commands differently. In older versions, Ctrl+Z keeps stepping backward through your history instead of toggling between states. This change can confuse editors when switching between versions. To avoid mistakes, it’s essential to learn the right shortcuts for your version.
The solution is simple-use Alt+Ctrl+Z (Step Backward) instead of Ctrl+Z in older versions. This command works the same way across all Photoshop versions, providing consistent control over your editing history. Remember to save your work frequently as a backup in older versions.
Here's how to prevent common undo problems:
Memory Management
- Clear history for better performance
- Save snapshots of important stages
- Work with fewer open files
- Close unused panels
Version Compatibility
- Learn your version's shortcuts
- Use Step Backward consistently
- Save work frequently
- Create manual backups
4. Tips for Efficient Editing with Undo and Redo
Adobe experts suggest that efficient undo management starts with smart workflow practices. Knowing the right techniques can save hours of editing time. Let's explore the most effective ways to protect your work while editing and how to make the most of undo and redo features in Photoshop.
Working with Layers for Non-Destructive Editing
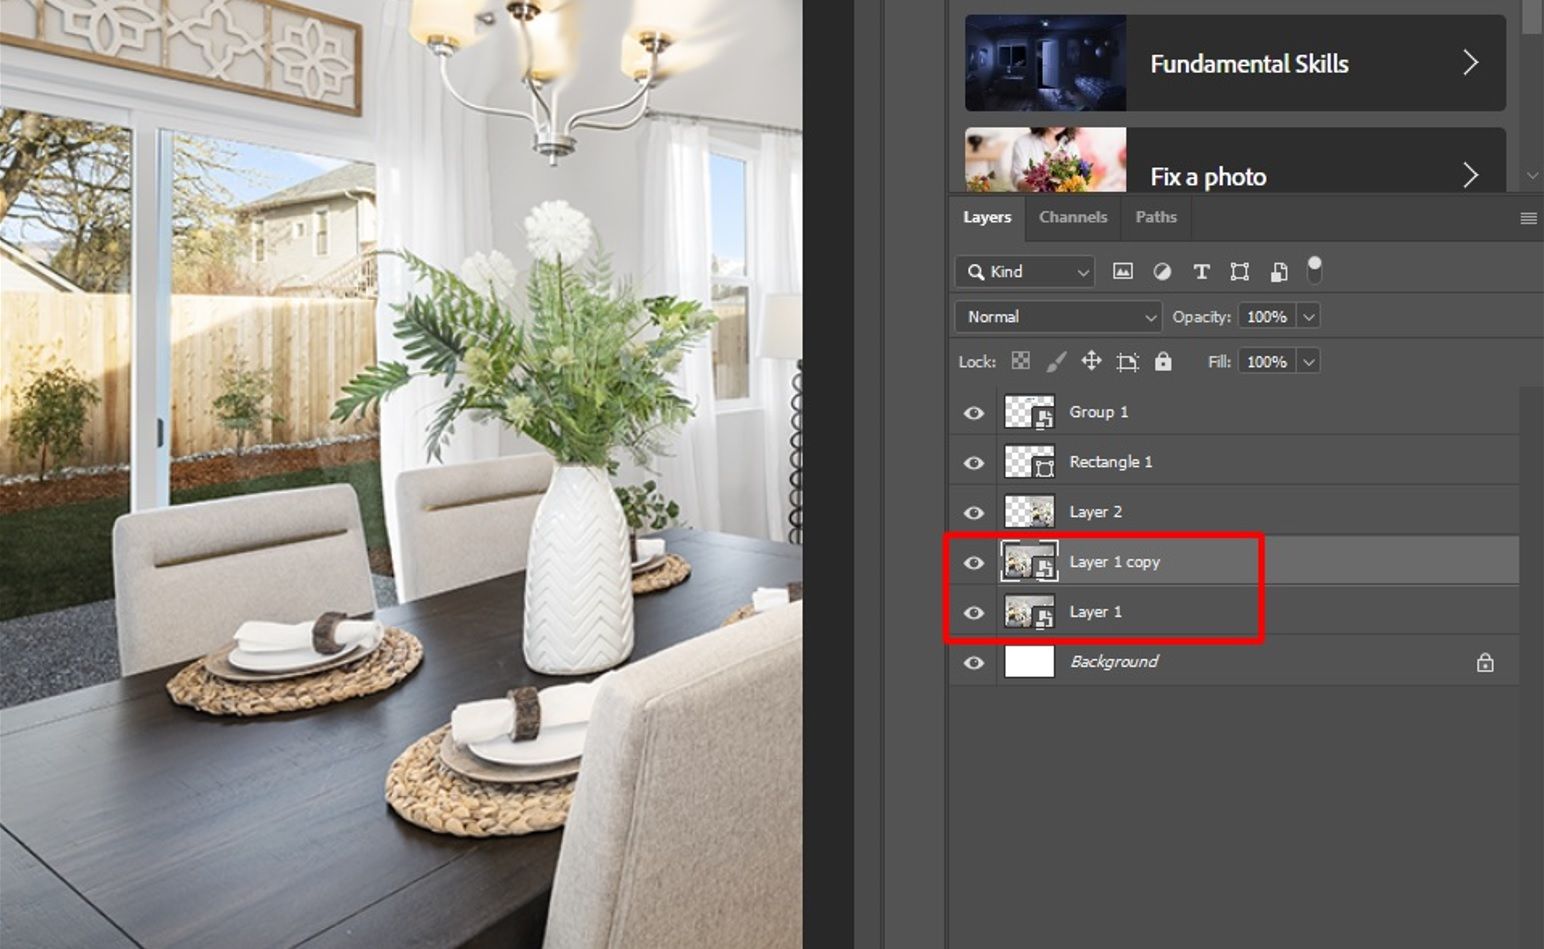
Layers are your first defense against editing mistakes. Create a new layer for each major edit instead of working on the original image. This way, you can hide or delete problematic edits without using the undo command. Think of layers like transparent sheets stacked on top of your photo.
Working with layers gives you unlimited undos for specific edits. You can adjust layer opacity to reduce an effect's strength or use masks to hide parts of an edit. Most importantly, your original image stays safe on its own layer. In real estate photo editing, this method is particularly useful for making adjustments to images while preserving the original quality, allowing for a seamless workflow when working with multiple property photos. This approach is especially useful when you’ve run out of history states.
Combining Undo with Smart Object Layers
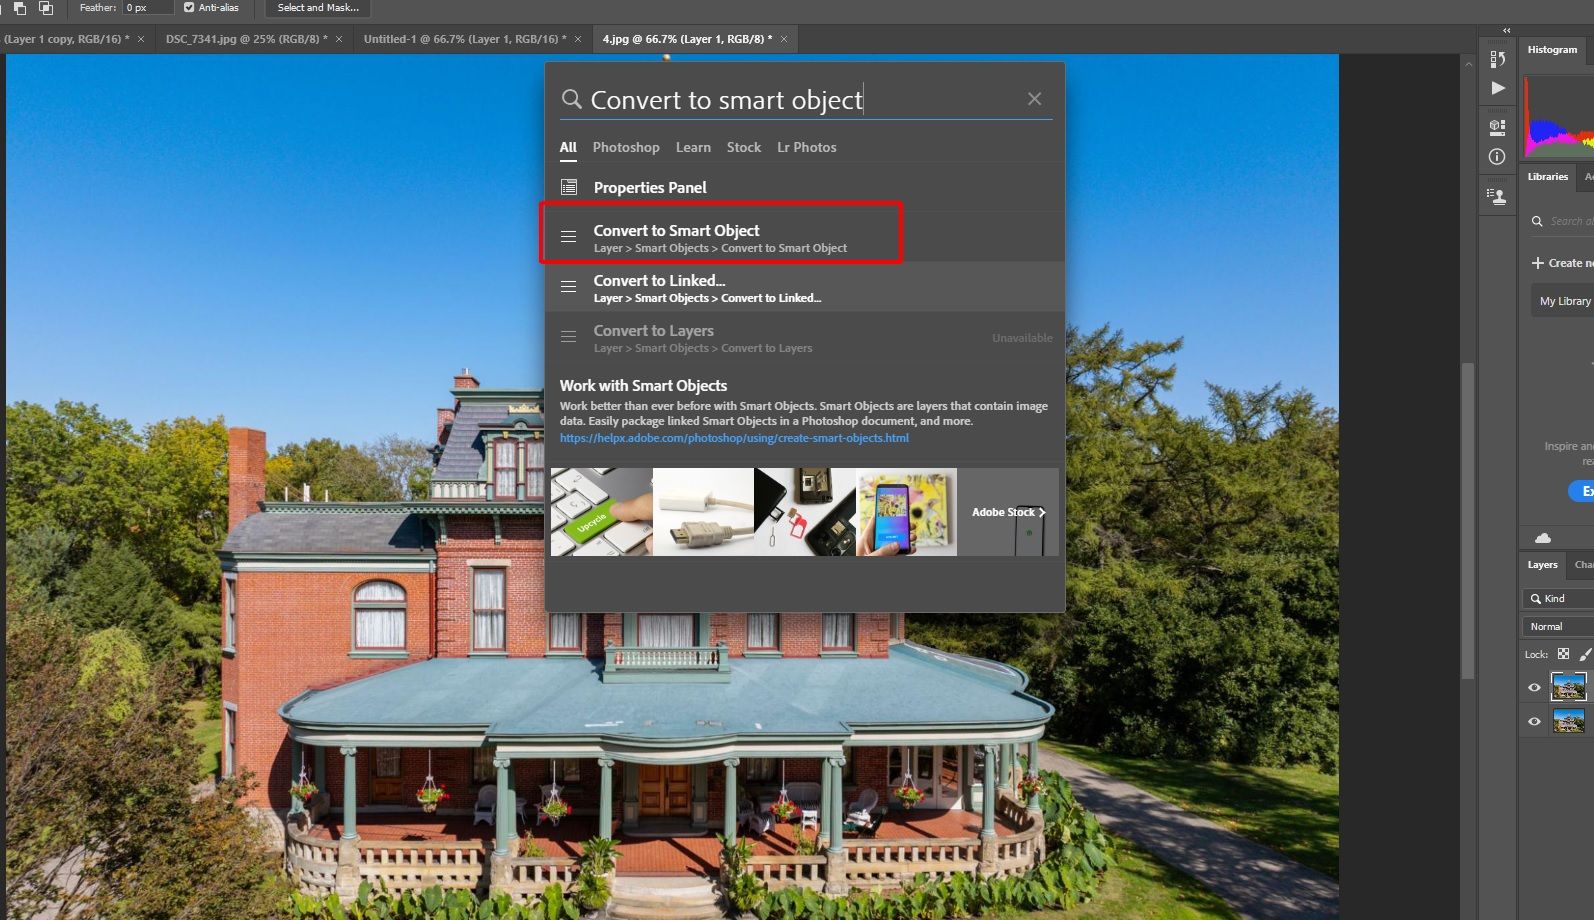
Smart Objects add another level of protection to your editing process. When you convert a layer to a Smart Object, Photoshop preserves its original quality no matter how many changes you make. You can resize, transform, or apply filters without permanently affecting the image. These changes can be undone at any time.
Think of Smart Objects like a special container that protects your image data. You can make all sorts of adjustments to the container, but the original content inside stays safe. This means you can undo transformations or filter effects weeks after applying them. Smart Objects are particularly useful for professional workflows where clients might request changes to old edits.
Here's how to implement these techniques:
Layer Management
- Duplicate before editing
- Name layers clearly
- Use groups for organization
- Keep original layer safe
Smart Object Tips
- Convert important layers
- Use for transform operations
- Apply filters non-destructively
- Save versions when needed
5. Why Professional Editors Like Fotober Trust These Techniques
When handling complex photo editing tasks, having a reliable backup plan is crucial. At Fotober, a professional real estate photo editing service, our experts process thousands of property photos monthly using these exact undo techniques to ensure perfect results.

Proper undo management is vital in high-volume photo editing. Fotober's professional editors combine careful history management with non-destructive techniques to maintain quality control. Whether editing lighting, colors, or retouching details, they rely on these tools to deliver consistent, high-quality results efficiently. For clients needing reliable, professional photo editing services, this systematic approach ensures both quality and quick turnaround times.
6. Conclusion
Mastering Photoshop's undo features takes practice. Start with basic shortcuts and gradually use advanced techniques like layer management and Smart Objects. Even professionals make mistakes – it’s how you recover that counts. With Fotober, combine undo methods with smart workflow practices, such as keeping layers organized and using non-destructive editing. Save versions of important stages to work more confidently and achieve better results.

.png)
.png)
.png)
