
How to Remove Shadows in Lightroom for Bright & Airy Property Photos

Share:
Table of Contents
- 1. Why shadow correction matters in real estate marketing
- 2. Basic techniques: How to remove shadows in Lightroom (global adjustments)
- 3. Advanced: Fixing harsh shadows in real estate photos (local adjustments)
- 4. Case study: How to fix window shadows in interior photography
- 5. AI-powered tools in Lightroom for rapid shadow correction
- 6. Common mistakes to avoid when doing shadow correction in property photos
- Conclusion
- FAQs: Common questions on shadow correction
Even the most seasoned real estate photographers struggle with high-contrast environments. Sometimes, removing harsh shadows in post becomes inevitable. Therefore, understanding shadow correction is the bridge between a mediocre snapshot and a magazine-quality listing, allowing you to reveal hidden architectural details and restore the natural balance of a room. In this comprehensive guide, we will explore how to remove shadows in Lightroom, moving from basic global adjustments to advanced AI-powered masking. By the end, you’ll have the toolkit to ensure every property you shoot is bathed in the perfect light.
1. Why shadow correction matters in real estate marketing
In short, shadow correction can brighten up a room and maximize its perceived space, highlight key details, reveal premium architectural features, materials, and textures that would otherwise remain hidden, thus building emotional appeal. A bright, airy aesthetic creates a welcoming "home" feeling, which increases click-through rates and shortens the time a property stays on the market.
The first impression in the modern real estate market is almost always digital. Potential buyers scroll through hundreds of images in seconds, and lighting is the primary factor that dictates whether they stop or keep scrolling. Statistics from Eye-tracking research of The Wall Street Journal indicate that buyers spend 60% of their time looking at the photos and only 20% on the property description. Furthermore, 95% of users report that the "brightness and clarity" of the first image determines whether they will book a physical tour. This is why real estate photo lighting correction shouldn’t be regarded as just a technical step. It is a vital marketing strategy.
Harsh, uneven shadows can make even the most luxurious spaces feel gloomy, cramped, or even neglected. When a room is riddled with dark patches, the human eye instinctively perceives it as smaller and less "breathable." Effective shadow correction in property photos transforms these uninviting corners into bright, welcoming spaces that suggest a sense of cleanliness and modern living. In real estate, light is often equated with luxury and space; therefore, a photo with balanced luminosity is more likely to trigger positive emotional responses from viewers.
 Clean shadow areas aren’t just signs of professionalism. They reduce the sense of uncertainty and insecurity, conveying a pleasant lifestyle
Beyond aesthetics, shadow correction is about visual honesty and clarity. High-contrast lighting often hides the very features that add value to a home, the texture of a custom tile backsplash, the grain of expensive mahogany flooring, or the depth of a walk-in closet. By neutralizing these shadows, you reveal the property’s true potential, providing a clear, detailed view that builds trust with the buyer.
Furthermore, professional-grade editing distinguishes a top-tier listing from a low-effort mobile upload. For agents and photographers, delivering images with balanced light and minimal distractions establishes a brand of excellence. It signals to clients that every detail of their investment is being showcased with the highest level of care. Ultimately, mastering lighting correction ensures that the home’s story is told in its best possible light, directly influencing click-through rates and the final sale price.
2. Basic techniques: How to remove shadows in Lightroom (global adjustments)
The Basic panel in Lightroom has you covered for most “across-the-board” exposure shifting tasks. These global adjustments affect the entire image and serve as the foundation for a balanced, professional real estate photograph. Before moving to localized "painting," you must ensure the overall exposure provides a clean canvas.
The most straightforward method to remove shadows in Lightroom is to increase the Shadows slider in the Basic panel. For more precise corrections, use Masking tools like the Adjustment Brush or Luminance Range Mask to selectively brighten shadowed regions without affecting the rest of the photo.
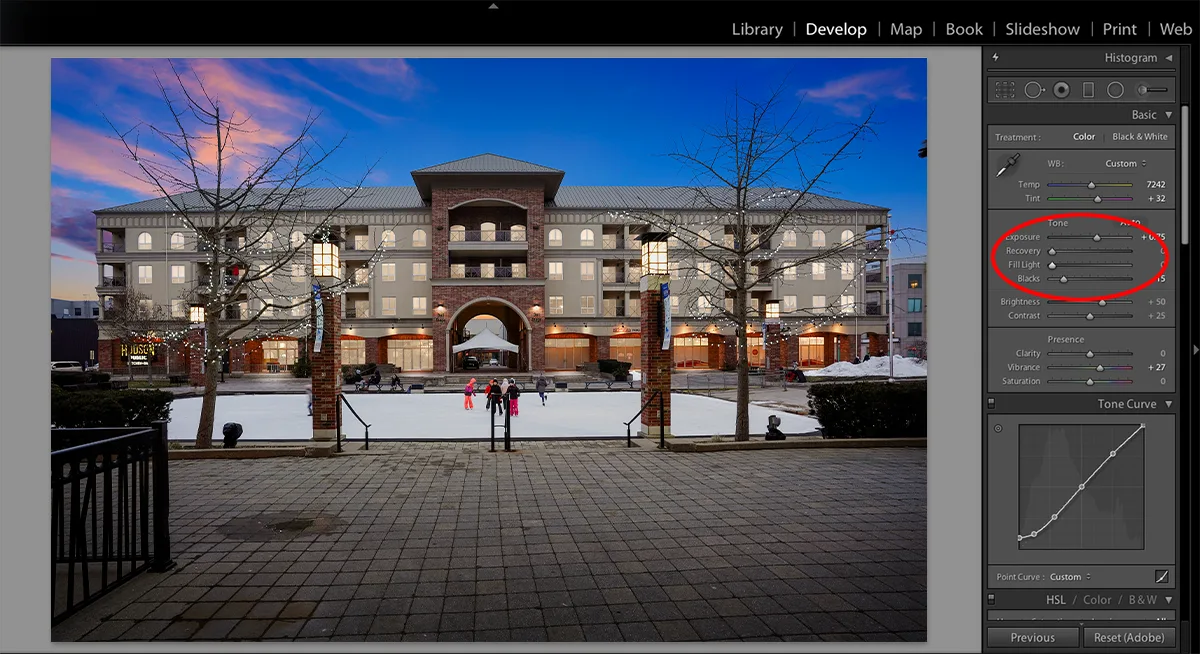
Global adjustments for shadows
Understanding how to remove shadows in Lightroom requires starting from the basic tools. The primary tools for real estate photo lighting correction are the Shadows and Blacks sliders.
- Shadows slider: Moving this to the right selectively lifts the darker regions of the photo without significantly altering the mid-tones or highlights. This is crucial for revealing architectural details in a dark corner while maintaining the exposure of a bright window.
- Blacks slider: This controls the absolute darkest points of the image. Lifting the Blacks prevents "crushing" the darks, ensuring that textures, such as the grain in dark hardwood floors or the fabric of a deep-colored sofa, remain visible rather than turning into flat black blobs.
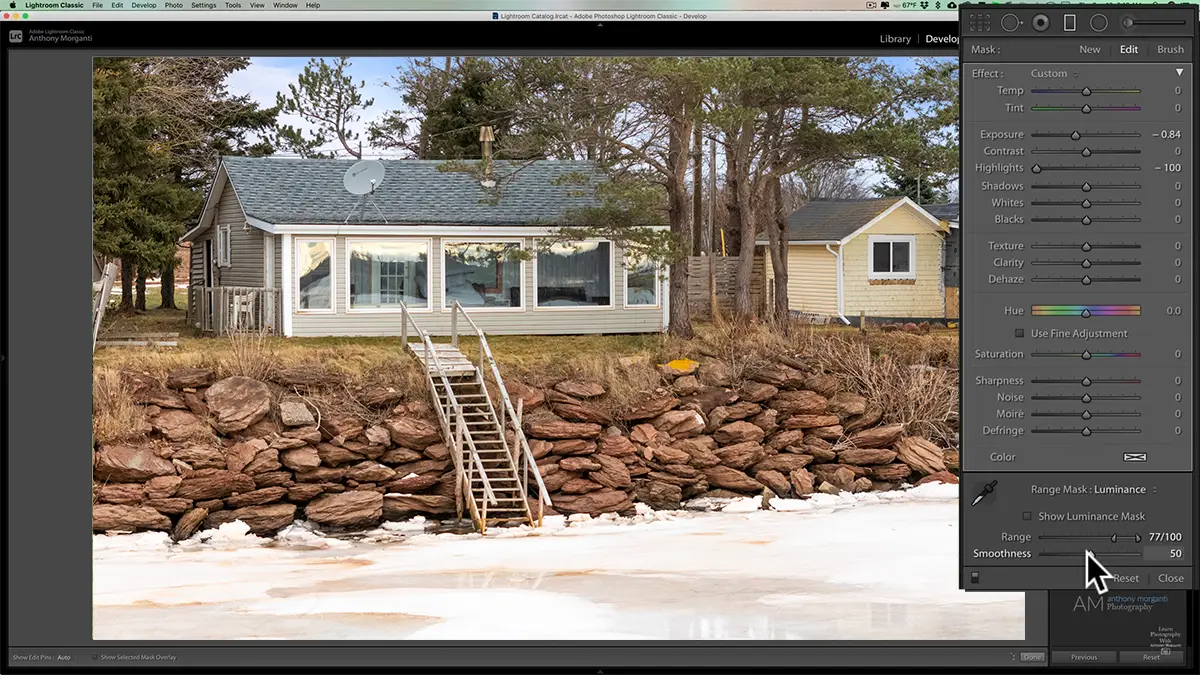
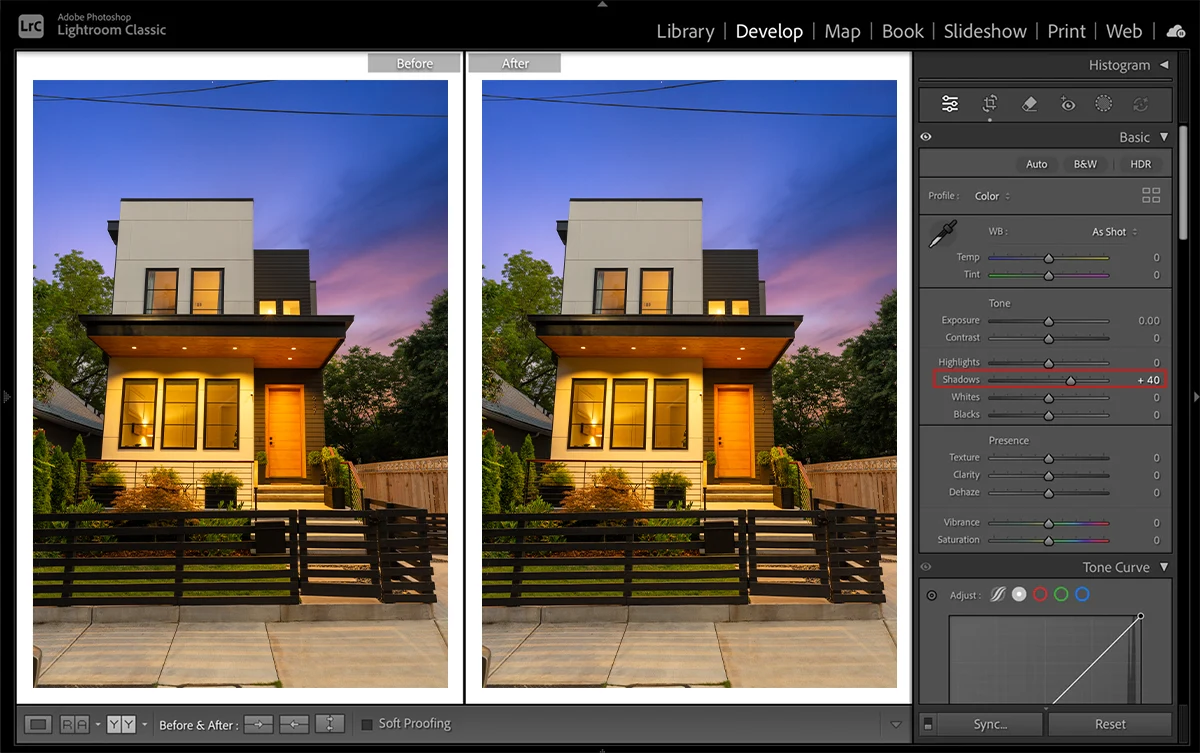 Shadows and Blacks sliders have the most significant effect on the darker parts of the photo
Exposure vs. shadows
A common mistake is increasing the overall Exposure to brighten dark areas. This often leads to "blown-out" highlights, those white, detail-less patches on walls or ceilings near light sources. Instead, focus on lifting the Shadows and then refining the Contrast. This maintains the natural depth of the room while ensuring every corner is legible and inviting.
The tone curve for precision
For more granular control, the Tone Curve is indispensable. By using the "Point Curve," you can target the specific tonal range of your shadows. Lifting the lower-left quadrant of the curve allows for a smoother transition between deep shadows and mid-tones, providing a more natural look than the Basic sliders might offer on their own.
Pro tip: Using the histogram
Always monitor your Histogram. If the graph is bunched up against the far-left edge, your shadows are "clipped", meaning they are pure black with zero recoverable detail. Toggle the Shadow Clipping Warning (the small triangle on the top-left of the histogram) to see blue overlays on your image where detail is being lost. Aim for a balanced distribution to ensure a high-quality, professional finish.
3. Advanced: Fixing harsh shadows in real estate photos (local adjustments)
While global adjustments provide a solid foundation, truly professional results, especially when you need to remove harsh shadows in real estate photos, require the surgical precision of localized masking. High-end property photography often involves complex lighting scenarios, such as deep shadows cast by a kitchen island or dark corners in a high-ceilinged room, where a global "Shadows" slider would simply wash out the rest of the image.
The power of localized masking
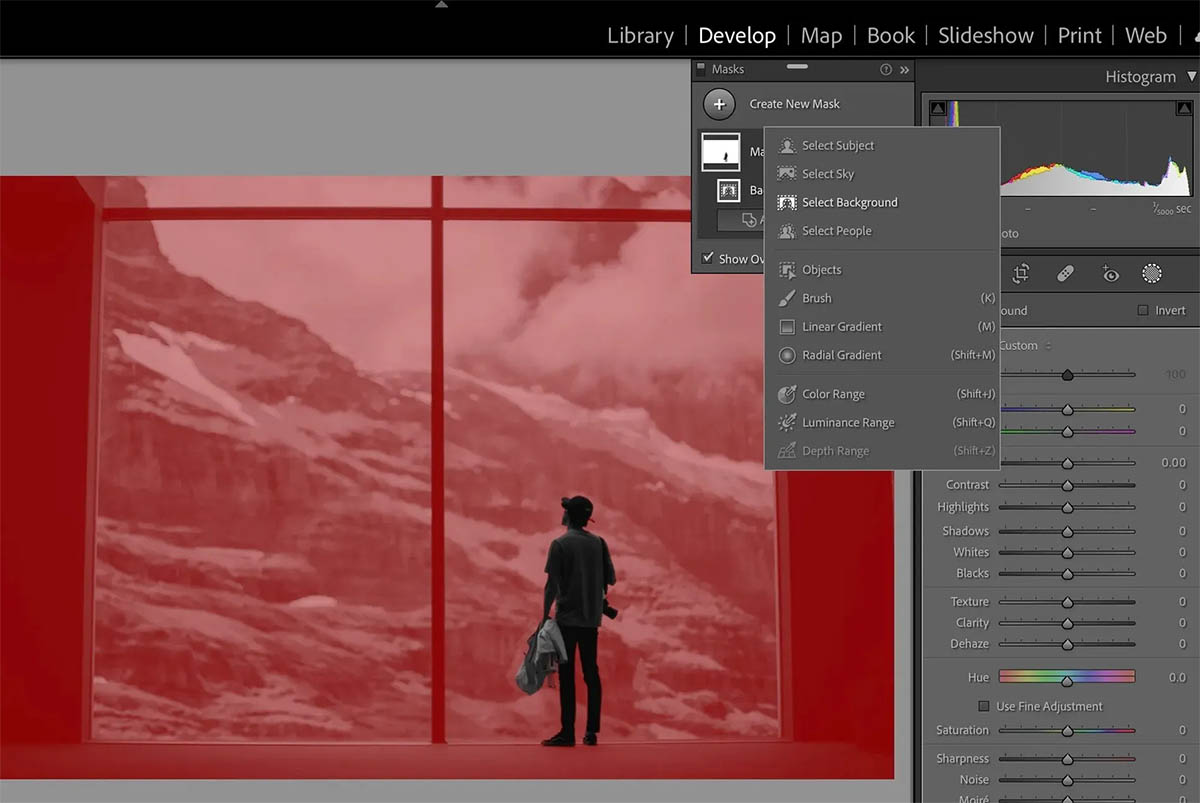
Lightroom’s Masking Tool is your most potent asset for shadow correction. Rather than affecting the entire frame, masks allow you to "paint" light exactly where it is missing.
- The Adjustment brush: This is the tool of choice for irregular shadows. If a piece of furniture or a staircase casts a distracting, jagged shadow across a hardwood floor, you can brush over that specific area to lift the exposure or shadows independently.
- Linear and Radial Gradients: These are perfect for directional light issues. Use a Linear Gradient to brighten a shadowed wall that sits far from the primary window source, or a Radial Gradient to subtly "pop" light into a dim entryway or a dark fireplace mantle.
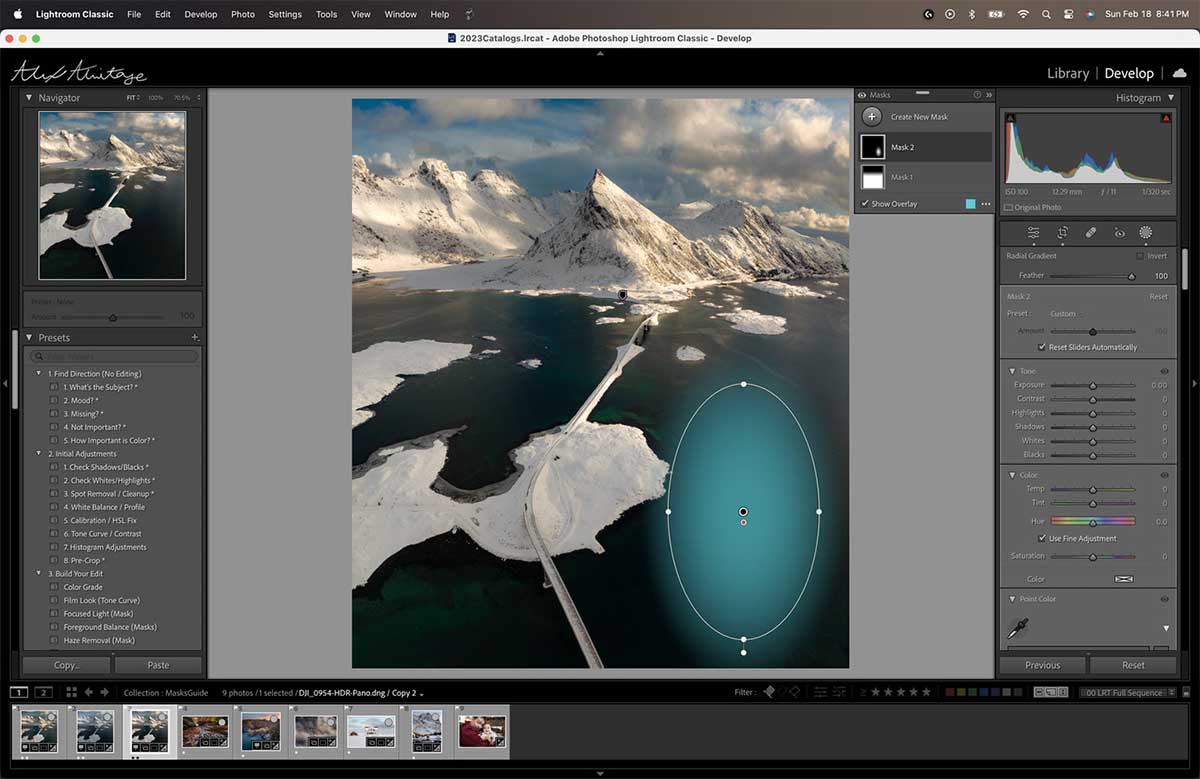 Masking allows editors to selectively adjust a specific region in the frame
Precision editing with luminance range
The secret to an "invisible" edit that doesn't look over-processed is the Luminance Range Mask. When you are working to remove harsh shadows in real estate photos, you don't want to accidentally brighten the mid-tones nearby. By selecting a Luminance Range mask, you can tell Lightroom to only apply your adjustments to the darkest pixels within your selected area. This ensures that as you lift the shadows, the highlights and mid-tones remain crisp and untouched, preventing that dreaded "faded" look.
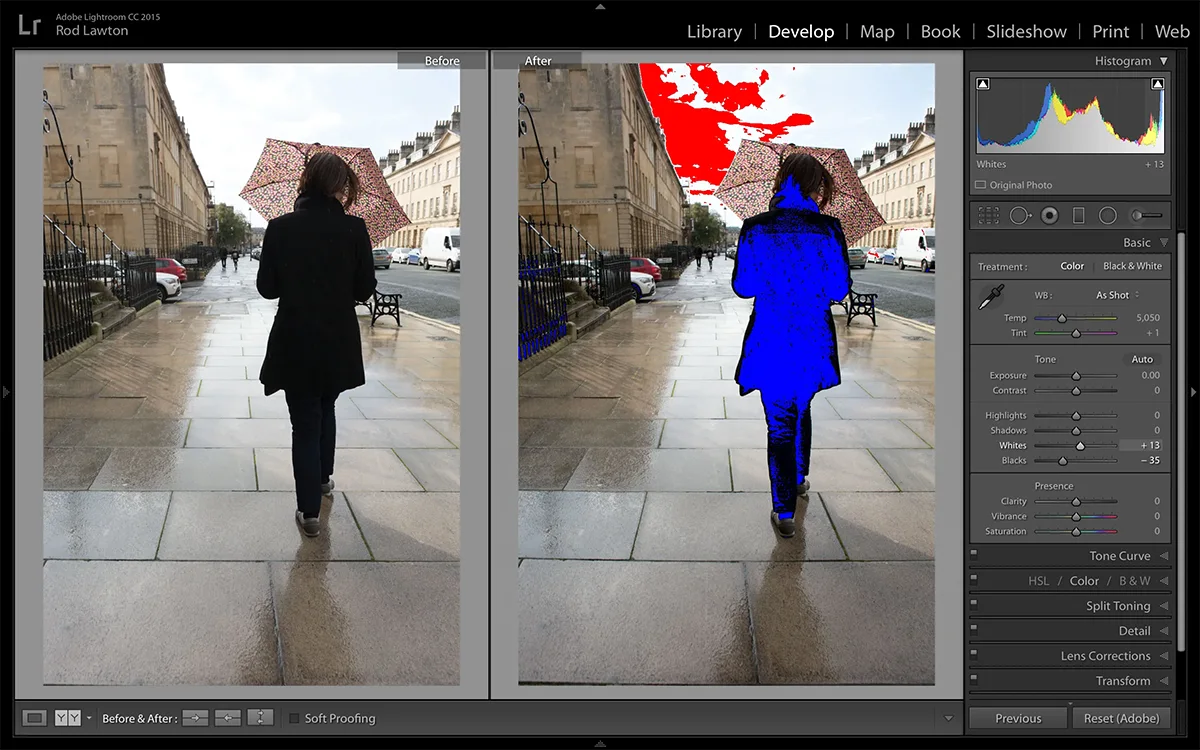
Correcting color casts in shadows
A common technical hurdle in real estate photo lighting correction is the color shift. Shadows in interiors often appear "muddy" or blue because they are illuminated by cool, ambient light rather than the direct, warm light of a lamp or the sun. When you lift these shadows, the blue tint becomes much more obvious and looks unnatural. To fix this, use the Temp and Tint sliders within your mask to remove a specific color. Adding a touch of warmth (yellow) and a hint of magenta will neutralize the cool cast, making the newly brightened area blend seamlessly with the rest of the room’s natural white balance.
 Unwanted color casts are a common headache for editors, requiring meticulous selective balancing
Maintaining three-dimensional depth
Finally, remember that shadows provide depth. While you want to remove distracting shadows, removing all shadows will make the room look flat and artificial. To keep the image realistic, avoid dragging the Shadows slider to +100. Instead, lift them moderately and add a small amount of Contrast and Dehaze within the mask to ensure the area retains its texture and architectural shape.
4. Case study: How to fix window shadows in interior photography
Interior photography often presents a daunting challenge: the extreme contrast between the bright outdoor view and the relatively dark indoor space. This high dynamic range frequently results in deep, distracting shadows cast from window frames or furniture near light sources. To effectively fix window shadows in interior photography, professionals rely on a combination of shooting techniques and post-processing mastery.
HDR merging: The foundation of balance
The most effective way to handle this contrast is through "bracketing", taking several shots at different exposure levels (usually 3 to 5 frames). In Lightroom, you can select these frames and use the Photo Merge > HDR feature. This tool automatically blends the crisp highlights from the underexposed shots (the view outside the window) with the rich shadow details from the overexposed shots (the interior corners). The result is a high-dynamic-range image that serves as a perfectly balanced starting point for further real estate photo lighting correction.
Manual blending with precision masks
Even with a successful HDR merge, some shadows near window sills or behind heavy curtains can remain stubborn. This is where manual masking becomes essential. By using the Adjustment Brush with a low flow and density, you can subtly "dodge" the shadowed areas around the window frame. This technique allows you to lift the shadows without blowing out the highlights of the exterior view. For a more natural look, use a Radial Gradient centered on the window to simulate a soft, realistic glow entering the room, gently lifting the surrounding shadows to match the ambient light level of the rest of the space.
 Recovering windows’ shadow calls for precise masking of the problematic areas
Ensuring visual consistency
A common pitfall is over-correcting a single room until it looks disconnected from the rest of the property. When you fix window shadows in interior photography, aim for a consistent "exposure feel" throughout the entire listing. If the living room is bright and shadow-free, but the adjacent dining area remains moody and high-contrast, the flow of the virtual tour is disrupted. Use Lightroom’s Sync settings to apply similar shadow and highlight adjustments across all photos taken in the same lighting conditions, ensuring a professional, cohesive portfolio that captures the buyer's attention.
5. AI-powered tools in Lightroom for rapid shadow correction
The latest updates to Adobe Lightroom have revolutionized the speed and efficiency of real estate photo lighting correction through advanced AI-driven features. For photographers handling high-volume listings, these automated tools are essential for maintaining quality without spending hours on manual brushing.
One of the most impactful features is AI Masking. With a single click, Lightroom can now "Select Background" or "Select Objects," allowing you to isolate entire walls or floor sections that are shrouded in darkness. This is a game-changer for shadow correction in property photos, as it enables you to lift the exposure of an entire shadowed room while keeping the view through the windows perfectly preserved. The intelligent features also enable quicker item removal in tight-deadline real estate photo projects.
 Automatic detection features relieve the burden of intensive manual masking from editors
Furthermore, the Generative Remove tool (powered by Adobe Firefly) has become indispensable for removing "impossible" shadows. Whether it’s a distracting tripod shadow on a polished marble floor or a complex shadow cast by unsightly power lines on a home's exterior, the AI can intelligently analyze the surrounding textures to erase the shadow and recreate the underlying surface seamlessly. When combined with AI Denoise, which cleans up the grain often revealed when lifting deep shadows, these tools ensure that learning how to remove shadows in Lightroom is now faster and more effective than ever before.
6. Common mistakes to avoid when doing shadow correction in property photos
While learning how to remove shadows in Lightroom, the most common pitfall is over-processing. Removing every trace of shadow can result in a "flat-looking" image that lacks depth, making a room look artificial rather than inviting. Real estate photos need subtle shadows to define architectural shapes and provide a sense of three-dimensional space.
Another frequent error is ignoring digital noise. When you aggressively remove harsh shadows from an underexposed file, it often reveals heavy grain. Failing to use "Denoise" tools can lead to a low-quality, unprofessional finish. Additionally, watch out for "halos": bright, glowing edges around furniture or walls caused by imprecise brushing with high exposure settings.
 Lifting deep shadows liberally may not always be a good idea as this reveals a substantial amount of noise
Lastly, neglecting the blue color cast often found in shadows can make the brightened areas look "muddy." Successful real estate photo lighting correction requires a delicate touch; the goal is to enhance the property's natural beauty, not to create a surreal environment that breaks the viewer's immersion.
Conclusion
Mastering real estate photo lighting correction is one of the most valuable skills a property photographer can possess. As we’ve explored, the journey from basic global adjustments to advanced AI-powered masking is about more than just technical proficiency. It’s about storytelling. By learning how to remove shadows in Lightroom, you transform dark, uninviting spaces into bright, aspirational homes that capture the imagination of potential buyers.
The techniques discussed in this guide, from balancing the histogram to neutralizing cool color casts, are the keys to creating a cohesive and professional portfolio. Remember, the goal of shadow correction in property photos is to enhance reality, not replace it. Balanced, airy, and detailed images are the ones that drive clicks and ultimately close deals.
Now it’s time to apply these workflows to your next shoot. Start experimenting with these tools today to see the immediate impact on your image quality. For those managing high-volume listings, you can keep refining your process to ensure every property shines or partner with a specialized editing team well-versed in commercial real estate visuals like Fotober to maintain consistent quality at scale.
Follow us on social media to explore more practical techniques in real estate photography and up-to-date details of our services!
- Facebook: fotobermedia.co
- YouTube: Fotober
- TikTok: @fotober
- Instagram: fotober_media.
FAQs: Common questions on shadow correction
How can I remove shadows in Lightroom without affecting the whole photo?
The best method is using Masking tools. By utilizing the Brush or Linear Gradient, you can perform localized shadow correction in property photos, ensuring you only brighten dark corners without overexposing the rest of the room.
Why do my shadows look blue after I lift them?
This is a common color cast issue. Shadows often capture cool ambient light. To fix this, increase the "Temp" slider within your specific mask to neutralize the blue and restore a natural, warm glow.
Can I fix window shadows in interior photography automatically?
While Lightroom's "Auto" button provides a start, using AI-powered masks is much more effective for professional real estate photo lighting correction.
Related posts
Houston Virtual Staging: The Best Options for Vacant Listings in 2026
July 31, 2026

Dallas Real Estate Photo Editing: Outsourcing with 8 Best Services
July 30, 2026

How Luxury Home Photography in Las Vegas Saved a Stagnant $3M Listing
July 30, 2026
Winning Buyers With These Las Vegas Real Estate Photography Top Picks
July 29, 2026
