
How HDR Effect Photo Editing Boosted Engagement for a Vermont Listing

Share:
Table of Contents
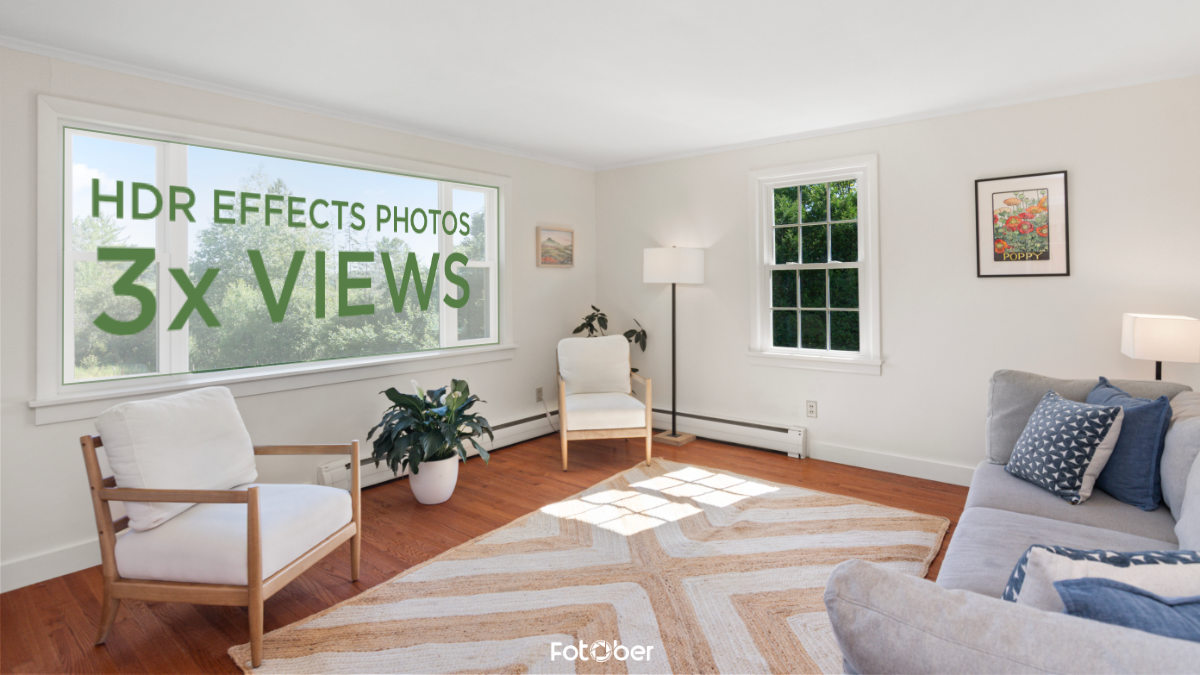
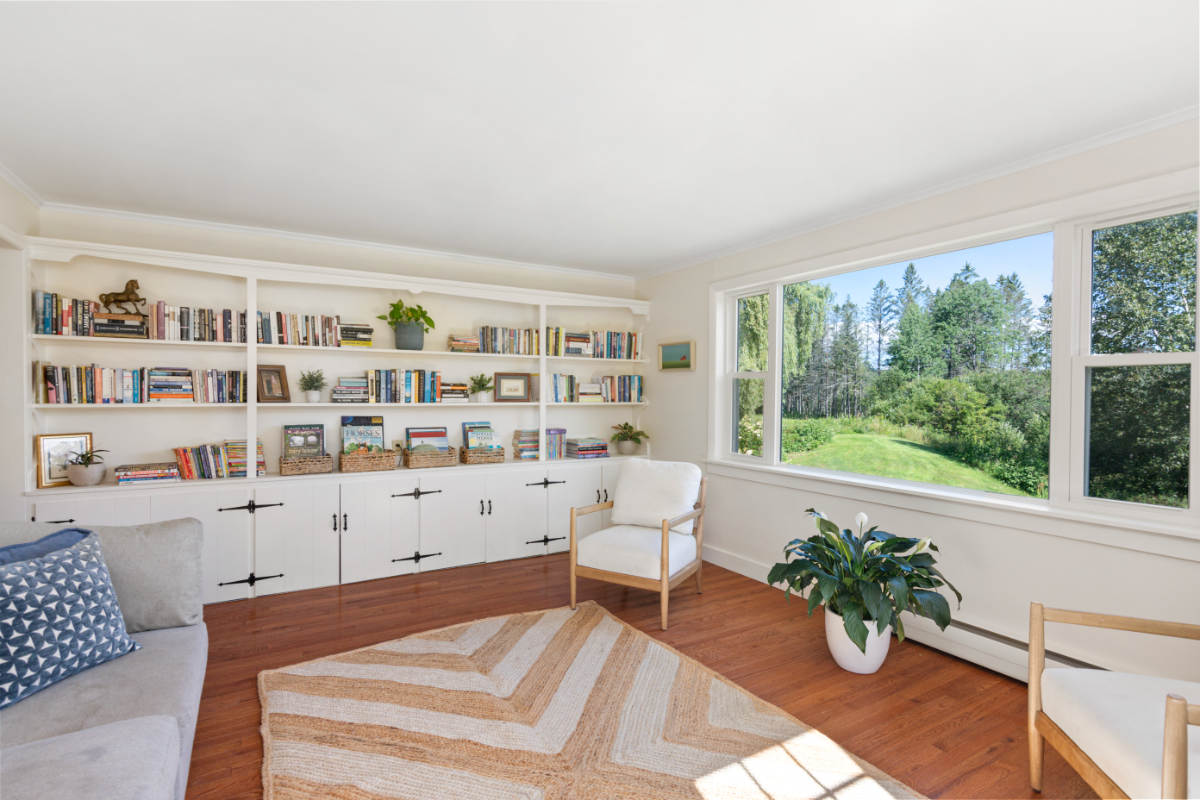
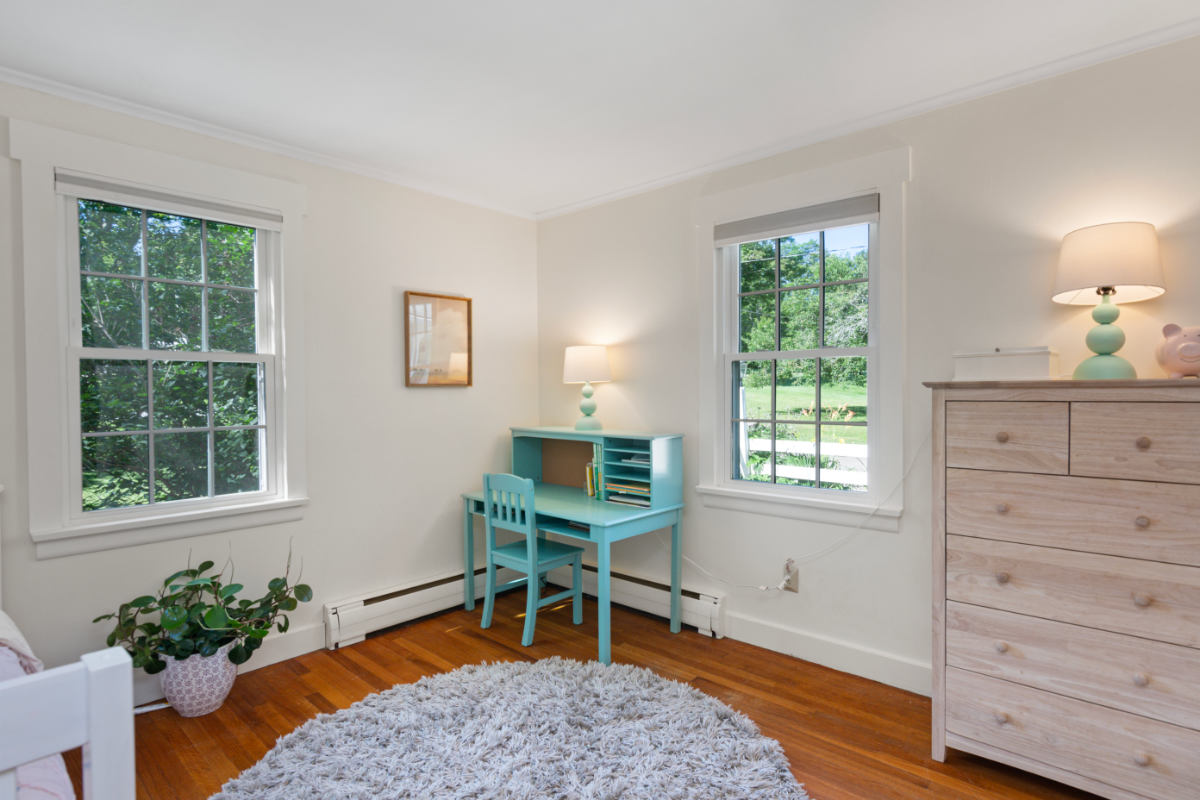
Consider the charming property located at 1625 Center Road, East Montpelier, VT. While the home boasted incredible architectural potential, standard photography failed to capture its true warmth, resulting in flat, uninspiring thumbnails that got lost in search feeds. To unlock its full market value, the listing underwent a visual transformation, leveraging professional HDR effect photos. This advanced editing technique seamlessly balanced tricky interior shadows with Vermont's scenic outdoor landscapes, completely revitalizing the property's digital footprint.
1. The challenge: The suboptimal lighting of standard non-HDR real estate photography
The property at 1625 Center Road, East Montpelier, VT, perfectly encapsulates the classic lighting nightmare of traditional real estate photography. Featuring expansive windows designed to showcase beautiful Vermont landscapes, the home naturally suffers from extreme dynamic range. When captured using standard, single-exposure camera settings, the lens simply cannot process both the brilliant exterior daylight and the rich, warm interior woodwork simultaneously.
 The exposure went overboard at either end of the histogram, resulting in clipped highlights or crushed shadows.
The result was a series of visual tragedies: either the stunning outdoor views were completely blown out into a harsh white glare, or the interior living spaces were cast into deep, muddy shadows. Essential textures in the hardwood flooring and rustic exposed beams vanished entirely. Online, these unoptimized images translate directly into a marketing bottleneck. The listing thumbnails appeared dark, flat, and uninviting on platforms like Zillow, severely suppressing the property's initial click-through rate (CTR) and driving potential buyers right past the listing.
2. The solution: Leveraging HDR effect photos to bridge the gap
To bridge this visual gap, the listing strategy shifted away from restrictive single exposures toward professional HDR effect photos. High Dynamic Range (HDR) photography works by capturing a sequence of bracketed shots, typically three to five separate frames taken at different exposure levels, ranging from intentionally underexposed to overexposed. In post-production, these layers are meticulously fused together with a bracketed exposure blending technique, extracting the crisp, perfectly exposed window views from the darker frames and the rich, clean shadow details from the brighter frames.
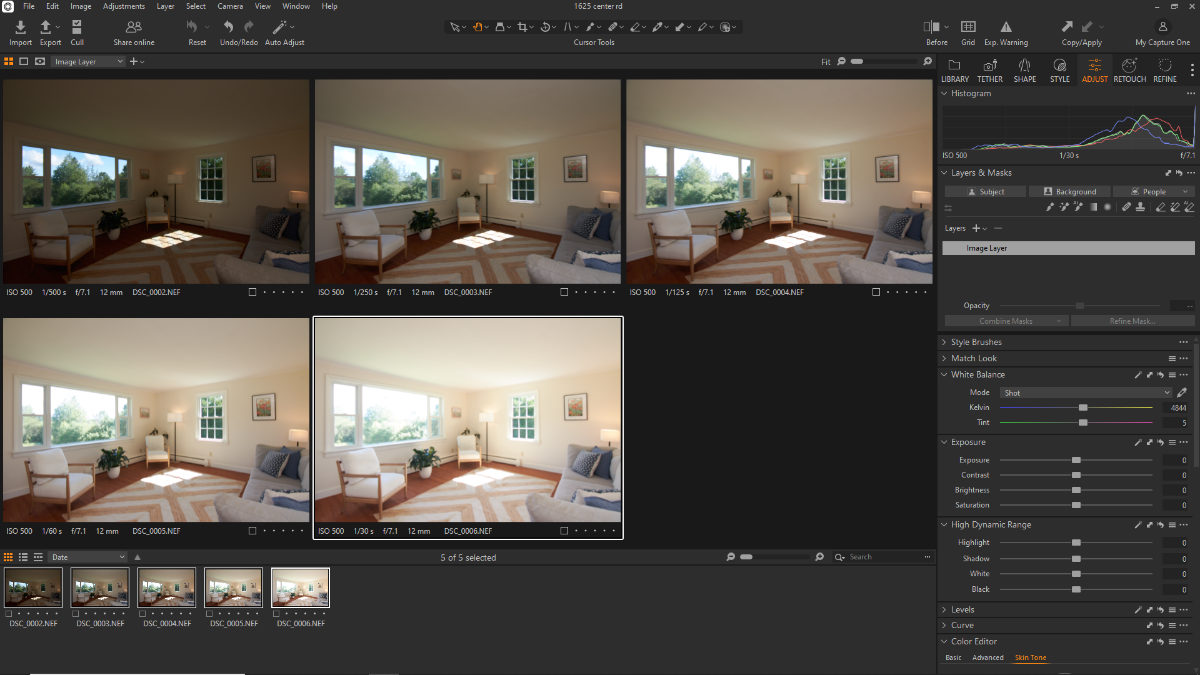 Shooting the same scene at different levels of exposure allows for HDR blending in post.
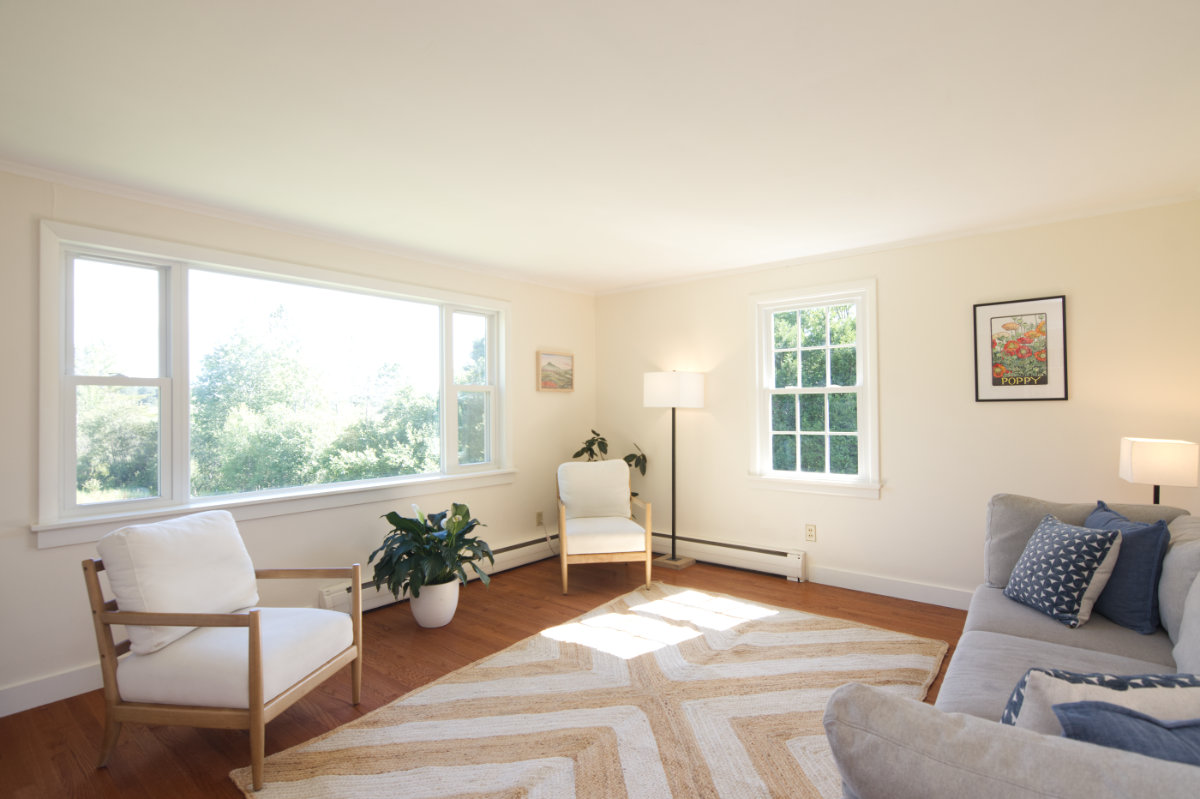
When applied to 1625 Center Road’s photos, this technique worked absolute magic. Instead of forcing a compromise between a dimly lit living room and a blinded window view, the final images displayed both areas with flawless clarity. Prospective buyers could now fully appreciate the intricate grain of the home's rustic interior wooden beams while simultaneously viewing the vibrant, lush green Vermont hillsides just outside the glass. The resulting HDR effect photos successfully replicated how the human eye naturally perceives a physical space, creating an immediate sense of warmth, balance, and spatial depth.
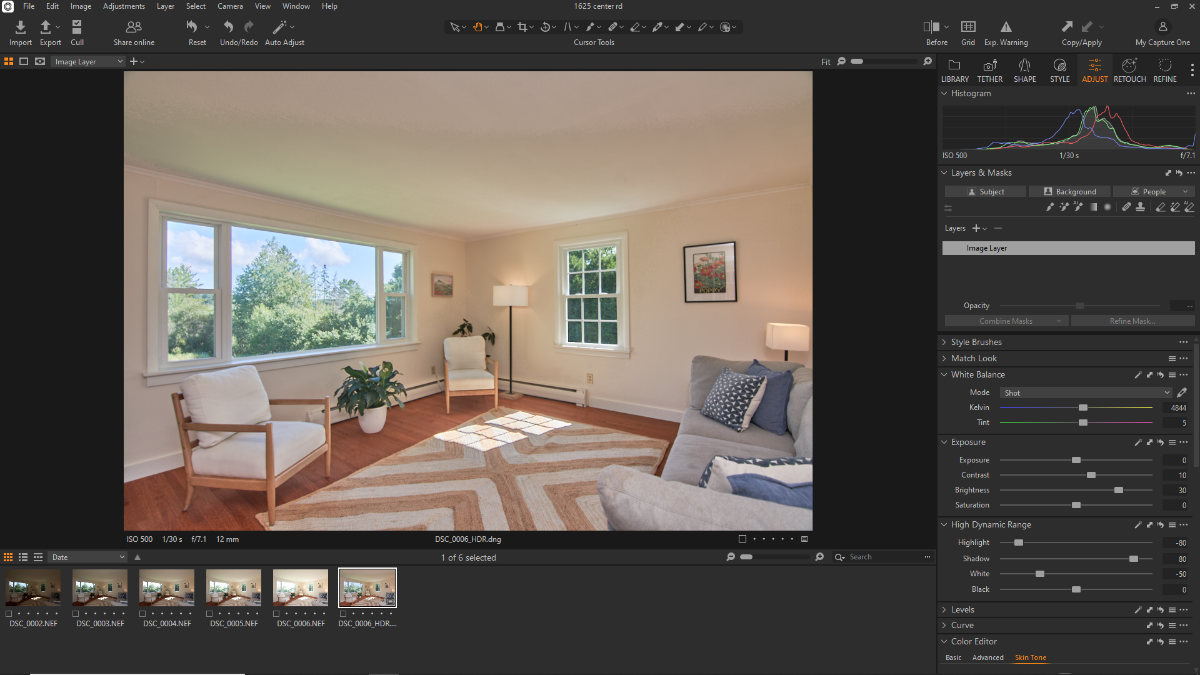 The merged image is ready to be processed further with both highlight and shadow details retained.
Crucially, the success of this case study relied on a sophisticated approach to digital editing. While amateur real estate filters often ruin listings with unrealistic glow effects and oversaturated colors, professional-grade HDR effect photos maintain strict realism. The goal was to enhance contrast and textures while keeping the home completely authentic to an in-person tour. This premium visual upgrade gave the East Montpelier listing a polished, editorial aesthetic that immediately stood out.
3. The results: Metrics and listing engagement breakdown
The introduction of professional editing completely redefined the listing’s performance metrics across major syndication platforms. To quantify the impact, we tracked user engagement data on Zillow and Redfin over two distinct two-week windows: before and after the photographic upgrade.
|
Engagement metric |
Standard photos (Weeks 1-2) |
HDR optimized photos (Weeks 3-4) |
Performance growth |
|
Daily listing views |
42 views/day |
178 views/day |
+323% Increase |
|
Platform "saves" / favorites |
14 total |
92 total |
+557% Increase |
|
Weekly tour requests |
2 requests/week |
11 requests/week |
+450% Increase |
The data reveals an undeniable correlation between visual clarity and active buyer interaction. Within just forty-eight hours of replacing the flat, unoptimized imagery with vibrant HDR effect photos, the East Montpelier listing experienced an immediate surge in local search rankings. The massive spike in daily views proved that a visually striking thumbnail is the single most critical factor in winning the initial click from modern buyers.
 Visual clarity provides that pleasing effect which makes the room feel more open and spacious.
Furthermore, the substantial jump in user "Saves" indicates that the realistic depth and beautiful Vermont window views created a lasting emotional connection, converting passive scrollers into highly motivated prospects. Local buying agents noted that clients explicitly referenced the bright, magazine-worthy interior spaces when booking appointments. By showcasing the home's true potential through balanced lighting, the property's digital footprint skyrocketed, ultimately securing a competitive offer well ahead of the regional average Days on Market (DOM).
 The listing stands out on the platform with exceptional professionalism.
4. Why HDR effect photos move the needle for real estate SEO
The digital algorithms governing major real estate platforms like Zillow, Redfin, and Realtor.com are heavily driven by user behavior signals. When a property listing features HDR effect photos, it fundamentally alters how search engines rank the page. High-quality visuals immediately elevate click-through rates (CTR) by creating an irresistible thumbnail that commands attention in a crowded search feed.
 Life-like HDR real estate photography attracts more viewers and keeps them engaged longer on the listings.
Once a user clicks, the realistic depth and flawless lighting achieved through professional HDR editing encourage them to linger, significantly increasing page dwell time. Real estate algorithms interpret high CTRs, extended dwell times, and frequent "Saves" as clear indicators of value and relevance. Consequently, the platform rewards the listing with prime positioning at the top of local organic search results. Furthermore, optimized image file sizes and proper alt-text formatting improve visibility on Google Images, adding an extra layer of search discoverability that drives motivated buyers directly to the listing.
5. Conclusion
The transformation of 1625 Center Road demonstrates that premium visuals are no longer optional in modern real estate marketing; they are the baseline for success. Transitioning to professional HDR effect photos turned a stagnant listing into a high-engagement asset by effortlessly mastering complex lighting challenges.
To replicate these stellar results and captivate buyers instantly, partner with Fotober. Fotober provides elite real estate photo editing services with HDR blending that transform flat, uninspired property photos into magazine-worthy visuals that rank higher and sell faster. Don't let poor lighting slow down your sales. Contact Fotober today to unlock your property's full potential.
Follow us on social media to get practical insights into visual marketing and up-to-date details of our services!
- Facebook: fotobermedia.co
- YouTube: Fotober
- TikTok: @fotober
- Instagram: fotober_media.
Related posts
Las Vegas Virtual Staging: Best Platforms to Enchant Your Listings
July 23, 2026

Best Austin Real Estate Photography Options for Perfect Listing Photos
July 22, 2026
Best Aperture for Real Estate Photography: The Range for Sharp Photos
July 18, 2026
Short-Term Rental Photography: Shoot & Edit Photos That Gain Bookings
July 17, 2026
