
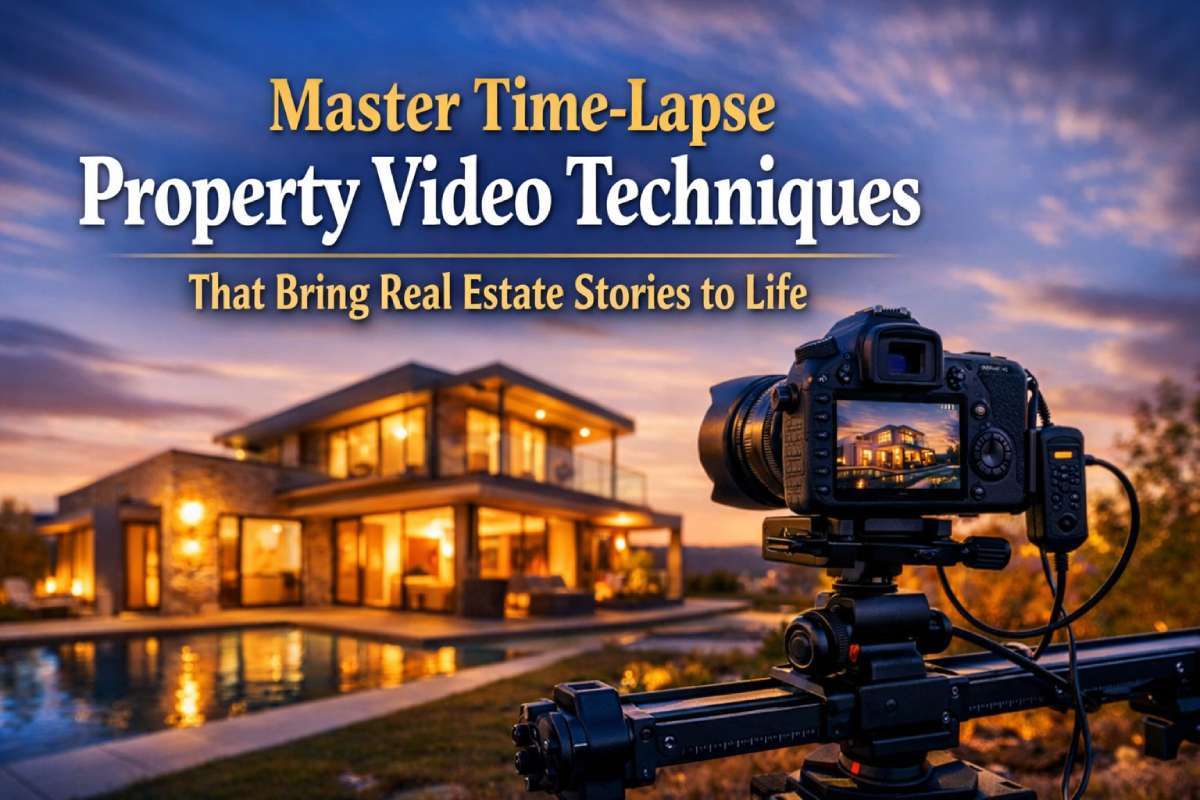
Master time lapse Property Video Techniques That Bring Real Estate Stories to Life

Share:
Table of Contents
- 1. Introduction to time lapse in Real Estate
- 2. Essential Equipment for Shooting Professional time lapse Property Videos
- 3. Optimal Camera Settings and Shooting Intervals for Real Estate time lapse
- • 3.1. Turning Technical Control into Smooth, Professional Storytelling
- • 3.2. Manual Camera Settings That Preserve Visual Consistency
- • 3.3. Choosing the Right Shooting Interval Based on Real Estate Scenarios
- • 3.4. Professional Workflow for Setting Up a time lapse Shoot
- • 3.5. Common Mistakes That Weaken Real Estate time lapse Quality
- • 3.6. Expert Checklist Before Starting Your time lapse Capture
- 4. Creating Motion with time lapse Variations
- • 4.1. How Movement Transforms time lapse Property Video Techniques into Cinematic Storytelling
- • 4.2. Standard time lapse vs. Hyper lapse: Choosing the Right Approach
- • 4.3. Motion Tools That Enhance Real Estate time lapse Production
- • 4.4. Decision Framework: When Should You Add Motion to a time lapse?
- • 4.5. Common Motion Mistakes That Reduce Professional Quality
- • 4.6. Motion and Post, Production: Two Parts of the Same System
- 5. Post, Production Techniques That Elevate Real Estate time lapse Videos
- • 5.1. Where Raw Footage Becomes a Compelling Marketing Story
- • 5.2. Frame Organization and Sequence Preparation
- • 5.3. Stabilization and Visual Flow Refinement
- • 5.4. Motion Blur and Natural Movement Enhancement
- • 5.5. Color Grading for Consistency and Brand Alignment
- • 5.6. Pacing, Speed Ramping, and Sound Integration
- • 5.7. Export Strategy for Marketing Platforms
- 6. Why Professional Editing Support Strengthens time lapse Property Video Techniques
- Closing Thought Before the Conclusion
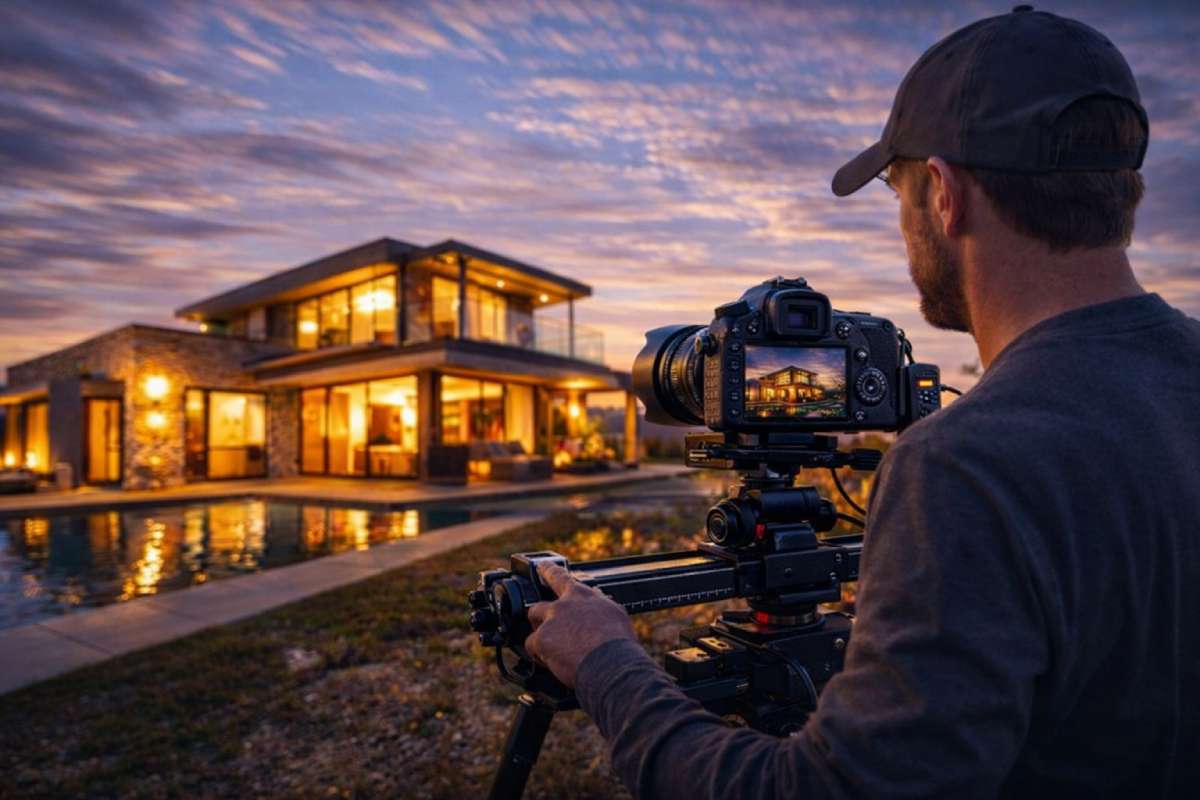
In real estate marketing, attention is no longer captured by static visuals alone. Buyers want to see movement, atmosphere, and transformation, not just a space, but a living environment. That’s where time lapse property video techniques become a powerful storytelling tool. From documenting construction progress to revealing how natural light evolves throughout the day, time lapse adds emotional depth and visual credibility that traditional video often misses.
But creating a professional property time lapse involves more than setting up a camera and pressing record. It requires thoughtful planning, technical precision, and post production expertise to ensure smooth motion, consistent lighting, and a cinematic finish that enhances, not distracts from, the property itself.
In this guide, I’ll walk you through the practical techniques professionals use to produce high impact real estate time lapse videos, from shooting strategy to editing workflow, along with insights from real, world media production. Whether you're an agent capturing your own footage or a marketing team looking to scale your visual content, these techniques will help you create time lapse videos that engage viewers and elevate your listings.
1. Introduction to time lapse in Real Estate
1.1. Why time lapse Property Video Techniques Matter in Modern Property Marketing
In today’s competitive property market, visual storytelling plays a decisive role in how quickly buyers connect with a listing. High, quality photography may capture attention, but motion, especially time lapse, builds narrative. When applied correctly, time lapse property video techniques transform hours, days, or even months of real world change into a concise visual experience that communicates progress, atmosphere, and value within seconds.
Rather than simply documenting a property, time lapse allows viewers to experience transformation. The subtle shift of sunlight across an open living room, the evolution of a construction site into a finished development, or the rhythm of daily activity around a neighborhood all contribute to a stronger emotional connection. This sense of movement helps potential buyers visualize the property as part of a real, dynamic lifestyle, not just a static structure.
1.2. Where time lapse Creates the Most Impact in Real Estate
Professionals in real estate media often use time lapse in situations where change over time tells a stronger story than a single shot ever could:
· Construction and development progress: Developers and marketing teams use long, term time lapse sequences to demonstrate transparency, professionalism, and project momentum, especially valuable for pre, sale campaigns.
· Exterior and landscape transformations: Renovations, seasonal changes, or staging updates can be presented in a visually engaging way that reinforces the perceived value of a property.
· Natural lighting evolution in interiors: Showing how daylight moves through a home adds warmth and realism, helping buyers imagine how the space feels at different times of day.
1.3. Beyond Aesthetic, time lapse as a Strategic Marketing Tool
From a marketing perspective, time lapse content performs well because it compresses long processes into short, shareable moments. This makes listings more engaging on websites, social media platforms, and listing portals where viewer attention spans are limited.
However, successful real estate time lapse is rarely accidental. It requires an understanding of timing, framing, and post, production refinement to avoid common pitfalls like flicker, inconsistent exposure, or unnatural pacing. Many real estate professionals capture the footage themselves, but rely on experienced editing teams to transform raw sequences into polished marketing assets that align with their brand and audience expectations.
When integrated strategically, time lapse becomes more than just a visual effect, it becomes a narrative device that communicates trust, progress, and lifestyle in a way that static visuals cannot.
2. Essential Equipment for Shooting Professional time lapse Property Videos
2.1. Building a Reliable Setup for Consistent and Cinematic Results
Behind every smooth and compelling real estate time lapse video is a setup designed for stability, endurance, and precision. While many creators begin experimenting with basic tools, professionals who consistently produce high, quality content understand that equipment choices directly influence how effective their time lapse property video techniques will be, both visually and technically.
Unlike traditional real estate video shoots that last minutes, time lapse sessions can run for hours, days, or even months. That means your gear isn’t just capturing footage, it’s maintaining consistency over extended periods, often in unpredictable lighting and environmental conditions. Investing in the right tools doesn’t just improve image quality; it reduces risk, minimizes post, production challenges, and helps maintain a professional standard across projects.
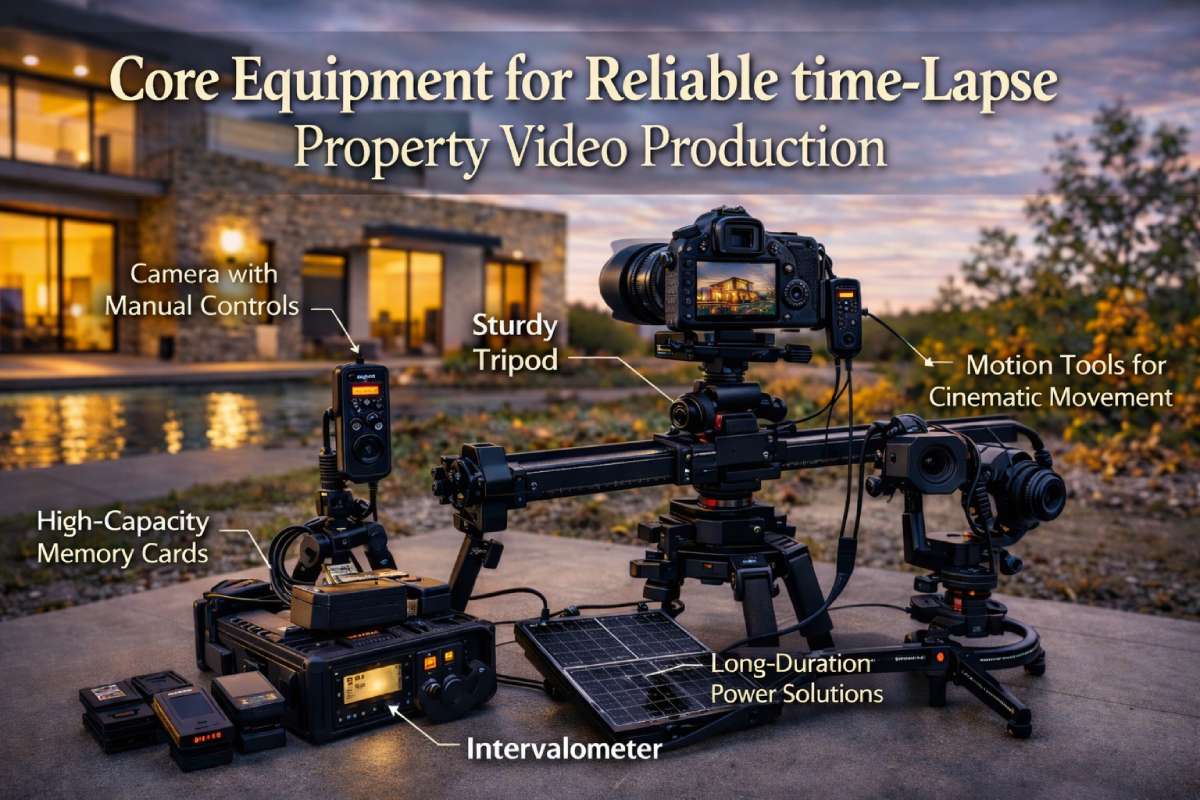
2.2. Core Equipment for Reliable time lapse Property Video Production
Below is a professional, grade equipment framework commonly used in real estate media workflows:
Camera with Full Manual Control
A DSLR or mirrorless camera capable of manual exposure and interval shooting is essential. Real estate time lapse demands consistency, meaning your camera must maintain stable exposure and color over thousands of frames.
Professionals typically prioritize:
· High dynamic range for challenging lighting situations
· Reliable interval shooting features
· Strong low, light performance for interior and sunset sequences
· Consistent color science for easier editing later
Choosing a camera that allows precise manual adjustments significantly improves the final output and reduces the need for heavy corrective editing.
Stable Tripod System
In time lapse work, even the smallest vibration becomes amplified once footage is compressed into seconds. A rigid, vibration resistant tripod ensures that architectural lines remain stable and professional, particularly important when filming luxury listings or high end developments where visual precision matters.
Look for:
· Heavy, duty construction
· Secure locking mechanisms
· Weather, resistant materials for long, term outdoor setups
A solid tripod is often the difference between a cinematic sequence and a distracting, shaky result.
Intervalometer for Controlled Shooting
An intervalometer controls how frequently the camera captures each frame, one of the most important technical aspects of time lapse property video techniques. While many modern cameras include built- in interval functions, external intervalometers provide more advanced control and reliability for extended shooting sessions.
Precise interval control allows you to:
· Match motion speed to real estate scenarios (construction vs interior lighting)
· Maintain consistent pacing throughout long projects
· Reduce unnecessary data capture and storage overload
Motion Tools for Cinematic Movement
Static time lapse is effective, but subtle camera movement dramatically increases engagement. Professional creators often incorporate motion tools to create immersive storytelling:
· Motorized Sliders: Smooth horizontal motion across kitchens, terraces, or facades
· Robotic Pan/Tilt Heads: Gradual directional movement that adds depth to wide architectural shots
· Gimbals for Hyper lapse: Controlled movement through interiors or along walkways to simulate walkthrough experiences
Movement helps viewers feel connected to a space rather than simply observing it from a fixed perspective.
Long, Duration Power Solutions
Because real estate time lapse sessions frequently run unattended for extended periods, reliable power management is critical. Sudden shutdowns can ruin hours, or weeks, of captured progress.
Professional setups often include:
· External battery packs
· AC adapters for indoor projects
· Solar, assisted systems for outdoor construction time lapse
· Backup power monitoring to avoid unexpected interruptions
Storage and Data Management
time lapse workflows generate thousands of images quickly. Fast, high, capacity memory cards help prevent data bottlenecks and ensure smooth capture when shooting in RAW, a format many professionals prefer for greater post, production flexibility.
A well, planned storage system also simplifies the editing workflow, allowing post, production teams to organize sequences efficiently and maintain consistent project delivery timelines.
While having the right gear dramatically improves capture quality, it doesn’t guarantee a professional final product. Even perfectly shot sequences often require advanced stabilization, flicker correction, color balancing, and pacing adjustments during editing. This is why many real estate teams separate the capture phase from post, production, focusing their on, site energy on filming while relying on specialized editors to refine the final visual narrative.
In professional real estate media workflows, equipment and editing are two halves of the same system, each supporting the effectiveness of your overall time lapse property video techniques.
3. Optimal Camera Settings and Shooting Intervals for Real Estate time lapse
3.1. Turning Technical Control into Smooth, Professional Storytelling
The difference between an amateur sequence and a professional real estate time lapse often comes down to consistency. When exposure shifts unexpectedly or intervals are poorly chosen, viewers may not know exactly what feels wrong, but they immediately sense that something looks unpolished. Mastering the technical side of time lapse property video techniques ensures that your footage supports the property’s visual story instead of distracting from it.
Rather than relying on automated camera settings, experienced creators approach time lapse with a mindset of control: consistent lighting, predictable pacing, and deliberate planning based on the type of property and the transformation being captured.
3.2. Manual Camera Settings That Preserve Visual Consistency
Real estate environments present constant changes in light, especially interiors with large windows or exteriors filmed across multiple hours. Locking your best camera into manual settings prevents unwanted fluctuations between frames.
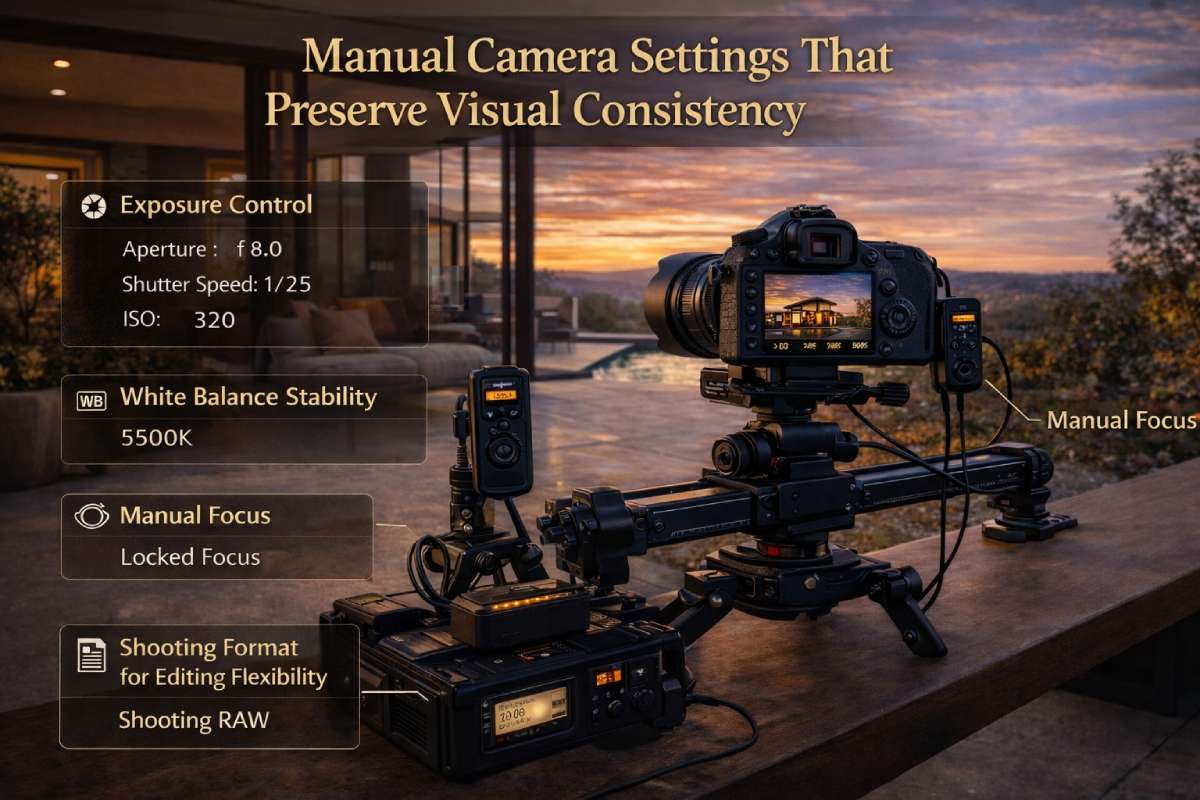
Exposure Control
Manual exposure keeps brightness consistent across thousands of images. When filming spaces with natural light transitions, small automatic adjustments can create visible flickering in the final video.
Professional approach:
· Set aperture based on desired depth and architectural clarity
· Adjust shutter speed to balance motion feel and brightness
· Maintain ISO as low as possible to preserve detail in textures and surfaces
White Balance Stability
Auto white balance may shift color temperature as lighting changes throughout the day. Manually setting white balance ensures that walls, flooring, and furnishings maintain consistent tones, particularly important for branded real estate marketing content.
Manual Focus
Even minor autofocus adjustments between frames can cause subtle flickering or softness. Once the scene is sharp, lock focus and avoid further adjustments unless the composition changes.
Shooting Format for Editing Flexibility
RAW image capture provides greater flexibility during post, production, especially when correcting exposure variations or balancing interior and exterior light levels. While RAW increases file size, it significantly improves editing precision, an advantage when refining high, end property visuals.
3.3. Choosing the Right Shooting Interval Based on Real Estate Scenarios
Intervals determine how time compresses into motion. Selecting the correct timing is one of the most influential decisions within professional time lapse property video techniques, shaping both the visual rhythm and storytelling pace.
Below is a practical reference used in many real estate production workflows:
|
Real Estate Scenario |
Suggested Interval |
Typical Capture Duration |
Final Video Feel |
|
Interior daylight transitions |
10–30 seconds |
6–10 hours |
Smooth, atmospheric lighting changes |
|
Construction progress |
5 minutes – 1 hour |
Weeks to months |
Dramatic transformation overview |
|
Landscaping or staging updates |
30 seconds – 5 minutes |
1–7 days |
Gradual visual improvement |
|
Cloud movement / golden hour exteriors |
1–5 seconds |
30–60 minutes |
Dynamic sky and lighting motion |
General guideline:
Shorter intervals = smoother motion and higher visual energy
Longer intervals = stronger transformation emphasis with fewer frames
Choosing intervals strategically helps align the time lapse with marketing goals, whether the objective is emotional atmosphere or proof of project progress.
3.4. Professional Workflow for Setting Up a time lapse Shoot
Experienced real estate creators often follow a simple but structured workflow before pressing record:
· Define the Story Goal: Are you showing lifestyle atmosphere, architectural flow, or construction progress?
· Evaluate Lighting Conditions: Identify potential exposure shifts caused by windows, weather, or sunset timing.
· Determine Final Video Length: Work backward from your intended output duration to calculate frame count and interval timing.
· Run a Short Test Sequence: Capture several minutes of footage and review exposure stability and composition before committing to long sessions.
· Lock Settings and Monitor Power: Once stable, secure all settings and confirm battery and storage readiness.
This structured approach reduces errors and saves significant time during editing.
3.5. Common Mistakes That Weaken Real Estate time lapse Quality
Even technically capable creators can run into issues that reduce the professional feel of a sequence:
· Exposure Flicker: Caused by auto settings or inconsistent lighting control
· Unstable Framing: Minor camera movement becomes exaggerated in compressed playback
· Intervals That Don’t Match the Subject: Too fast for construction or too slow for cloud movement
· Overly Long Clips Without Pacing Variation: Leads to viewer fatigue and reduced engagement
· Ignoring Editing Needs During Shooting: Poor framing or inconsistent settings create heavy post, production challenges
Recognizing these pitfalls early helps creators refine their workflow and capture footage that transitions smoothly into the editing phase.
3.6. Expert Checklist Before Starting Your time lapse Capture
Camera fully set to manual mode
· White balance and focus locked
· Interval calculated based on final output goal
· Tripod secured and vibration minimized
· Power supply verified for full session duration
· Storage capacity checked for RAW capture volume
· Test sequence reviewed for exposure stability
A disciplined setup process allows real estate professionals to focus on storytelling rather than troubleshooting during editing.
4. Creating Motion with time lapse Variations
4.1. How Movement Transforms time lapse Property Video Techniques into Cinematic Storytelling
A static time lapse can capture change, but motion creates immersion. In real estate marketing, where the goal is not just to show a property but to help viewers feel the space, subtle camera movement can dramatically increase engagement. When used intentionally, motion, driven time lapse property video techniques guide the viewer’s attention, reveal architectural depth, and simulate the natural experience of walking through a home or exploring a development.
Instead of presenting isolated moments, motion helps build continuity. It turns a sequence into a visual journey, something especially valuable when showcasing luxury properties, large, scale developments, or spaces designed with strong architectural flow.
4.2. Standard time lapse vs. Hyper lapse: Choosing the Right Approach
Understanding the difference between motion styles allows creators to select the technique that best aligns with the story they want to tell.
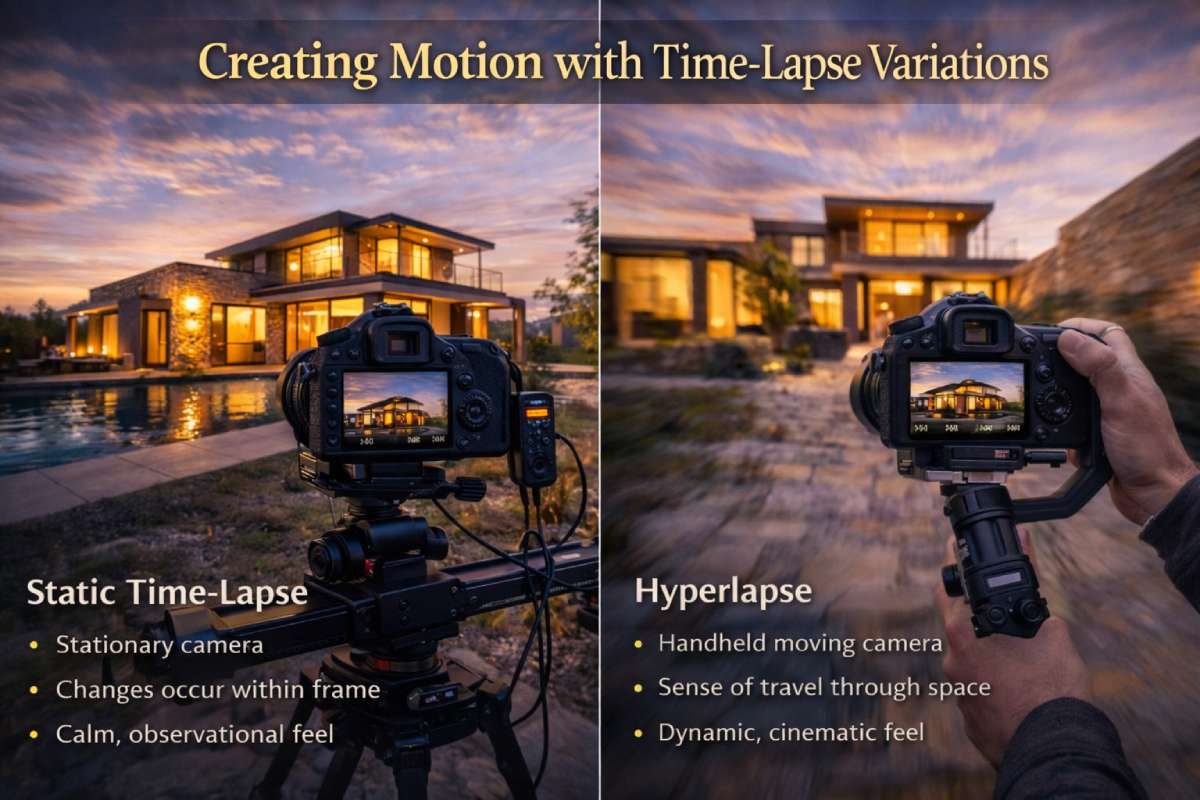
Static time lapse
The camera remains fixed while environmental changes occur within the frame. This approach is ideal for:
· Natural light transitions through living spaces
· Exterior environmental changes such as clouds or street activity
· Construction progress from a consistent viewpoint
· Establishing shots that emphasize scale and stability
Static time lapse often feels calm and observational, useful when the goal is to highlight atmosphere rather than movement.
Hyper lapse
Hyper lapse introduces physical camera movement between frames, creating a dynamic sense of travel through space. In real estate, hyper lapse is commonly used for:
· Simulated walkthrough experiences
· Exterior approach sequences toward an entrance
· Neighborhood exploration shots
· Long corridors or architectural pathways
While hyper lapse adds energy and cinematic impact, it also increases technical complexity and requires careful stabilization and editing to maintain a professional look.
4.3. Motion Tools That Enhance Real Estate time lapse Production
Professional creators often rely on specialized equipment to achieve smooth and controlled movement:
Motorized Sliders
Sliders introduce slow horizontal motion that adds depth without overwhelming the viewer. They work particularly well when:
· Revealing kitchens or countertops
· Tracking across balconies or terraces
· Emphasizing architectural lines
Subtle motion helps viewers notice spatial relationships that might otherwise go unnoticed.
Robotic Pan and Tilt Heads
These systems allow gradual directional movement throughout the time lapse sequence. They are commonly used to:
· Sweep across wide living spaces
· Tilt upward through multi, story interiors
· Reveal building height or ceiling architecture
The controlled motion feels intentional and refined, aligning well with high, end property marketing.
Handheld Hyper lapse Techniques
More advanced creators may manually reposition the camera between shots to simulate travel through space. While this approach offers flexibility, it requires careful planning and strong post, production stabilization to achieve a smooth result.
This method is particularly effective for:
· Walkthrough, style reveals
· Exterior pathways or landscaping tours
· Showing connections between indoor and outdoor living areas
Stabilization Systems and Gimbals
When capturing moving sequences, stabilization tools help maintain consistent framing and reduce motion irregularities that become exaggerated during playback. Proper stabilization ensures that movement feels cinematic rather than chaotic.
4.4. Decision Framework: When Should You Add Motion to a time lapse?
Before introducing movement, experienced real estate creators often ask:
· Does motion help viewers understand the layout or flow of the property?
· Will movement highlight architectural features that static shots cannot capture?
· Is the property large enough to benefit from spatial exploration?
· Does the marketing goal focus on lifestyle immersion rather than documentation?
If motion adds clarity or emotional engagement, it’s worth incorporating. If the purpose is purely to track environmental change, such as construction progress, a stable viewpoint may be more effective.
4.5. Common Motion Mistakes That Reduce Professional Quality
Even well, intentioned movement can undermine a project if not executed carefully:
· Excessive motion that distracts from property details
· Inconsistent movement speed between frames
· Poor stabilization leading to jittery playback
· Complex hyper lapse sequences without proper editing planning
· Overusing motion where a static perspective would feel more natural
Strategic restraint often results in a more refined viewing experience.
4.6. Motion and Post, Production: Two Parts of the Same System
While motion elevates storytelling, it also increases editing complexity. Stabilization adjustments, speed control, motion blur, and pacing refinement all play a major role in achieving a smooth final result. This is why many real estate teams treat motion capture and post, production as interconnected phases, planning camera movement with editing in mind from the beginning.
When motion is captured intentionally and refined during editing, time lapse property video techniques evolve from simple visual effects into cinematic narratives that keep viewers engaged and emotionally connected to a property.
5. Post, Production Techniques That Elevate Real Estate time lapse Videos
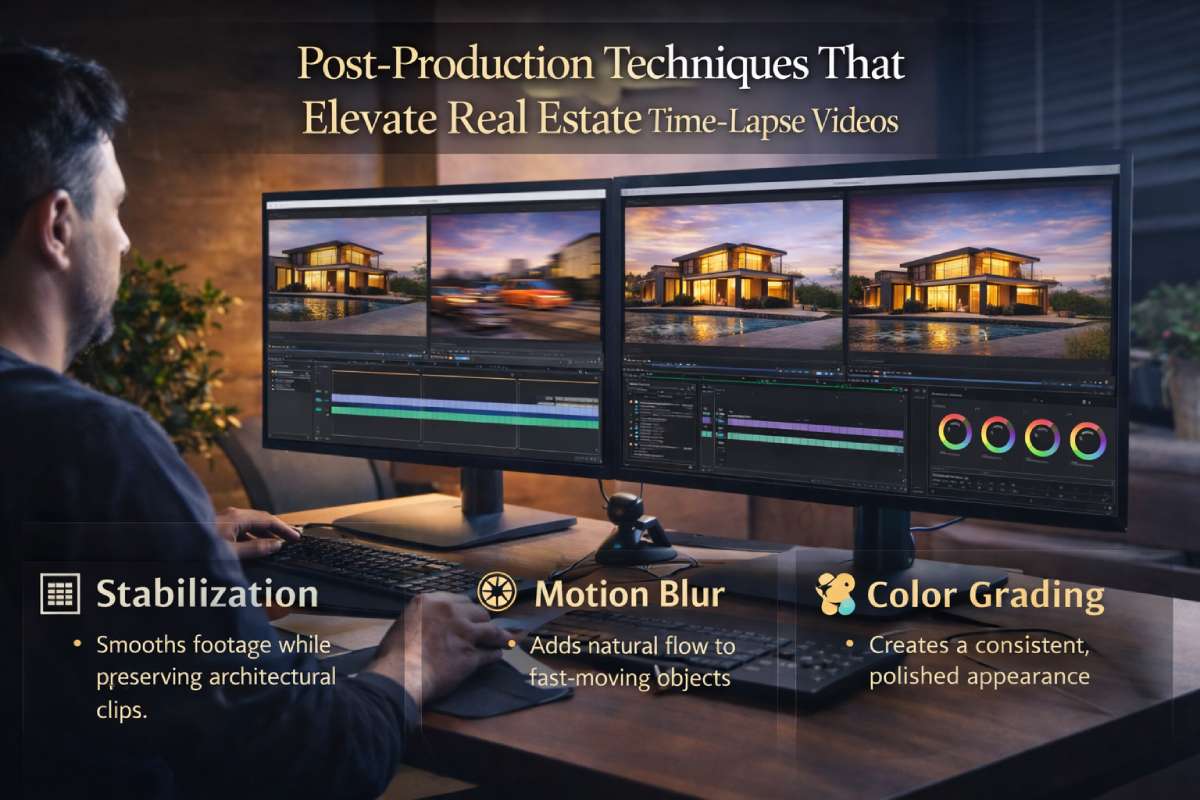
5.1. Where Raw Footage Becomes a Compelling Marketing Story
Capturing strong footage is only the beginning. The true impact of time lapse property video techniques emerges during post, production, the stage where thousands of individual frames are shaped into a cohesive narrative that feels intentional, immersive, and professionally refined.
In real estate marketing, editing is not simply about assembling clips. It is about protecting architectural integrity, maintaining natural lighting consistency, and guiding the viewer’s emotional experience from the first frame to the last. Thoughtful post, production transforms a technical sequence into a persuasive visual asset that supports listing performance and brand perception.
5.2. Frame Organization and Sequence Preparation
The editing process begins long before color grading or motion effects. Organizing and preparing frames ensures a stable foundation for the entire video.
Professional workflow often includes:
· Reviewing image sequences for interruptions or inconsistencies
· Removing frames affected by sudden movement or exposure anomalies
· Aligning sequences to maintain structural accuracy in architectural lines
· Synchronizing multi, day or multi, camera captures when documenting long, term projects
A carefully prepared sequence reduces editing friction and improves final playback smoothness.
5.3. Stabilization and Visual Flow Refinement
Even with careful shooting, subtle vibrations or environmental factors can introduce unwanted movement. Stabilization helps maintain the calm, polished feel expected in professional real estate visuals.
Editors typically focus on:
· Correcting micro, movement in long static sequences
· Refining handheld or hyper lapse motion
· Preserving natural camera motion while removing visual distractions
· Maintaining geometric accuracy of vertical and horizontal lines
Stabilization is particularly important for luxury listings where visual precision strongly influences perceived value.
5.4. Motion Blur and Natural Movement Enhancement
Because time lapse compresses time, movement can sometimes feel mechanical or overly sharp. Thoughtful motion blur restores a sense of realism and fluidity.
This technique helps:
· Smooth fast, moving elements such as shadows or vehicles
· Reduce harsh transitions between frames
· Create a cinematic pacing that feels organic rather than artificial
Applied carefully, motion blur enhances realism without overwhelming architectural details.
5.5. Color Grading for Consistency and Brand Alignment
Real estate time lapse often spans multiple lighting conditions, sunrise, midday, sunset, and artificial interior lighting. Professional color grading ensures a cohesive look that enhances both the property and the brand presenting it.
Editing teams typically:
· Balance exposure shifts caused by natural light changes
· Maintain consistent color temperature across long sequences
· Highlight textures, finishes, and architectural materials
· Align final color tone with brand identity or marketing style
A clean, neutral grading style often performs best in real estate because it preserves authenticity while maintaining visual elegance.
5.6. Pacing, Speed Ramping, and Sound Integration
The rhythm of a time lapse directly affects viewer engagement. Skilled editors shape pacing to match emotional beats and storytelling goals.
Common approaches include:
· Speed ramping to emphasize key transitions or reveal moments
· Adjusting playback speed to prevent viewer fatigue
· Integrating music that reflects the property’s positioning, from calm luxury ambience to energetic urban lifestyle
Thoughtful pacing ensures that the viewer remains engaged while absorbing the property’s narrative.
5.7. Export Strategy for Marketing Platforms
Final delivery should consider where the video will be viewed, listing portals, social media platforms, agency websites, or marketing presentations.
Professional export decisions often involve:
· Maintaining high resolution for modern screens
· Balancing file size with playback performance
· Creating multiple versions optimized for different distribution channels
A well, prepared export ensures that the video maintains quality across all viewing environments.
In professional real estate workflows, editing is not an afterthought, it is the stage where time lapse property video techniques become emotionally engaging marketing tools. By shaping visual flow, maintaining consistency, and enhancing storytelling, post, production turns technical footage into persuasive content that supports stronger viewer engagement and brand credibility.
6. Why Professional Editing Support Strengthens time lapse Property Video Techniques
Many real estate professionals successfully capture their own footage. However, transforming thousands of raw images into a cohesive and cinematic time lapse often requires specialized editing expertise. As marketing expectations continue to rise, professional editing has become a critical component of effective time lapse property video techniques, particularly for agencies, developers, and media teams managing multiple listings or large, scale projects.
Professional editors approach time lapse differently from traditional video workflows. Instead of simply assembling frames, they analyze exposure consistency, pacing, movement, and storytelling structure to ensure that each sequence communicates clearly and supports the property’s positioning in the market.
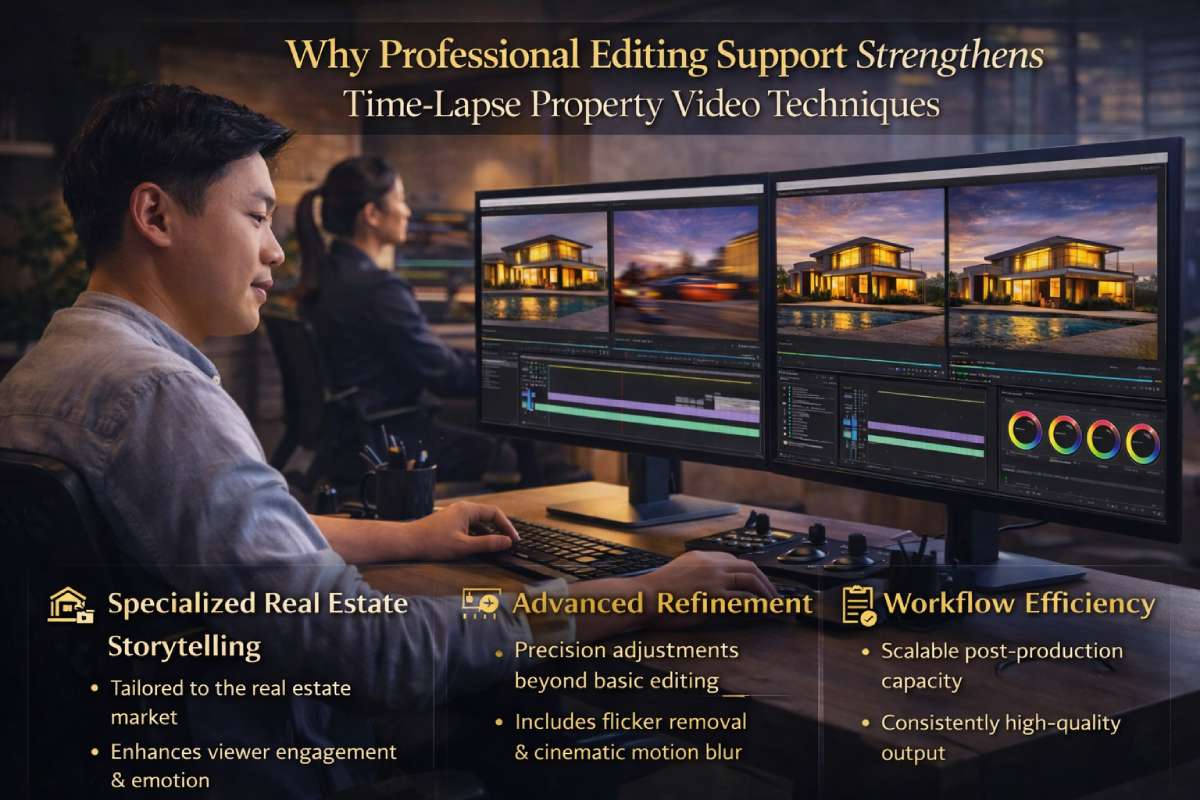
6.1. Specialized Understanding of Real Estate Visual Storytelling
Editors experienced in real estate media understand how buyers view property content. Their focus extends beyond technical correction to include:
· Highlighting architectural features without distortion
· Preserving the emotional tone of interior spaces
· Supporting lifestyle positioning through pacing and music selection
· Maintaining a clean, trustworthy aesthetic aligned with real estate branding
This specialized perspective helps ensure that the final video resonates with the intended audience.
6.2. Advanced Refinement Beyond Basic Editing
Professional editing teams often apply techniques that significantly improve viewing experience:
· Frame, level exposure and color correction
· Flicker removal from long, duration sequences
· Precision stabilization for hyper lapse motion
· Cinematic motion blur and speed control
· Brand, aligned overlays and graphic elements
These refinements can dramatically increase the perceived production value of a listing.
6.3. Workflow Efficiency for Scalable Real Estate Marketing
For agencies and developers managing multiple properties simultaneously, outsourcing post, production allows internal teams to focus on filming, client relationships, and marketing strategy.
Professional editing support helps:
· Maintain consistent visual quality across projects
· Meet tight campaign deadlines
· Deliver multiple content formats for different platforms
· Scale media production without overloading internal resources
Efficiency becomes especially important when producing regular listing content or documenting long, term construction projects.
6.4. Bridging the Gap Between Capture and Marketing Impact
Even well, captured footage may require significant refinement to reach a professional standard. Experienced editing teams bridge the gap between technical capture and strategic marketing, shaping pacing, tone, and visual narrative so that the final video supports buyer engagement rather than simply documenting change over time.
In many professional real estate workflows, creators focus on capturing authentic moments on site while specialized editors transform those moments into polished assets ready for marketing campaigns.
6.5. Supporting Consistent Brand Presentation
For agencies building long, term recognition, consistent visual style across listings is essential. Professional editing ensures that every time lapse video aligns with brand guidelines, creating a cohesive presence across websites, social platforms, and advertising materials.
Consistency builds trust, and trust influences how buyers perceive both the property and the professionals presenting it.
Closing Thought Before the Conclusion
When thoughtfully captured and expertly refined, time lapse property video techniques become more than a technical effect, they become a storytelling tool that communicates progress, atmosphere, and lifestyle in a way static visuals cannot achieve. By combining strong on site capture with strategic editing, real estate professionals can create content that keeps viewers engaged and strengthens the overall impact of their marketing efforts.
Follow Fotober:
- Facebook: fotobermedia.co
- Instagram: fotober_media
- YouTube: @Fotober
Related posts
Las Vegas Virtual Staging: Best Platforms to Enchant Your Listings
July 23, 2026

Best Austin Real Estate Photography Options for Perfect Listing Photos
July 22, 2026
Best Aperture for Real Estate Photography: The Range for Sharp Photos
July 18, 2026
Short-Term Rental Photography: Shoot & Edit Photos That Gain Bookings
July 17, 2026
