
How to Edit Photos for Real Estate: Tips for Perfect Listing Images

Share:
Table of Contents
- 1. Why real estate photo editing is non-negotiable
- 2. How to edit photos for real estate: A step-by-step technical guide
- 3. Advanced real estate image enhancement techniques for 2026
- 4. DIY vs. professional outsourcing of real estate image enhancement
- 5. Fotober: Your professional real estate photo editing partner
- 6. Conclusion
In the high-stakes world of modern real estate, the first showing happens on a five-inch smartphone screen. With thousands of listings vying for attention, a split-second scroll is all the time you have to capture a buyer's imagination. Raw photos, however, often suffer from dull lighting, distortion, or distracting clutter that masks a property's true potential.
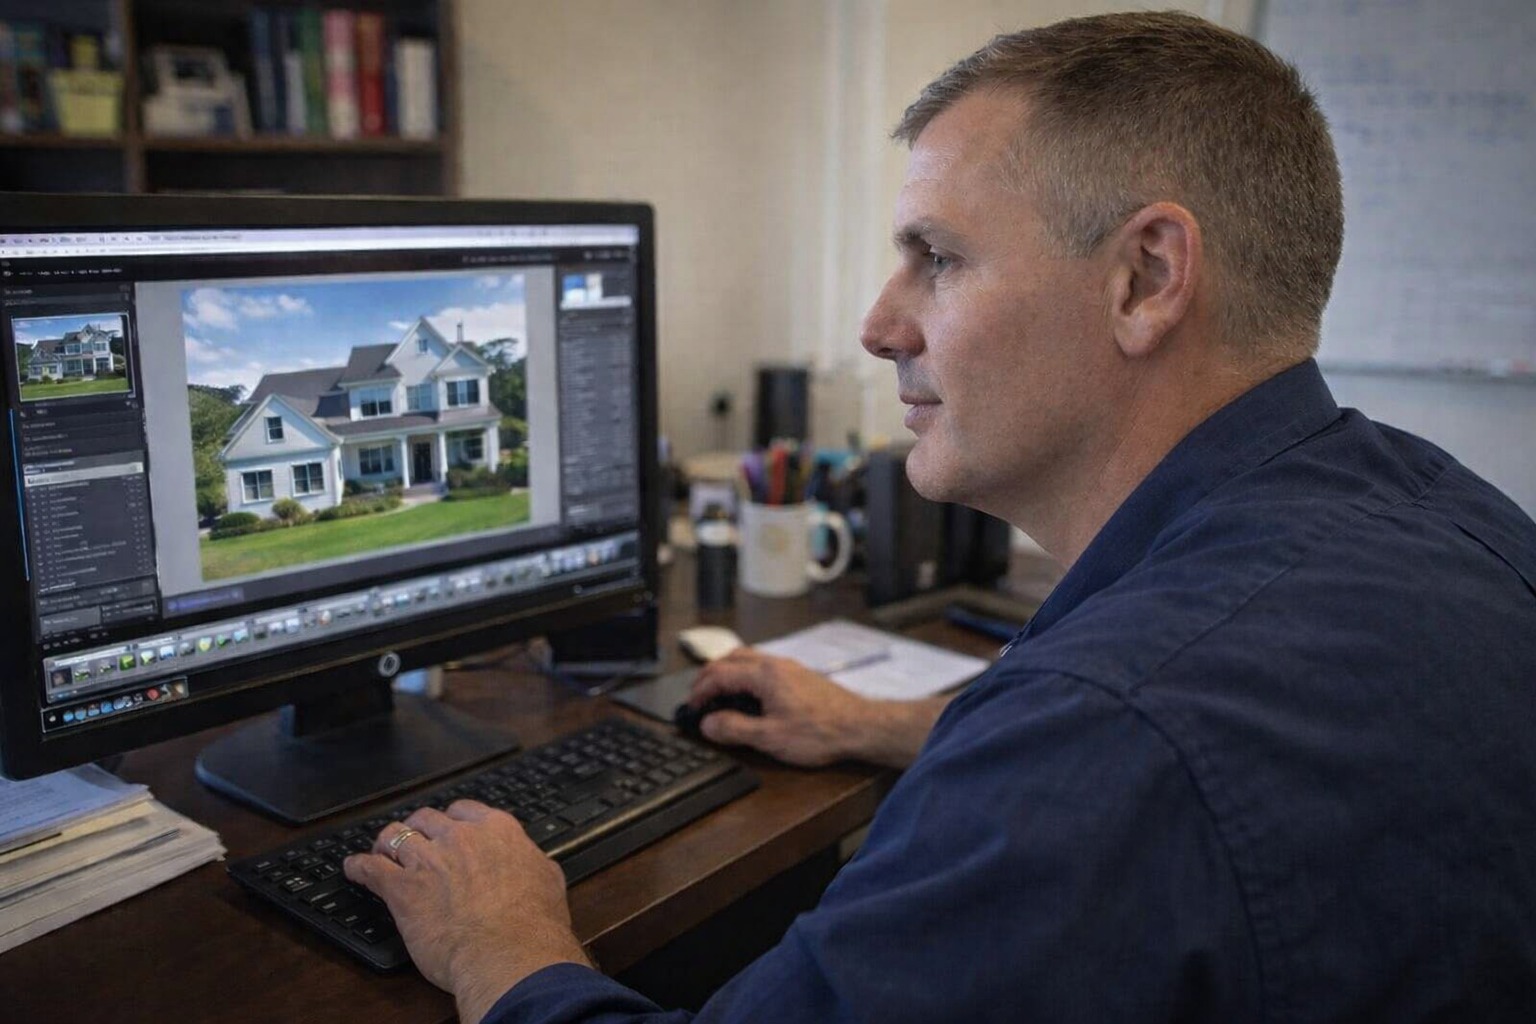
Post-production has become a requirement for closing deals faster and at higher prices. Professional editing can transform a bare space into an inviting home. Whether you are a DIY enthusiast or looking to scale your business by outsourcing to industry experts like Fotober, this comprehensive guide is your roadmap to mastering how to edit photos for real estate, effectively turning pixels into profit.
1. Why real estate photo editing is non-negotiable
In the digital-first era of property sales, "digital curb appeal" has replaced the physical front yard as the primary driver of buyer interest. You may ask why we should be figuring out how to edit photos for real estate. First and foremost, it is about emotional resonance. A raw camera file might capture a room's dimensions, but professional editing captures its soul. By balancing color temperatures and lifting heavy shadows, an editor transforms a sterile space into a warm, inviting sanctuary where a buyer can actually visualize their future.
Furthermore, the financial statistics are impossible to ignore. Industry data consistently shows that listings featuring high-quality, professionally edited photos sell significantly faster, often up to 32% quicker, than those with amateur imagery. In a market where every extra day on the listing site costs the seller money, the ROI of professional enhancement is immediate. It isn’t just about making things look "pretty"; it’s about establishing perceived value. A bright, crisp, and clean photo signals to a buyer that the home is well-maintained and worth the premium asking price.
 RAW photos preserve all the precious details, which won’t be revealed without proper editing.
Finally, your photos are a direct reflection of your professional brand. Whether you are an independent photographer or a high-volume real estate agency, the consistency of your visual portfolio dictates your market reputation. Utilizing a streamlined editing workflow, or partnering with a specialized service like Fotober, ensures that every property you represent meets a high-performance standard.
In a sea of mediocre smartphone snapshots, polished imagery acts as a powerful filter, attracting serious buyers and high-intent leads. Without professional editing, you aren't just losing out on aesthetic points; you are leaving money on the table and slowing down the velocity of your sales cycle. In 2026, if your photos aren't perfect, your listing is essentially invisible.
2. How to edit photos for real estate: A step-by-step technical guide
Transforming a raw image into a high-end listing photo requires more than just a few filters; it demands a systematic technical workflow. By following a structured process, you ensure that every image is not only visually stunning but also technically accurate. Here is the professional step-by-step guide to mastering the real estate photo editing workflow.
2.1. Color correction
Real estate photography editing relies on precise white balance and color correction to ensure accurate color representation across all property images, creating a cohesive and appealing presentation.
Professional editors begin by establishing proper white balance. This critical step ensures whites appear truly white, not bluish or yellowish. Room colors should match their real-world appearance, particularly important for showcasing interior design elements and materials.
 Real estate photos often suffer from mixed indoor and outdoor lighting, resulting in undesirable color casts.
Advanced color correction includes:
- White balance temperature
- Tint correction
- Saturation balance
- Individual color channel adjustment
- Global color grading.
Real estate interiors are often a "battle of the bulbs." You might have warm, yellow light from a tungsten lamp competing with cool, blue light coming through a window. This results in distracting unwanted color casts that make white walls look muddy or yellow.
To fix this, use the eyedropper tool in your RAW editor to select a neutral gray or white area in the room. You must balance the color temperature (Kelvin) and tint until the whites look clean. Pay special attention to wood floors and cabinetry; you want them to look rich and natural, avoiding the "radioactive orange" look that happens when saturation is pushed too high. Using the HSL (Hue, Saturation, Luminance) panel to desaturate specific yellow or blue casts is a standard professional move.
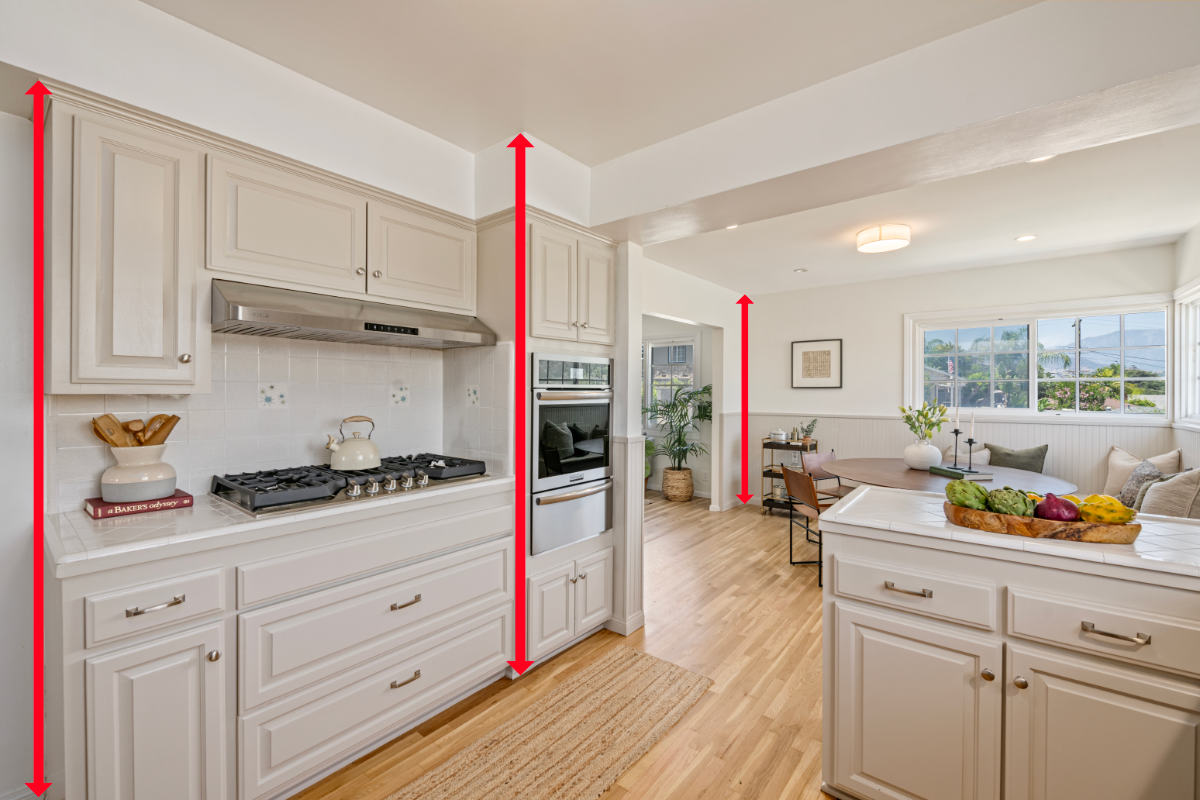
2.2. Straightening lines and correcting verticals
Vertical line correction represents one of the most crucial aspects of property photo editing. This process ensures all architectural elements appear properly aligned, creating a professional and polished appearance. Professional editors focus on key structural elements that immediately catch a viewer's eye.
 Maintaining straight vertical lines and a perfect level horizon are essential for professional real estate photos.
Common elements requiring vertical alignment include:
- Door frames and window edges
- Wall corners and baseboards
- Cabinet lines and countertops
- Building exterior edges
- Ceiling and floor lines.
The correction process requires careful balance to maintain a natural perspective. Editors who know how to edit photos for real estate use specialized tools to adjust convergence while preserving the authentic feel of the space, ensuring the final image appears both professional and realistic.
In the editing phase, your first task is to use the Transform panel in Adobe Lightroom or the Camera Raw filter in Photoshop. By using the "Upright" tool or manual vertical sliders, you can straighten the architecture. This restores geometric integrity to the room, making it look stable and professionally shot. Failure to do this is the quickest way to make a professional listing look amateur.
2.3. Light adjustment
Real estate photography editing tips emphasize light balancing to transform flat or poorly lit photos into bright, inviting images. Professional editors ensure natural-looking illumination that highlights architectural features while maintaining proper exposure across the entire frame.
 Enhancing the exposure and evenness of light across the frame can make a real estate look more appealing.
The process involves careful manipulation of exposure, highlights, shadows, and contrast. Editors often work with multiple adjustment layers to target specific areas of the image independently. This selective approach allows for precise control over brightness levels in different parts of the room.
Common lighting challenges include:
- Window exposure recovery
- Shadow detail enhancement
- Highlight protection
- Room brightness optimization
- Light direction consistency.
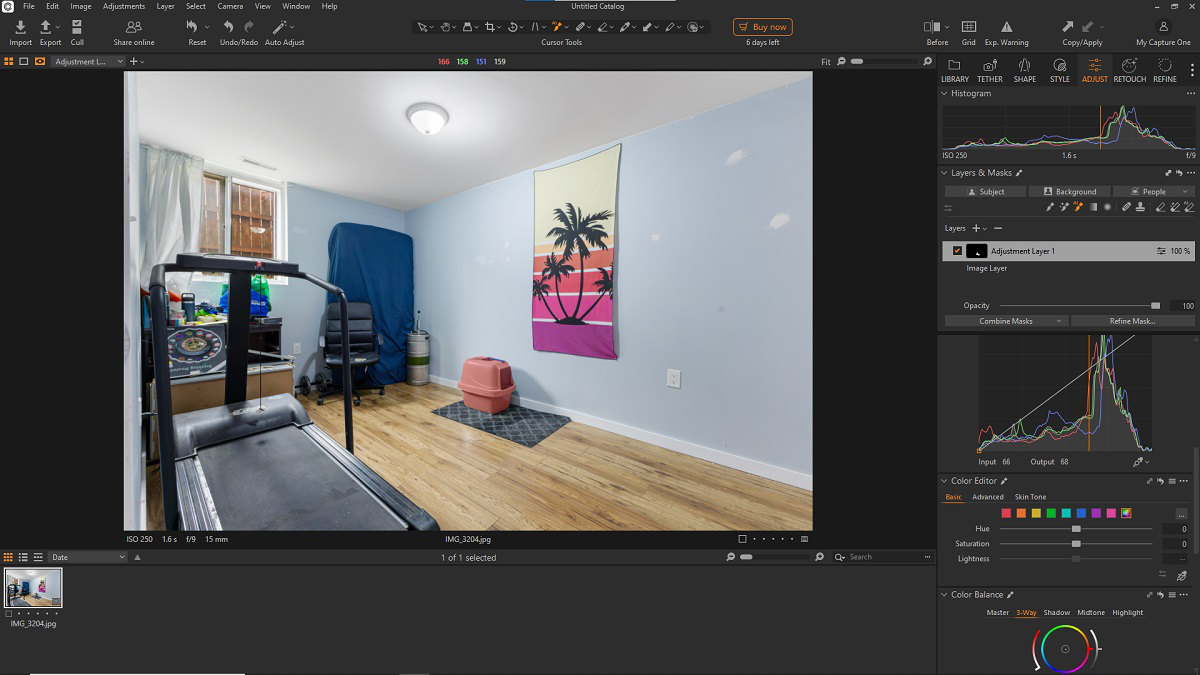
2.4. Cloning and retouching
Professional retouching enhances property presentation while maintaining photography integrity. This technique requires precise attention to detail and understanding of what elements can be ethically removed or modified. Editors focus on temporary imperfections that distract from the property's core features.
 Sometimes the photos need subtle cleanups to remove distracting elements.
Common retouching elements include:
- Electrical cords and outlets
- Minor wall scuffs
- Temporary fixtures
- Distracting reflections
- Seasonal debris.
The key to successful retouching lies in maintaining natural appearances while improving overall image appeal. Professional editors ensure all modifications blend seamlessly with surrounding areas, creating clean, polished results.
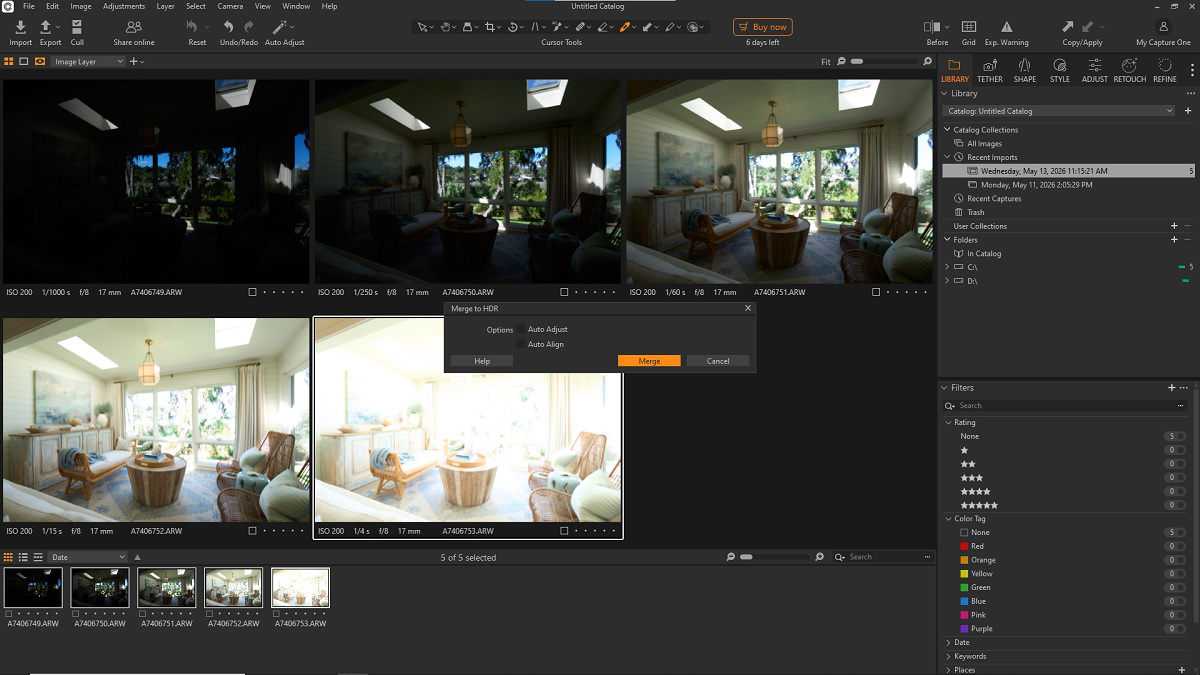
2.5. Mastering light with HDR processing
HDR processing combines multiple exposures to capture the full range of light in real estate scenes. This technique proves essential for rooms with extreme contrast, such as interiors with bright windows or dark corners. Professional editors carefully blend exposure brackets to create natural-looking results.
 HDR bracketing helps overcome the limited dynamic range of the camera sensor.
Critical HDR considerations include:
- Highlight preservation
- Shadow detail recovery
- Color consistency
- Texture maintenance
- Natural contrast levels.
The success of HDR processing depends on subtle application and careful attention to detail. Professional editors focus on creating results that showcase the property's features while avoiding the artificial appearance common in over-processed HDR images.
Using software like Photomatix or Lightroom’s built-in HDR Merge, you blend multiple bracketed exposures, usually 3 to 5 frames, ranging from dark to bright. This technique allows you to "pull" the detail from the windows while keeping the interior shadows bright and clean. For a more natural look, many editors use the flambient photography (flash + ambient) approach, manually masking flash layers over ambient layers in Photoshop to achieve crisp colors and perfect exposure balance.
2.6. Lens correction
Lens correction addresses optical distortions inherent in wide-angle photography. Real estate photographers often use wide-angle lenses to capture entire rooms, but these lenses can introduce barrel distortion and chromatic aberration that need correction in post-processing. Proper real estate photography editing minimizes these distortions, resulting in more accurate and visually appealing property images.
 The door looks warped due to barrel distortion, which requires proper correction.
Common lens corrections include:
- Barrel distortion removal
- Chromatic aberration correction
- Vignette adjustment
- Corner sharpness enhancement
- Perspective distortion fixes.
Professional editors analyze each image for specific lens-related issues and find how to edit photos for real estate. They apply corrections based on lens profiles and manual adjustments to achieve a natural-looking perspective. This process requires understanding both the technical aspects of lens distortion and the aesthetic impact of corrections.
2.7. Remove unwanted objects
Object removal requires both technical skill and ethical judgment. While editors can remove temporary items like garbage bins or parked cars, permanent property features must remain untouched to maintain marketing integrity.
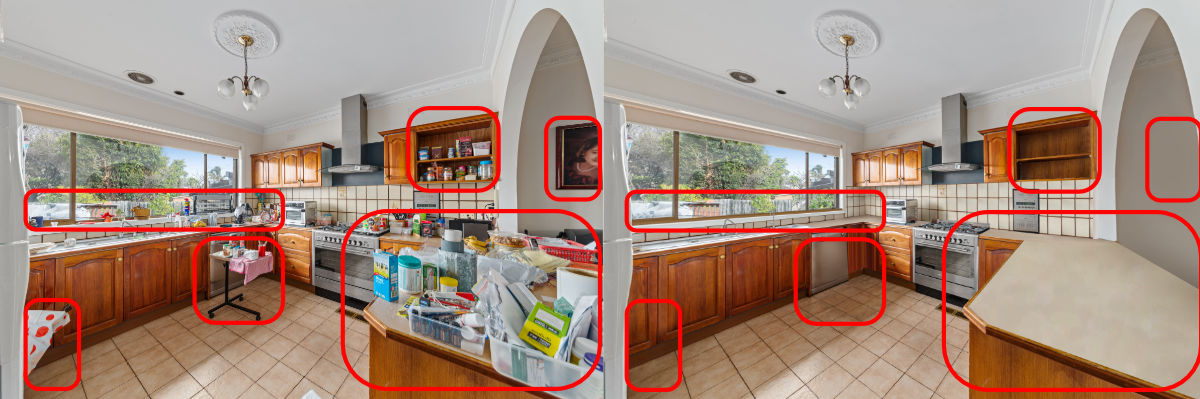 Removing an excessive amount of items requires specialized tools and a deep understanding of architecture.
The removal process involves sophisticated techniques:
- Content-aware filling
- Pattern-based cloning
- Texture reconstruction
- Perspective matching
- Shadow maintenance.
The removal process requires seamless integration with surrounding areas. Professional editors ensure modifications match existing textures, lighting, and perspectives to maintain natural appearances. In 2026, Generative AI and Content-Aware Fill tools have revolutionized this step. Use the Patch Tool or Healing Brush in Photoshop to "digitally declutter" the space. Removing small distractions allows the buyer to focus on the home's features rather than the current owner's belongings. However, remember the ethical line: remove temporary clutter and blemishes, but never hide permanent structural defects.
2.8. Sky replacement
Sky replacement enhances exterior real estate photos while maintaining natural lighting conditions. This technique can transform ordinary property photos into compelling marketing assets, particularly important for twilight shots and overcast days. Professional editors focus on creating realistic results that complement the property's features.
 The property can look much more stunning with a vivid sky.
Key considerations include:
- Light direction matching
- Color temperature balance
- Cloud pattern selection
- Reflection updates
- Edge detection accuracy.
Success in sky replacement requires careful attention to environmental consistency. Professional editors ensure new skies blend naturally with existing elements while maintaining authentic lighting conditions across the entire image.
2.9. The final touch
Once these technical steps are complete, a final pass for sharpness and noise reduction ensures the file is ready for high-resolution web displays. While this process is highly effective, it is also time-consuming. For high-volume photographers, performing these eight (!!!) steps for 30+ images per listing can take hours. This is why many top-tier professionals handle the shooting themselves and then partner with a specialized service like Fotober to execute this technical workflow with precision and speed.
3. Advanced real estate image enhancement techniques for 2026
As we move through 2026, the boundary between traditional photography and digital artistry has virtually disappeared. Advanced editing techniques are no longer reserved for ultra-luxury penthouses; they have become the baseline for any competitive listing. To stay ahead, photographers learning how to edit photos for real estate must look beyond basic color correction and embrace these high-impact digital solutions.
The most significant shift is the evolution of AI-powered virtual staging for real estate. Gone are the days of "flat" digital furniture that looks out of place. Today’s sophisticated rendering allows editors to match the exact light bounce, shadows, and textures of a room. This allows Realtors to showcase an empty property in multiple styles, from "Modern Industrial" to "Luxury Traditional", helping diverse buyer demographics visualize the space's potential without the massive logistical costs of physical staging.
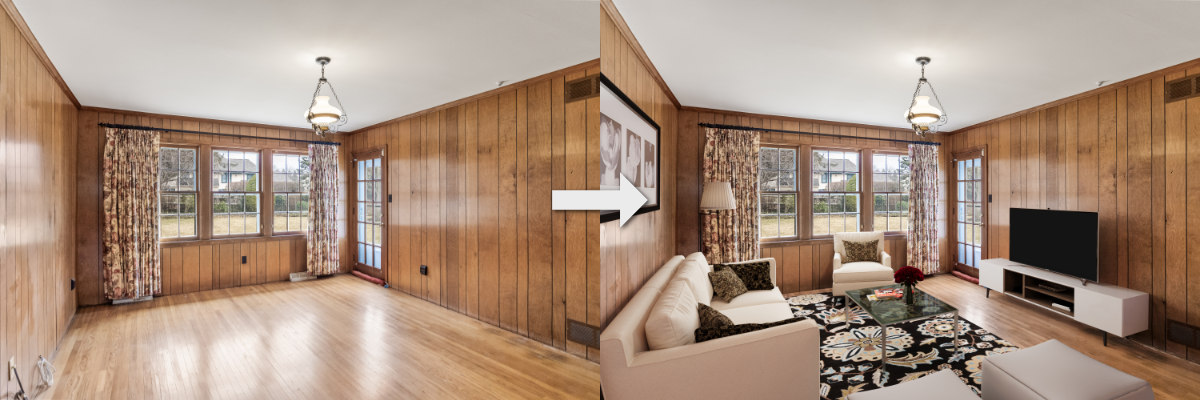 Virtual staging is increasingly integrated in real estate photo editing to provide a layer of potential to the property.
Another powerhouse technique is virtual twilight (day-to-dusk) conversion. Authentic twilight shoots are notoriously difficult to schedule and highly weather-dependent. Advanced editors can now digitally transform a photo taken in harsh midday sun into a stunning "golden hour" masterpiece. By "turning on" interior lights, adding a warm glow to window panes, and replacing a flat sky with a gradient sunset, editors create a romantic, high-end atmosphere that is proven to increase click-through rates on listing portals.
Finally, we are seeing the rise of integrated visual assets. High-end editing now often includes syncing enhanced photos with 2D or 3D floor plans. This holistic approach ensures that the "digital twin" of the home is both beautiful and informative. While these advanced techniques once required days of manual labor, specialized teams like Fotober now execute them with surgical precision and rapid turnaround. By leveraging these 2026 innovations, you aren't just displaying a property; you are selling a curated lifestyle that captures the buyer's imagination instantly.
4. DIY vs. professional outsourcing of real estate image enhancement
Deciding whether to handle real estate photo editing in-house or to outsource it is a critical "fork in the road" for photographers and agents alike. While the DIY approach offers total control, it often comes with hidden costs that can stall your business growth.
From my experience editing a huge load of photos myself for many years, even if you know how to edit photos for real estate like the back of your hand, the most significant resource you lose in the process is opportunity cost. For a professional, time is the most valuable currency. Spending five hours meticulously masking windows and straightening vertical lines in Photoshop is five hours not spent shooting new properties, networking with high-end clients, or closing deals. In the fast-paced 2026 market, the "velocity" of your workflow determines your income.
 Editing all the photos yourself is an impressive feat. But is it worth it?
Furthermore, there is a consistency gap. Real estate photography relies on a cohesive visual narrative; if the living room looks bright and airy but the kitchen appears muddy due to a difficult white balance issue, the listing feels disjointed. Achieving professional-grade consistency across varied lighting conditions requires a level of technical mastery that takes years to refine. Amateur DIY efforts often result in the "nuclear" look, over-saturated colors and unnatural HDR glows, which can actually repel sophisticated buyers.
Finally, consider scalability. A solo photographer can manage editing for one or two listings a week, but what happens during the spring rush when you have five shoots a day? Outsourcing to a specialized team like Fotober provides an elastic workforce that scales with your needs. It transforms editing from a stressful midnight chore into a streamlined business process, ensuring every listing hits the market with "magazine-quality" polish, regardless of your schedule.
5. Fotober: Your professional real estate photo editing partner
When it comes to high-volume, high-quality production, Fotober stands as a premier global partner for real estate photographers and agencies. Understanding that every hour a listing is off the market is a missed opportunity, Fotober has built a workflow designed for speed, precision, and aesthetic excellence. By combining the artistic intuition of expert editors with the latest AI-driven enhancements, Fotober ensures that your imagery does more than just show a property; it tells a compelling story.
5.1. A comprehensive suite of photo editing services
Fotober offers a full spectrum of post-production solutions tailored to the needs of the 2026 real estate market:
- Standard image enhancement: This covers the essentials: brightness, contrast adjustment, color correction, and sharpness, ensuring every shot looks crisp and professional.
- Expert HDR blending: Fotober’s editors, knowing fully how to edit photos for real estate, specialize in merging bracketed exposures to create a balanced, natural look that flawlessly showcases both the interior details and the exterior views through the windows.
- Virtual staging: Transform cold, empty shells into warm, livable homes. Fotober provides a vast library of modern furniture and decor styles to help buyers visualize the true potential of any space.
- Floor plan redraws: Beyond photography, Fotober creates clean, accurate 2D and 3D floor plans that provide essential context to the visual tour.
 Fotober provides comprehensive photo editing services for real estate.
5.2. The Fotober advantage
What sets Fotober’s real estate photo editing services apart is a commitment to the "three pillars" of real estate media: Speed, quality, and scalability.
Rapid turnaround: In an industry where time is of the essence, Fotober typically delivers completed projects within 12 to 24 hours, allowing you to get listings live faster than the competition.
Precision and quality control: Every image undergoes a rigorous quality check. While AI helps with efficiency, human editors ensure that vertical lines are perfectly straight and color casts are entirely removed.
Cost-effectiveness: Fotober offers competitive, value-driven pricing models that allow photographers to increase their profit margins by reducing their own time spent behind the computer.
 We create polished images with consistent quality and fast turnaround.
Whether you are an individual photographer looking to reclaim your weekends or a large agency managing hundreds of listings monthly, Fotober provides the scalable infrastructure you need to thrive. By partnering with Fotober, you aren't just outsourcing tasks; you are upgrading your brand’s visual standard.
6. Conclusion
In the competitive landscape of 2026 real estate, professional photo editing is no longer a luxury; it is a vital bridge between a physical structure and a buyer’s dream. By mastering how to edit photos for real estate with technical workflows like HDR blending and geometric correction, you transform raw data into an emotional experience.
Remember, quality editing isn’t about misrepresentation; it’s about revealing a property's true potential under the best possible light. Whether you choose to refine your DIY skills or leverage the expert efficiency of Fotober, your goal remains the same: to captivate and convert. Ready to elevate your visual brand? Partner with Fotober today and turn your listings into high-performance assets.
Follow us on social media to gain more useful real estate photography tips, updated insights into the property market, and our latest editing projects.
- Facebook: fotobermedia.co
- YouTube: Fotober
- TikTok: @fotober
- Instagram: fotober_media.

.png)
.png)
.png)
