
DIY Virtual Staging: A Guide to Enhance Property Listings

Share:
Table of Contents
In the competitive real estate market, captivating visual representations of properties can make all the difference. This is where diy virtual staging comes into play, offering a cost-effective and time-efficient way to present listings without the need for physical staging. Whether you're a seasoned real estate agent or a homeowner looking to sell, understanding how to virtually stage your property can enhance its appeal and ultimately lead to quicker sales.
1. Introduction to DIY Virtual Staging
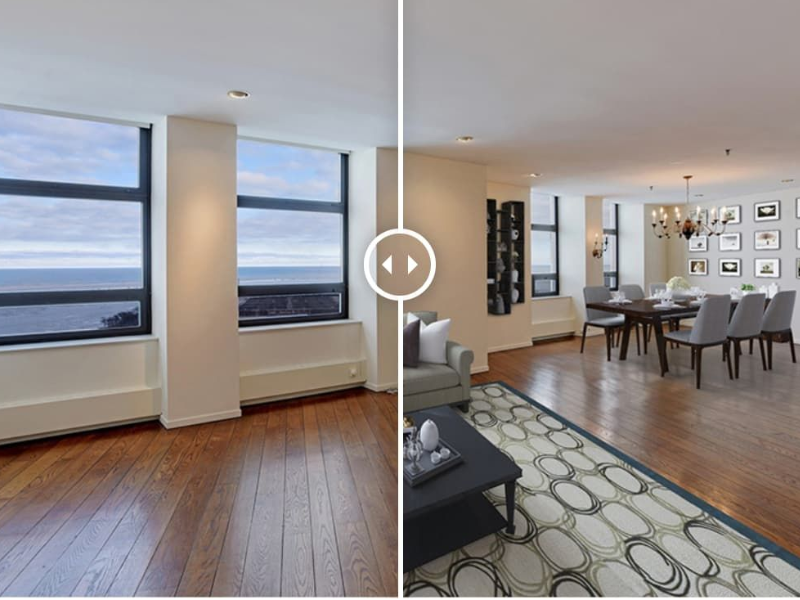
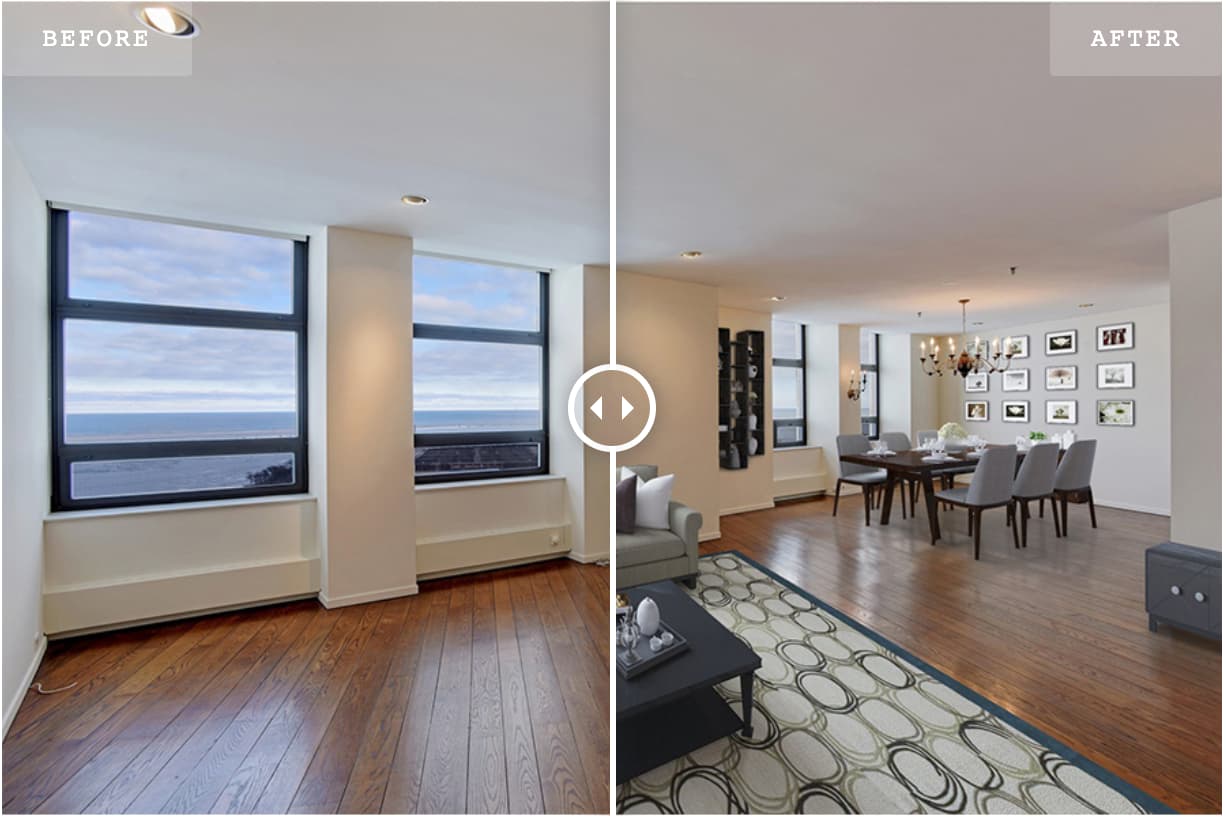
Virtual home staging refers to the process of digitally enhancing photos of empty or sparsely furnished spaces to make them appear more inviting and attractive. Unlike traditional staging, which involves physically arranging furniture and decor, DIY virtual staging uses software tools to add furnishings, wall colors, and decorative elements in a digital format.
This approach has gained immense popularity because of its affordability and flexibility. Homeowners and real estate agents no longer need to invest significant resources in physical staging; instead, they can creatively visualize how a space could look through digital enhancements. With the ongoing advancements in technology, DIY virtual staging offers innovative ways to highlight different aspects of a property, catering to various styles and preferences.
By immersing potential buyers in a beautifully staged environment, the aim is to evoke an emotional response that encourages them to envision themselves living in the space. This transformation can significantly impact the property's perceived value, speeding up the selling process while also attracting a wider audience.
The Benefits of DIY Virtual Staging
DIY virtual staging provides numerous advantages over conventional staging. First and foremost, it can be done at a fraction of the cost. Traditional staging typically requires renting furniture, hiring professionals, and investing in labor, which can quickly add up. In contrast, DIY virtual staging often involves just buying access to software or online services.
Secondly, flexibility plays a key role in the appeal of virtual staging. When working with digital images, you have the freedom to experiment with various designs, styles, and arrangements. You can easily create multiple versions of a space to cater to different buyer demographics, showcasing everything from modern minimalism to classic elegance.
Finally, the speed at which virtual staging can be completed is another noteworthy benefit. With traditional staging, homeowners often face delays related to logistics and coordination. However, when you use virtual staging software, changes can be made rapidly, allowing you to keep pace with market demands and listing schedules.
2. Tools and Software for DIY Virtual Staging
Before diving into the world of diy virtual staging, it's essential to have the right tools and software in place. There are several applications available that cater to different levels of expertise, ranging from user-friendly options for beginners to more advanced tools for professional users. Understanding what these tools offer will help you determine which one best suits your needs.
Popular DIY Virtual Staging Software
There are numerous software solutions on the market, each with unique features tailored to facilitate the virtual staging process. Some of the most popular options include:
-
RoomSketcher: This tool is exceptionally user-friendly and allows users to create 2D and 3D floor plans effortlessly. It also enables the placement of furniture and decor items directly onto the layout, offering realistic visualizations.
-
Homestyler: Homestyler provides an intuitive drag-and-drop interface that makes it easy to design rooms using a library of real furniture and fixtures from well-known brands. The platform allows users to switch between 2D and 3D views seamlessly.
-
virtualStagingSolutions.com: Focusing solely on virtual staging, this platform offers professional-grade real estate photo editing services. Users can submit their own photos, and the service team will stage them digitally, delivering high-quality results.
-
Adobe Photoshop: While not specifically designed for virtual staging, Photoshop remains a powerful editing tool that skilled users can employ for intricate edits, layering, and creating custom visuals tailored to a property’s aesthetic.

Each of these tools offers a unique approach to virtual staging, so exploring their features, pricing, and user reviews can help you make an informed choice based on your specific requirements.
How to Choose the Right Virtual Staging Tool
With many options available, choosing the right tool for your DIY virtual staging is crucial to ensuring a smooth experience. Here are some factors to consider:
-
Ease of Use: If you're new to virtual staging, opt for software with a straightforward interface and tutorials. User-friendly platforms like RoomSketcher or Homestyler might be ideal for beginners.
-
Library of Assets: Check if the software provides a diverse range of furniture and decor options. A broader selection allows for more creative staging possibilities and helps you cater to various tastes.
-
Cost Considerations: Weigh the costs associated with each platform. Some may offer free trials, while others require subscriptions or one-time payments. Assess your budget before making a commitment.
-
Support and Community: Look for tools that provide robust customer support and active user communities. These resources can be invaluable when troubleshooting issues or seeking inspiration from other users’ projects.
Ultimately, selecting the right virtual staging tool should align with your individual goals and the specific characteristics of the properties you're looking to stage.
3. Step-by-Step Guide: How to Use DIY Virtual Staging
The process of diy virtual staging can be broken down into manageable steps. Following this guide will enable you to create stunning visuals that highlight the best features of any property, attracting potential buyers effectively.
Preparing Your Property Photos
The first step in the virtual staging process is to prepare your property photos. High-quality images are crucial for achieving the best results, as they serve as the foundation for your staging efforts. Here’s how to get started:
-
Use a Professional Camera: While smartphones may suffice for casual photography, investing in a DSLR or mirrorless camera can significantly enhance image quality. Ensure you utilize proper lighting techniques and angles to capture the space accurately.
-
Declutter the Space: Before taking pictures, ensure the property is clean and free of clutter. Remove personal items, excess furniture, and distractions that may detract from the viewer's focus. A clean slate allows you to visualize how the space can be transformed.
-
Include Various Angles: Capture multiple angles for each room to provide viewers with a comprehensive view of the space. Highlight key features such as windows, fireplaces, and architectural details that may resonate with potential buyers.
Once you've gathered your images, choose the best shots that truly represent the property's charm and character. Prioritize wide-angle shots that showcase the full dimensions of each room.
Using Virtual Staging Tools
Now that your photos are ready, it’s time to dive into the virtual staging software of your choice. Depending on the tool you’ve selected, the interface and methods may differ slightly, but generally, the process follows these key steps:
-
Import Your Images: Begin by uploading your chosen property photos to the virtual staging software. Familiarize yourself with the workspace, navigating menus, and accessing your library of assets.
-
Select Furniture and Decor: Browse through the available furniture and decor options, dragging and dropping items onto your photos. Experiment with different layouts, scales, and placements to achieve a balanced and cohesive look. Pay attention to the size and proportion of each item in relation to the room.
-
Adjust Colors and Textures: Many virtual staging tools allow you to modify wall colors, flooring textures, and other design elements. Make adjustments to enhance the overall ambiance and style according to your target demographic. Consider incorporating current design trends to attract younger buyers or timeless classics for more traditional audiences.
Remember, the goal is to create a harmonious and inviting scene that resonates emotionally with potential buyers. Keep experimenting until you find the perfect combination that showcases the property's unique appeal.
Finalizing the Image and Exporting
After completing your virtual staging, it’s time to finalize the image and export it for use in property listings. Follow these steps to ensure your staged images are polished and ready for presentation:
-
Review and Edit: Before exporting, review your work meticulously. Zoom in to check for any inconsistencies or misplaced furniture. Making small adjustments can greatly enhance the final outcome.
-
Export Settings: Adjust the export settings based on where you plan to use the images. For online listings, high-resolution files are essential to retain clarity. Most staging software will allow you to select the file type and resolution during the export process.
-
Save Backups: Always save backups of your original photos and staged images. This will enable you to make further edits in the future if needed and prevent loss of data due to accidental deletions.
By following these steps, you’ll have beautifully staged images that captivate potential buyers and elevate your real estate listings to new heights.
4. Common Challenges in DIY Virtual Staging and How to Overcome Them
Although diy virtual staging offers numerous benefits, several challenges can arise during the process. Identifying these obstacles and learning how to address them will ensure a smoother, more successful staging experience.
Creating Realistic Staging
One of the primary concerns with virtual staging is ensuring that the final images look realistic and believable. Buyers want to envision themselves in a space, and unrealistic images may lead to skepticism. To achieve a convincing outcome, consider the following tips:
-
Choose Appropriate Scale: It's essential to ensure that the furniture and decor items you select are appropriately scaled to the room. Oversized or undersized items can disrupt the visual balance and diminish realism.
-
Pay Attention to Lighting: Natural light plays a critical role in photography and digital staging. By mimicking the light sources present in the photo-such as windows or lamps-you can create a more authentic atmosphere. Adjust shadows and highlights to match the light source direction for a realistic effect.
-
Limit the Number of Elements: While it can be tempting to fill every corner with furniture, sometimes less is more. Focus on a few key pieces that accentuate the room’s layout and functionality. Overcrowding can lead to visual chaos and reduce the effectiveness of your staging efforts.
Managing Time and Effort
DIY virtual staging can be a time-consuming endeavor; therefore, managing your time effectively is crucial. Here are strategies to streamline the process:
-
Establish a Workflow: Create a structured workflow for your virtual staging projects. Break down tasks into smaller segments, such as photographing the property, selecting furniture, and finalizing images. This organization will help you stay focused and efficient.
-
Set Time Limits: Establishing time limits for each task can prevent you from getting bogged down in perfectionism. Set achievable goals for each session and stick to them, ensuring you maintain momentum throughout the project.
-
Leverage Templates and Presets: If your chosen software offers templates or presets, take advantage of these features. Applying pre-designed layouts can save time and help you quickly visualize different staging options.
By implementing effective time management strategies, you can reduce stress and improve productivity throughout the virtual staging process.
Conclusion
Engaging in DIY virtual staging with Fotober unlocks a world of creative possibilities for property presentation. By leveraging Fotober's intuitive tools and following a streamlined process, real estate agents and homeowners can create visually compelling listings that resonate with potential buyers. While challenges such as realism and time management may arise, Fotober empowers users with features designed to craft high-quality, lifelike images efficiently. Embracing DIY virtual staging through Fotober not only enhances property appeal but also accelerates sales and boosts listing engagement-giving you a decisive advantage in today’s competitive real estate market.
Related posts

Double Your Booking: Airbnb Photography Tips for World Cup Host Cities
July 15, 2026

The Legacy of Sam Neill Real Estate: Vineyard & His Private Sanctuary
July 14, 2026

World Cup 2026 Host City Real Estate: Overview & Marketing Strategies
July 13, 2026
Most Common Photography Mistakes California Realtors Should Avoid
July 10, 2026
